Email Campaigns
Bloomreach Engagement enables you to easily send personalized email campaigns to targeted customer segments using a simple visual editor or the traditional HTML builder.
Watch this short introductory video about this feature:
In this article, you will learn where you can create email campaigns in Bloomreach Engagement and how to set the basic settings. To get a full headstart to all email features, go to the Working with Emails section.
Integration is required
Please note that you need to integrate one of the supported email service providers in order to send emails from Bloomreach Engagement. See what integrations are available. If needed, you can contact your dedicated consultant or our support to set this up.
Creating an email campaign
You can create an email campaign in two ways:
- Creating a standalone email campaign in
Campaigns>Email campaigns - Using an email node as part of a scenario
- Reuse an already created Project Template or pick a Predefined Template in the Asset Manager. You will be able to edit the template before sending. Learn more about our Predefined Templates.
In both cases, the process of creating the template and related settings is the same. The only difference is that in scenarios the audience for the email can be specified by a complex set of conditions, being part of a bigger campaign (including SMS, push notifications, etc.). When creating a standalone email campaign, you can only use the customer and event filters to determine your audience.
Creating an email template
After creating a new campaign in the Campaigns section, or double-clicking the email node in Scenarios, you will be presented with 3 options:
- Use the visual builder to build a new email
- Use the HTML builder to build a new email
- Reuse a template that you have already created in the Asset Manager. You will be able to edit it before sending.
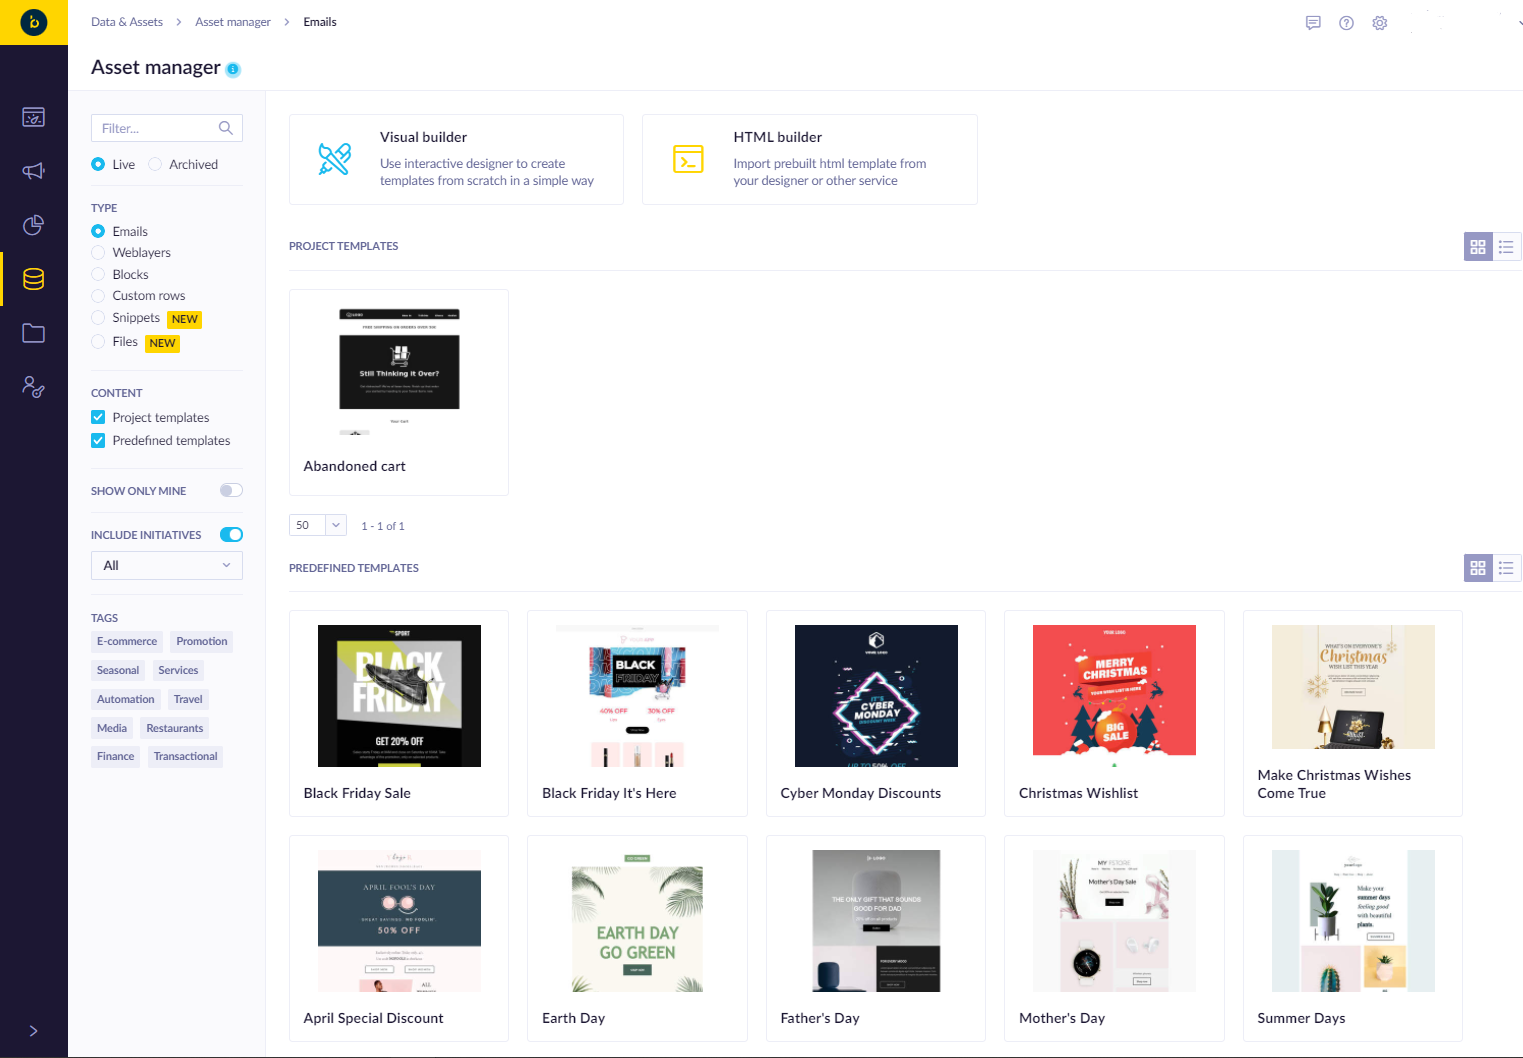
Using the visual and HTML editor
To learn how to create an email template in Bloomreach Engagement, please go to the Email Editors article. This article will continue explaining the settings related to sending an email campaign.
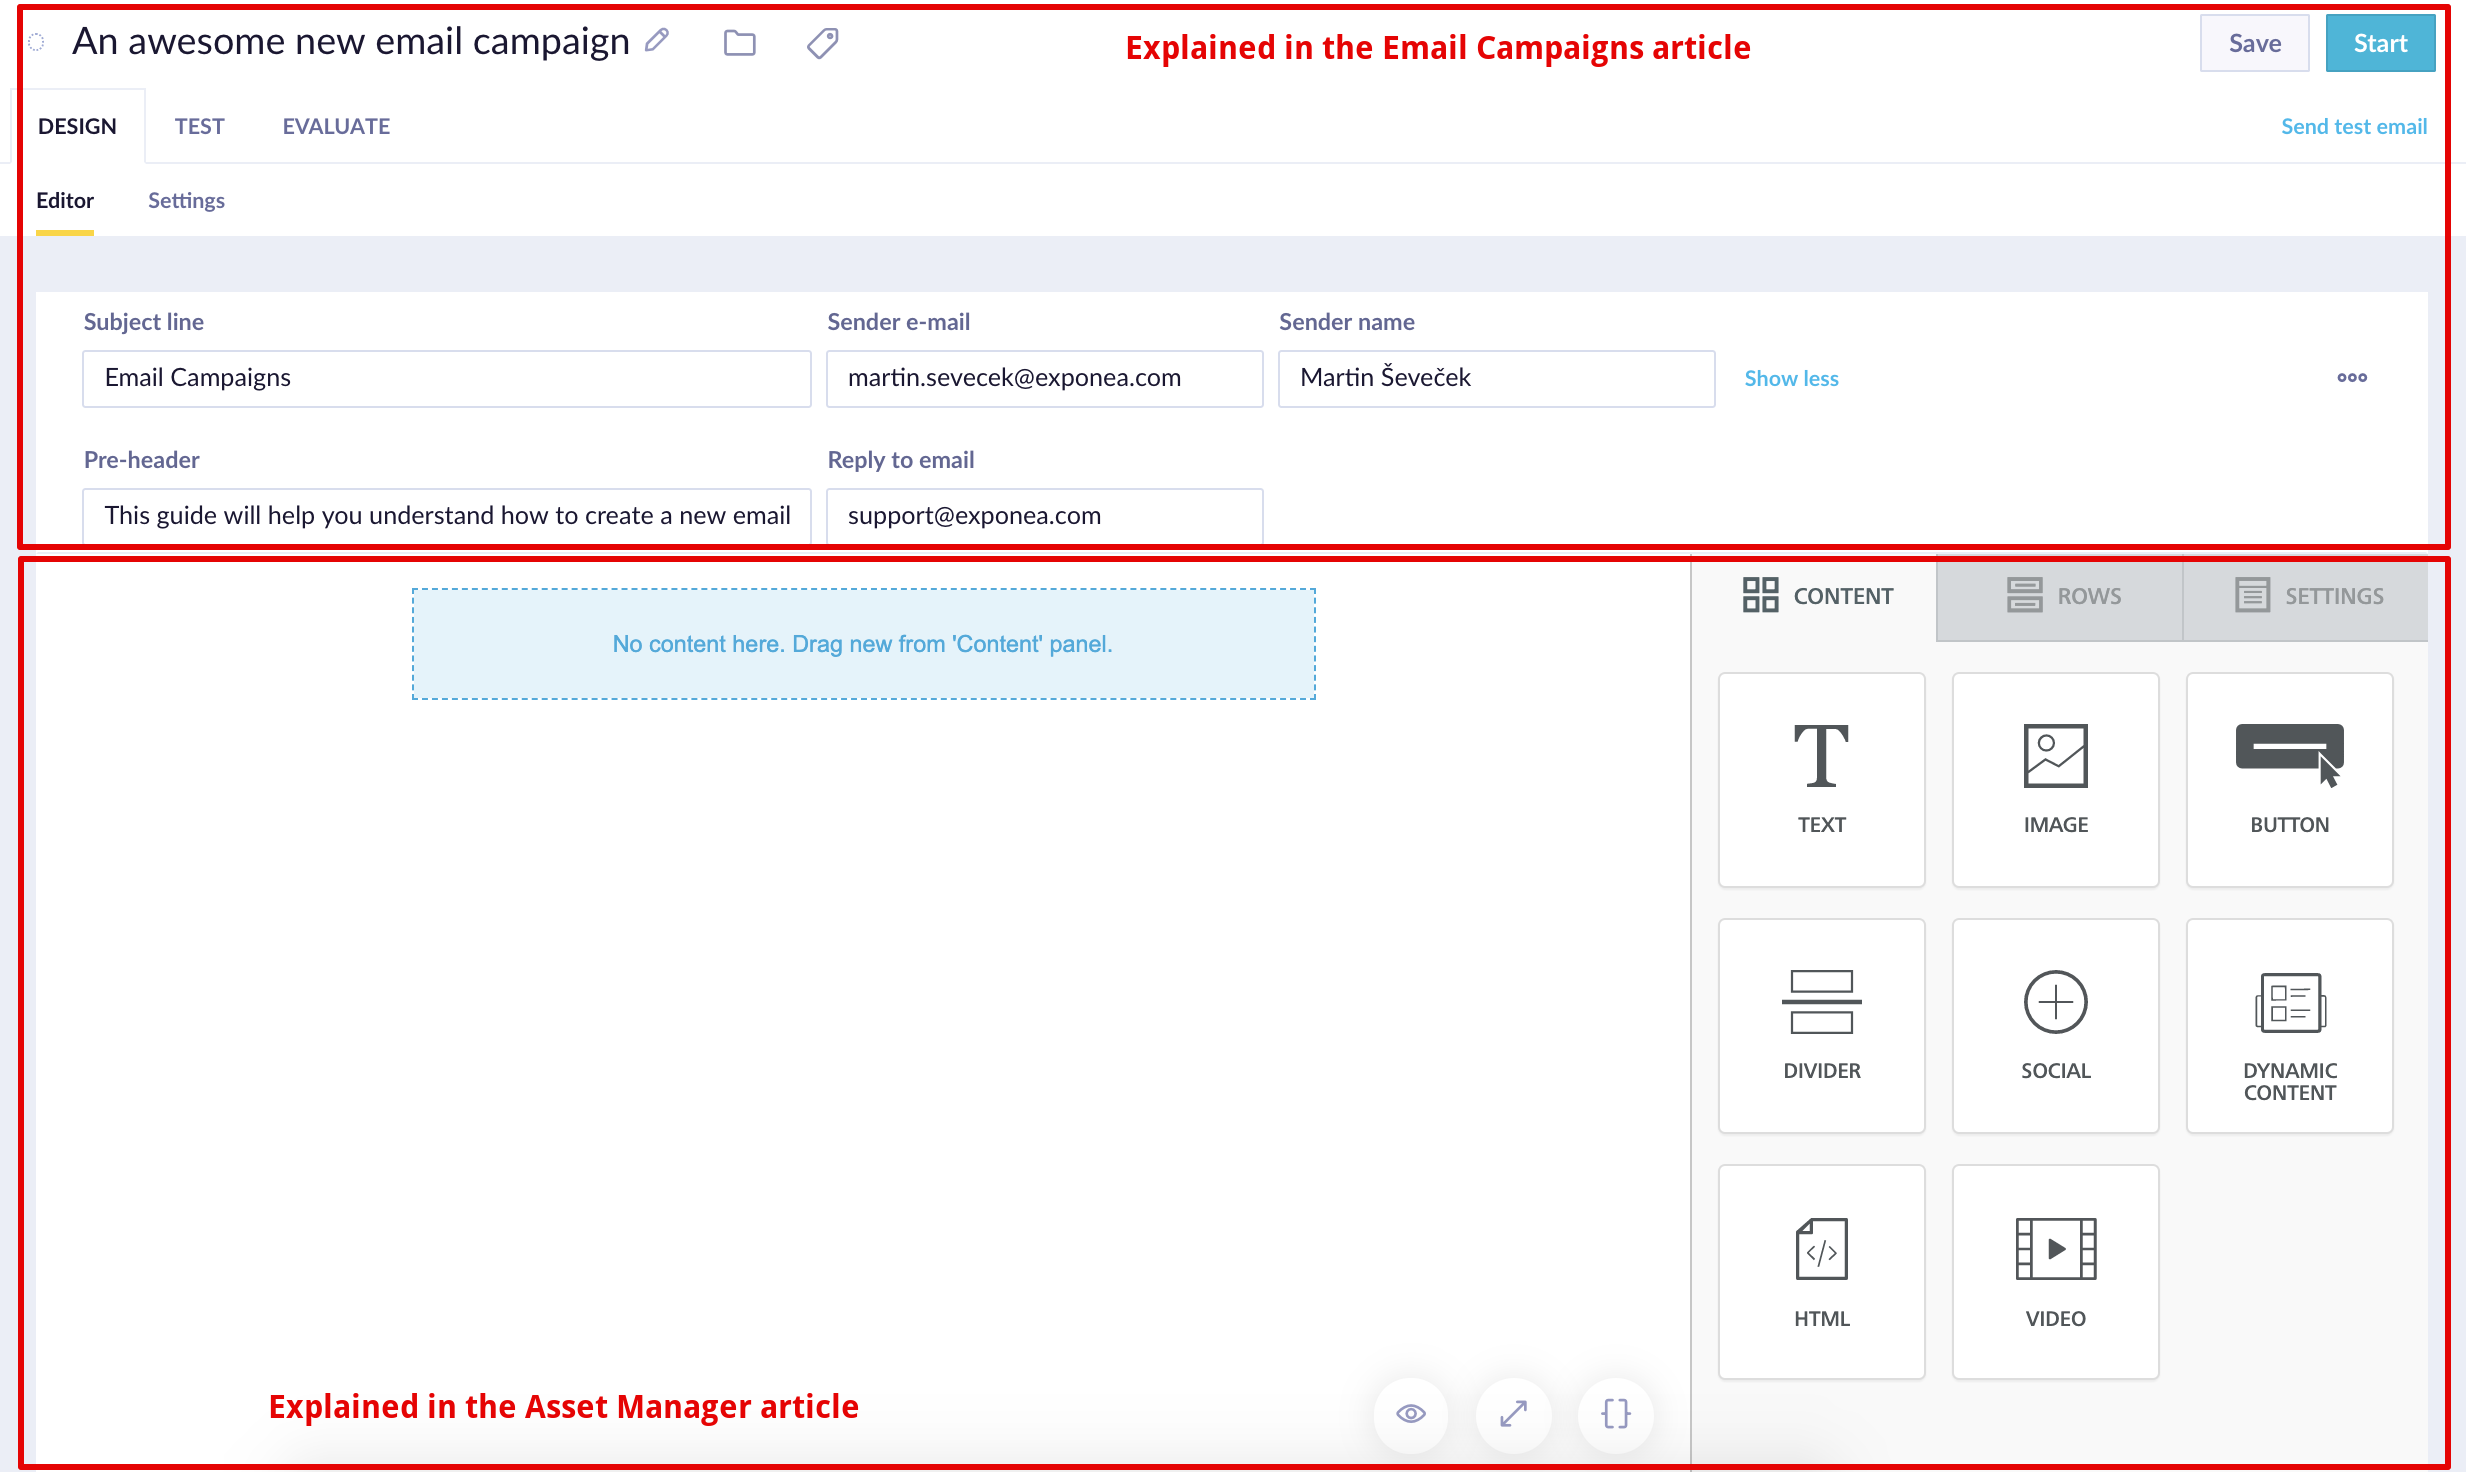
Image size limitations
The maximum size of the uploaded image to the email editor is 12MB. Also, images that are wider than 900px will be automatically resized. If the resized image is a GIF, the animation might stop working.
Subject and sender details and the three-dots menu
In the panel just above the email editor, you can define the subject of your email and the sender email address and name that will be shown in the email. Next, you can choose which of your integrated email service providers (ESP) you will use.
After clicking on the three dots you can add language versions (more information below), change the template you are working with, save your current work as a new template which you can use later, or download your current work as an HTML template.
Language versions
You can create a separate version of the email campaign for each language defined in your project settings. You can access this function by clicking on the three dots on the top-right side of the email builder, and then on Add language version.
The correct language version for individual customers will be chosen automatically based on the language attribute set in their profile. When a customer does not have any language set, the default template will be used.
When creating a new language version, the default template will be copied. However, if the default template is changed, the copies will not be updated.
Please be aware that if you use jinja code {{customer.language}} attribute in html Email builder, Editor View is forcing the email to render as if the customer had the language equal to the current Editing tab you are working with (Default one or the one you selected). Therefore, a client with Slovak language can render Empty Space or another selected language in the Editor View. If you need to see the corresponding language of the customer you need to use the Test Tab.
Default email settings
You can set default email settings after clicking on the settings icon in the top right corner under Project Settings>Channels>Emails as shown in the pictures below.

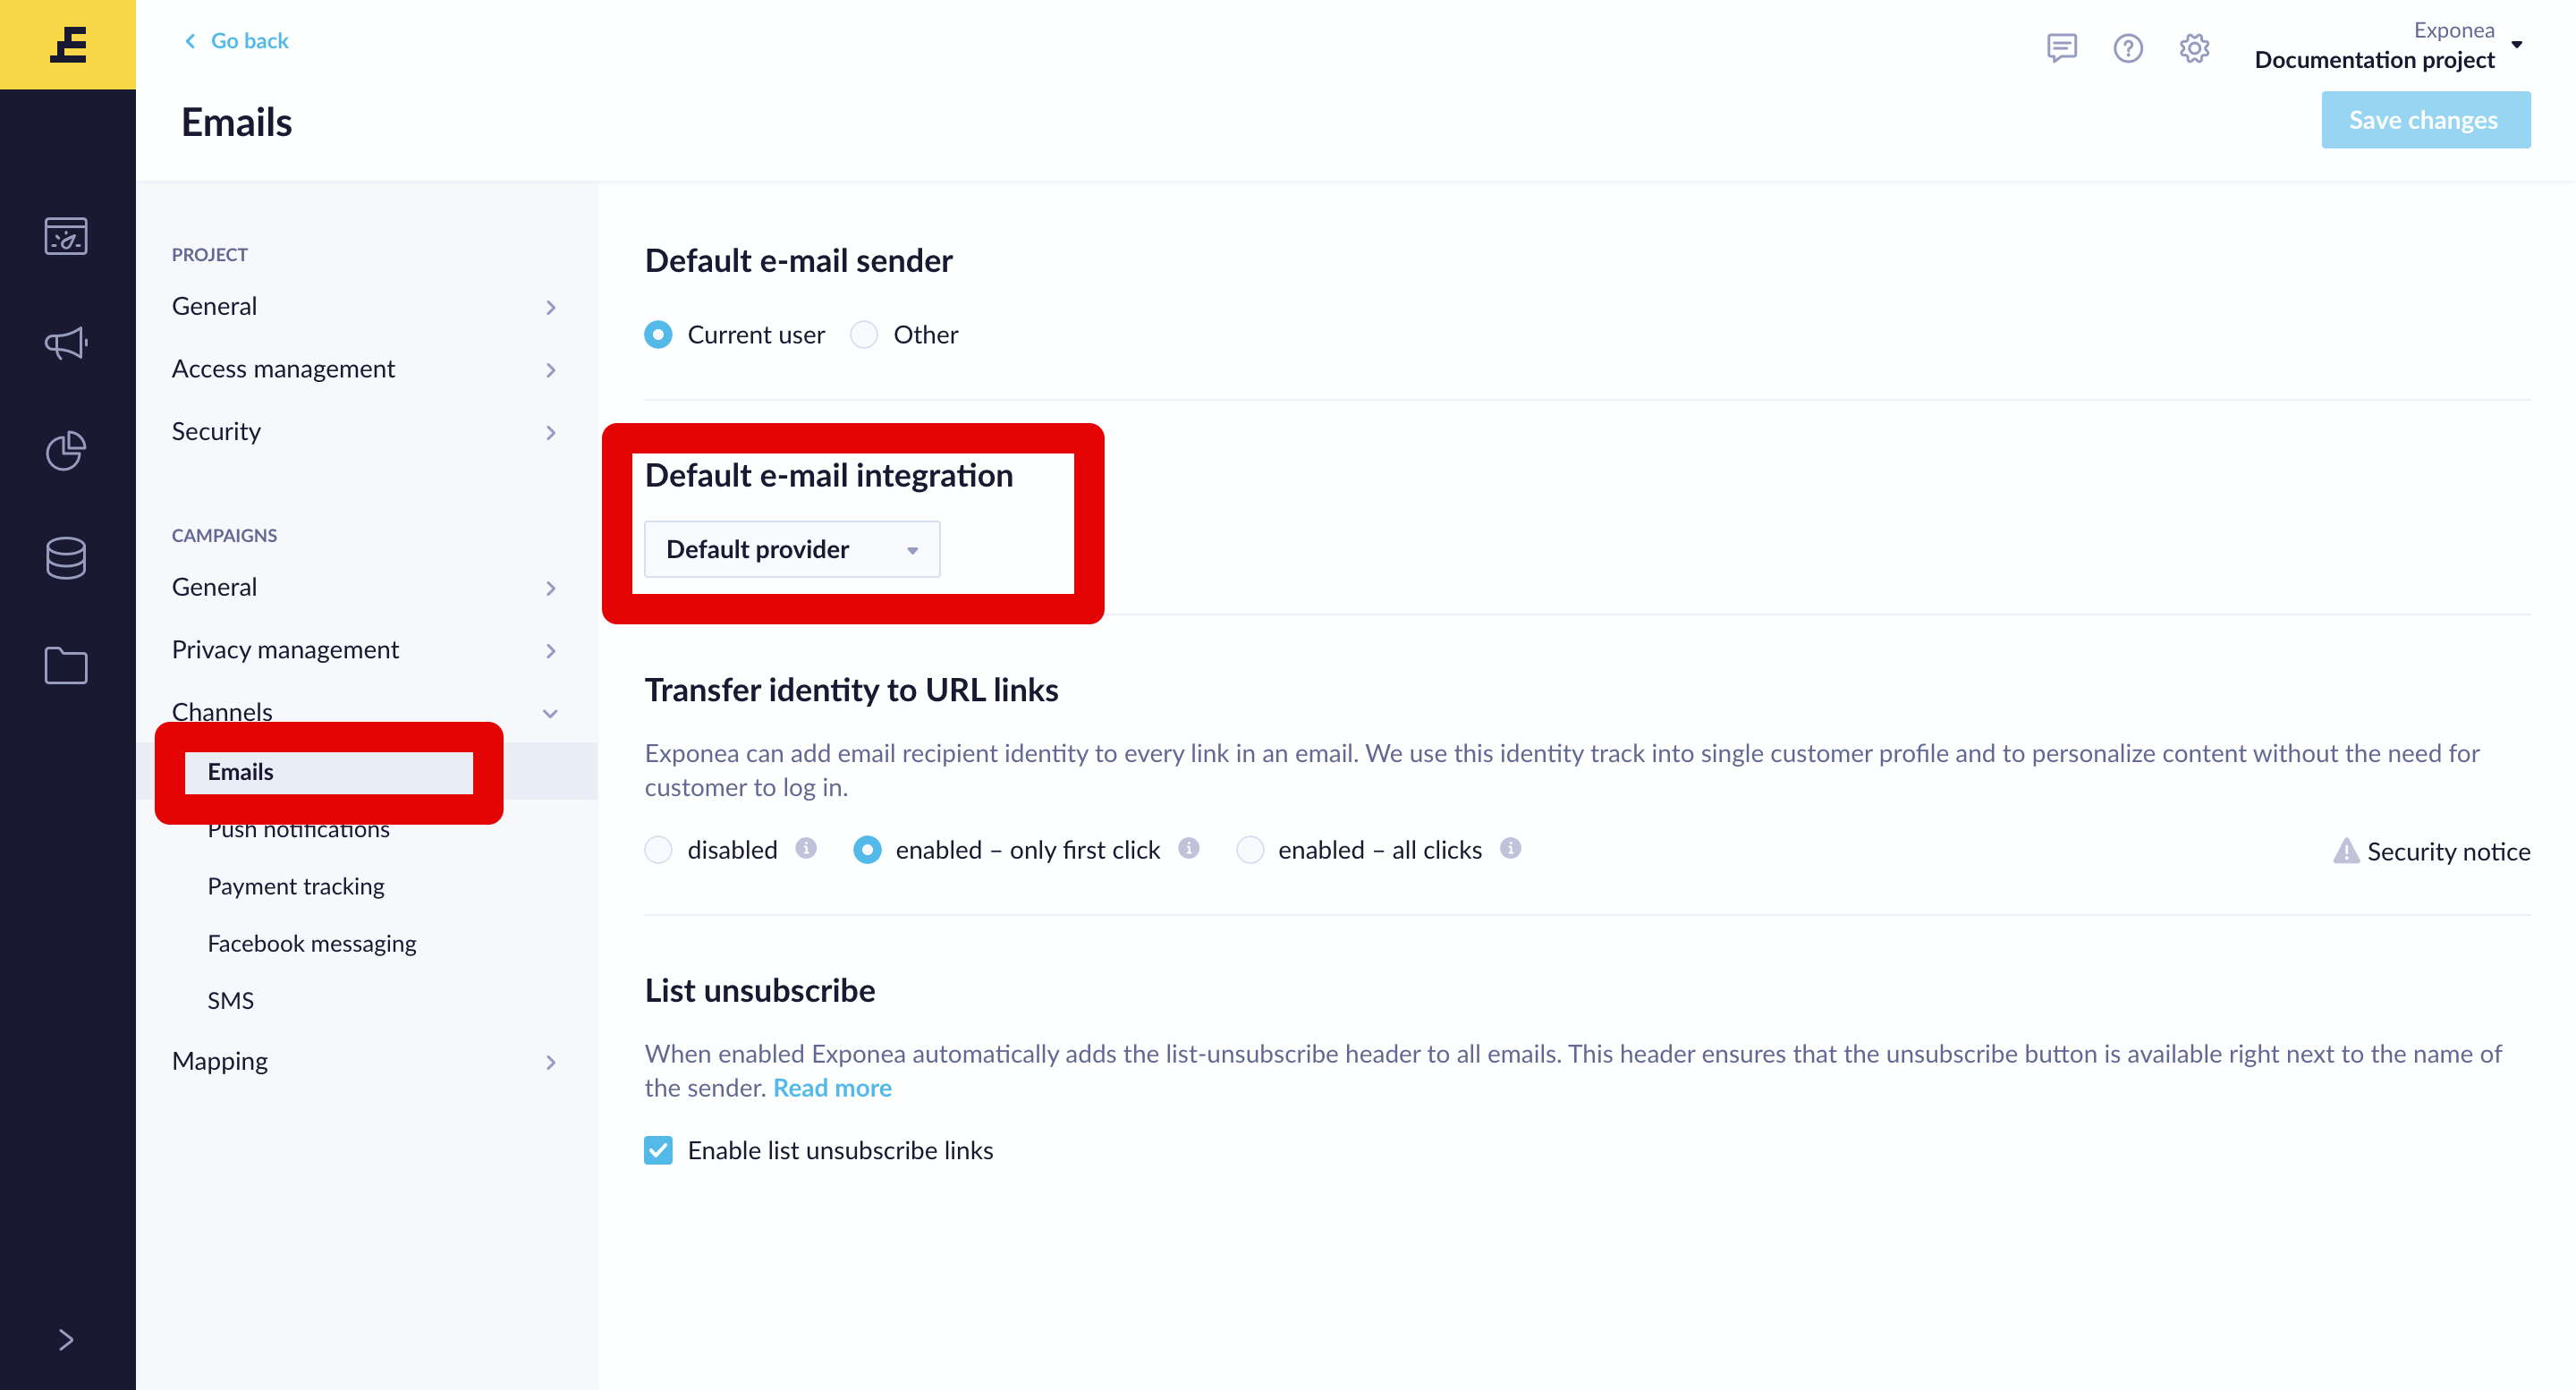
Here you can set the default email sender together with the default email integration.
Pre-header and reply to
Click on "Show more" in the upper control menu to reveal these features. You can set a custom pre-header, which is the text that is displayed next to the subject in email clients. Having a relevant preheader can increase the open rate and engagement with your email. We recommend to keep it between 80-100 characters long, although some devices might show as few as 30 characters.
Use the reply to function to set a different reply-to email when your recipients click "reply" to your email.
Consents and frequency policy
Bloomreach Engagement has advanced consent management, as well as the possibility to set frequency policy to cap the number of emails (or SMS, push notifications) sent to a single customer within a certain timeframe (we call this "Policies"). Each campaign can belong to a single consent and policy group. You can set this in the campaign settings as described below.
Settings
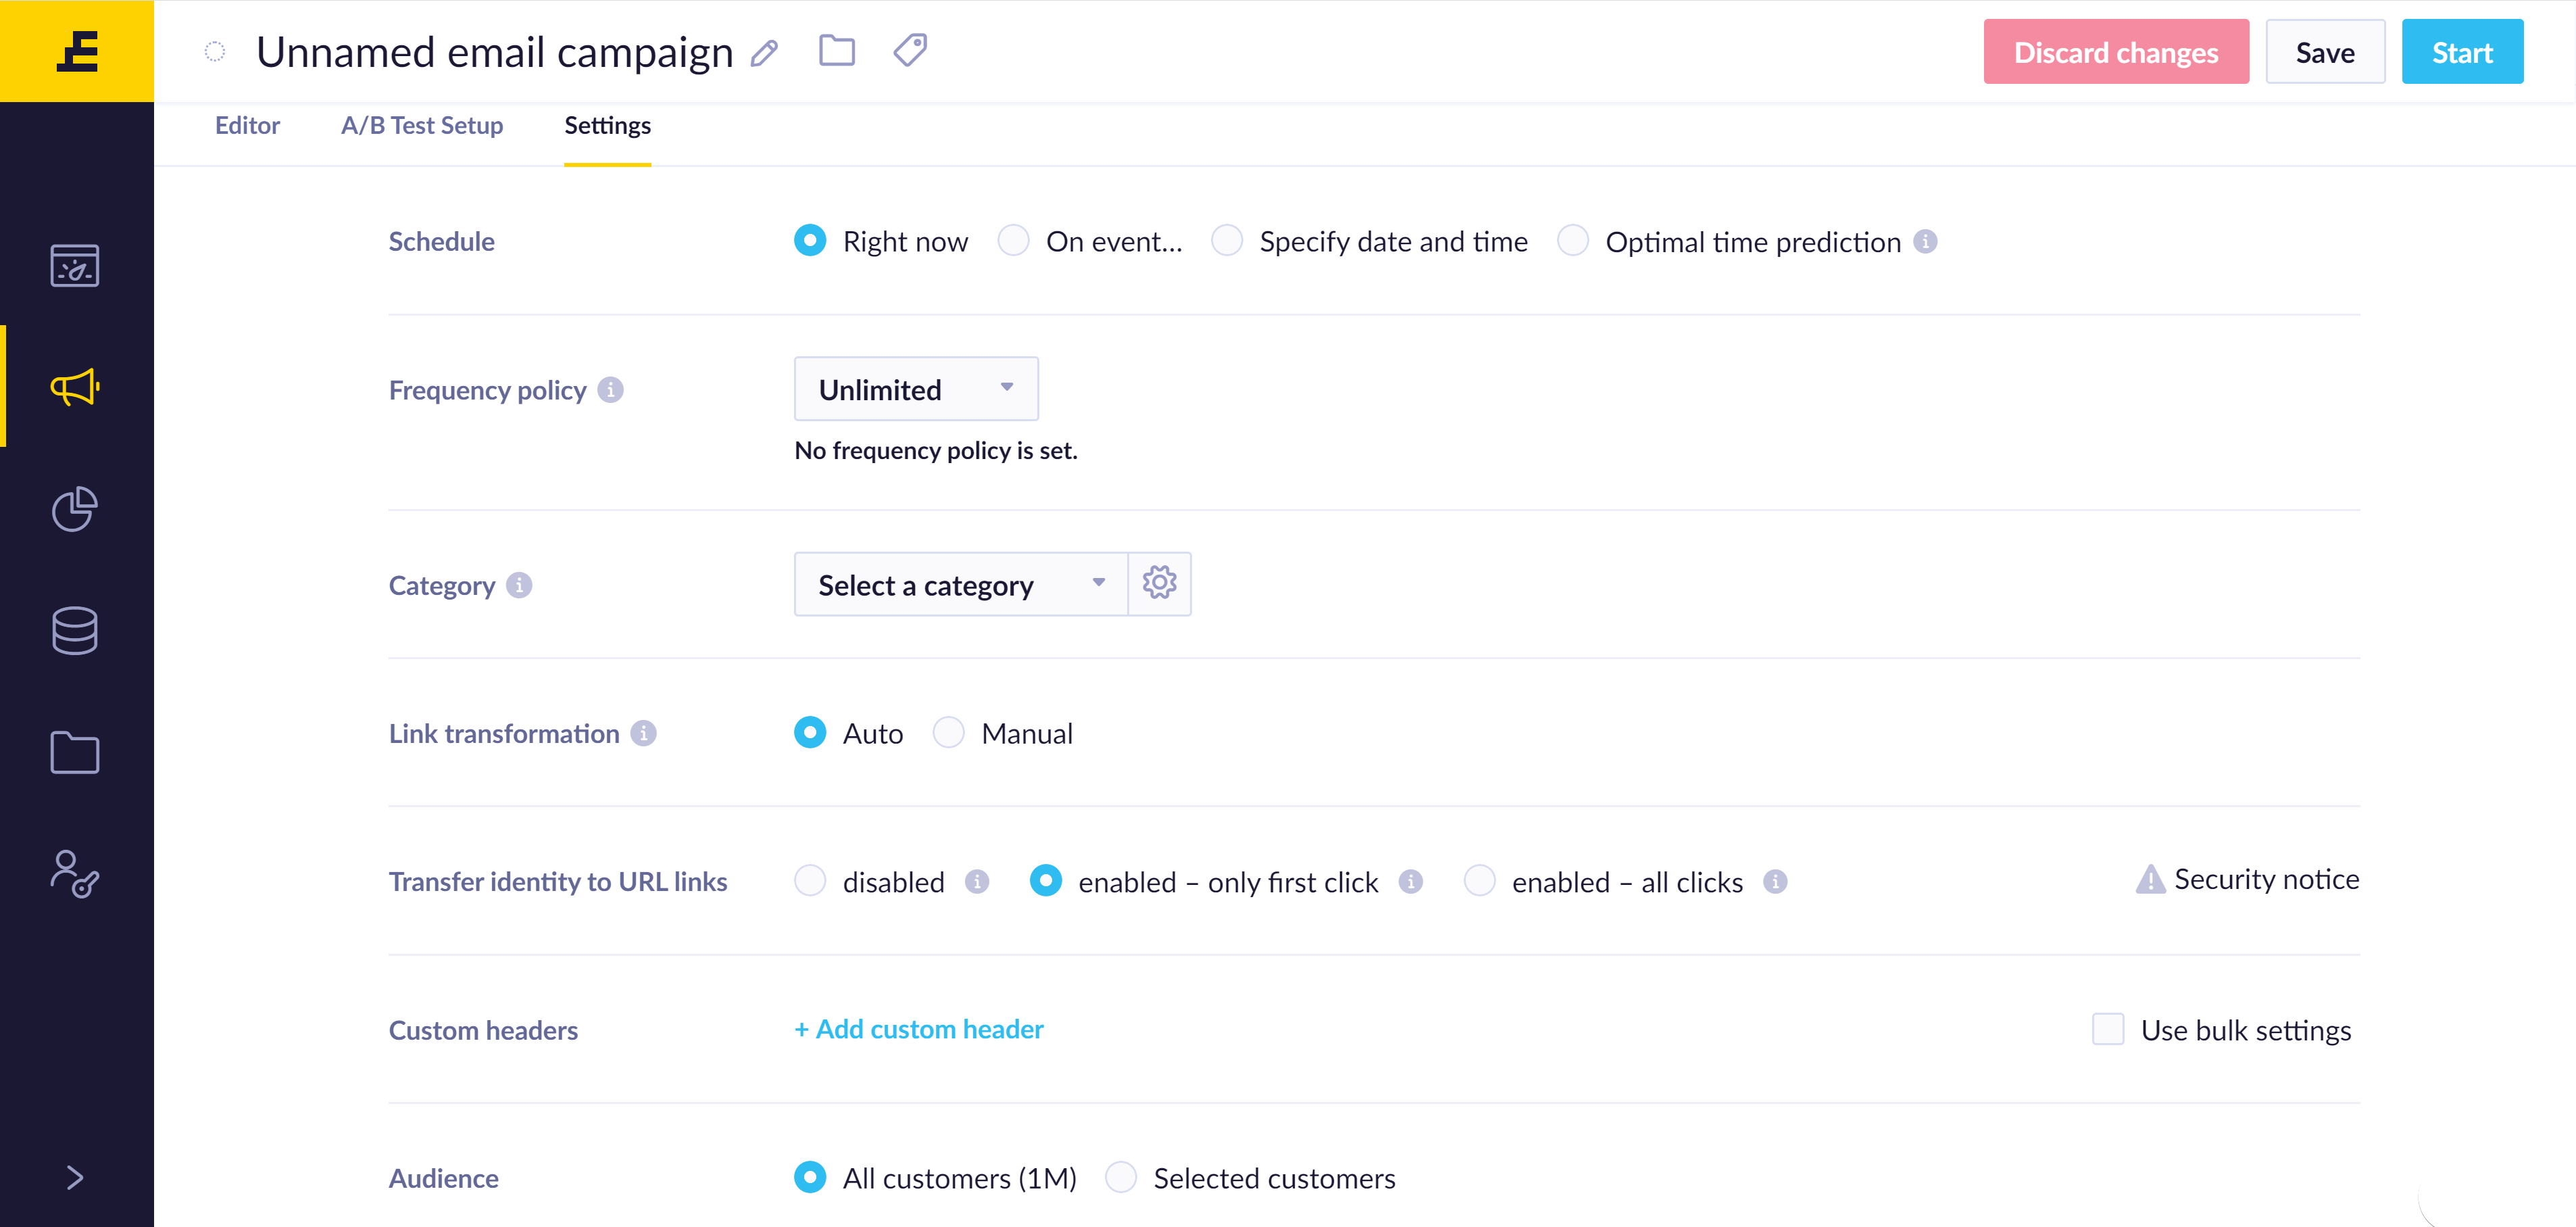
You can access email campaign settings through both Email campaigns -> Settings and Scenarios -> Email Node -> Settings
| Function | Description |
|---|---|
| Schedule (only visible when creating the email in email campaigns) | You can send the email: - Right after launching the campaign - Every time a specified event is tracked for each customer - On a specified day and time - At the predicted optimal time when the customer is most likely to either open or click in the email. Learn more about how to use optimal send time |
| Recipient (only visible when creating the email in a scenario) | Default option Customers matching campaign will send the email to all customers who enter the email node in the scenario. Email address will be extracted from customer attribute - email. Option Set recipient manually will allow you to define a specific email address (or jinja) that will be the recipient of this email. This can be used to get daily reports to your email or when you need to use other property than email to send the email. See the warning about usage of custom email recipient below. |
| Frequency policy | Defines the number of emails that a customer can receive within a specified timeframe. Read on how to create the policies |
| Category (group) | Choose which consent is required for a customer to have to receive this campaign. Read more on consents here. If you don't use consents yet, you will see the campaign groups setting here. |
| UTM | Define the UTM tags utm_campaign, utm_medium, and utm_source. Read more about UTM parameters here. |
| Custom headers | You can define your own headers. This is an advanced feature only affecting the background processes of email campaigns. You can read more about email headers here. This is not to be confused with pre-headers, which is the text visible in inboxes right after the subject. Check the Use bulk settings box in case you are sending in-bulk emails to multiple people. Otherwise, it is likely that the email will be directed to the recipient's spam folder. Read more in our Email Deliverability tips article! |
| Audience (only in email campaigns) | Define your custom audience that will receive this email campaign. You can use our standard customer and event filters. You can also filter your audience on a project level through Email list hygiene filter. |
| Transfer identity to URL links | The default setting states that only the first click on your URL link will cause customer identification on your website (for instance, if your client shares this link among their friends, original client´s customer properties will not be influenced). Therefore, for each scenario run a unique token will be created per an individual email. We highly recommend using the default setting for security purposes and to prevent corrupting customer data. You can also select an option to disable all identity transfers (meaning that clicking on a given link will not cause identification on your website) or enable all clicks (meaning that every time this link is opened through a different device, customers will be merged together). |
Transfer identity to URL - Limitations
Unfortunately, mobile SDK does not support IITT and TIFC, so events through the phone will not be tracked. Moreover, Jinja code is only supported for IITT.
Pre-populating settings from a template
When creating an email template within the Asset manager, you have the option to enable template settings, which will let you to predefine some of the campaign settings directly within the template. These settings include Link transformation, Transfer identity to URL links, or Custom headers and Custom Campaign Tracking attributes.
If you are creating a campaign using a template with these settings enabled and defined, this will pre-populate and pre-configure your campaign settings with how they are defined in the template. This means you do not have to configure the campaign settings every time for the same template.
Read more in the Asset Manager article.
Using custom recipient
Using custom email recipient with option - Set recipient manually
This email setting may disable automatic check of customer consents and email policy.
Specifically if your custom recipient or its rendered jinja value is anything different than customer's email property, there will be no validation of consents nor email policy for this customer. If custom recipient equals to customer's email property, normal validation will apply.Therefore be very careful in case you plan to use custom recipient for more than one customer, because you can easily:
- send email to customers without validation of their consent (GDPR breach)
- send emails to customers too frequently (no validation of policy)
If you have no other option and you have to use custom recipient, we recommend to at least implement scenario condition node, which would check for correct consents and email frequency. For more details contact our support.
Using optimal send time
If you choose optimal send time in the Schedule, you can set it up in the same way as in a Wait node in Scenarios.
Based on your customers' past behavior, the optimal send time option under the Schedule setting allows you to automatically send out email campaigns to individual customers at a time, rounded to an hour, when they are most likely to click/open your email. Learn more about Optimal send time

Testing your email
There are various options on how you can test your email template before launching a campaign. Learn more in our email testing article. We strongly recommend using at least one of the testing options before launching the live campaign.
A/B test setup
For email campaigns created via scenarios, A/B tests are configured using the dedicated A/B test operator node.
To set up an A/B test for Email campaigns navigate to the A/B Test Setup tab under DESIGN. You can choose between two types of tests Automatic winner distribution or Custom distribution. Read more on A/B tests in our detailed guide.
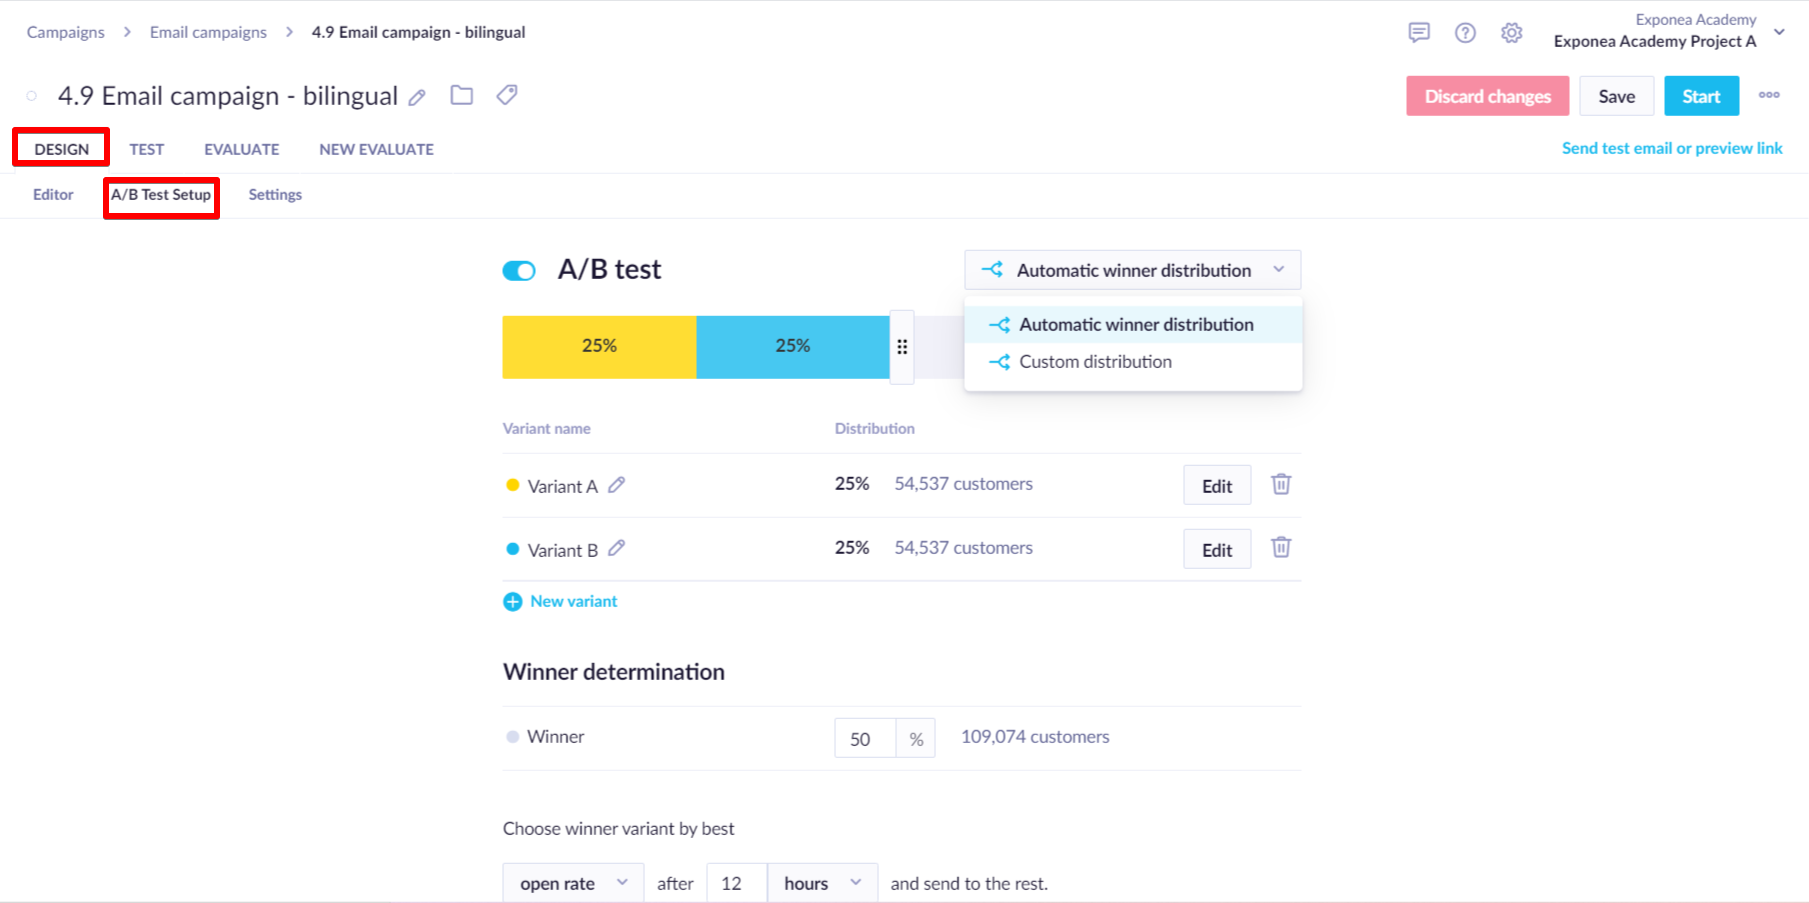
To set up A/B testing, you have to enable the A/B testing feature by turning the button on in the set-up or by clicking the "Enable A/B test" button.

To navigate between the designs for each variant or add new variants use the A/B test menu in the top right of your email editor. You can switch between the different variants and design the campaign for each version separately.

Evaluation
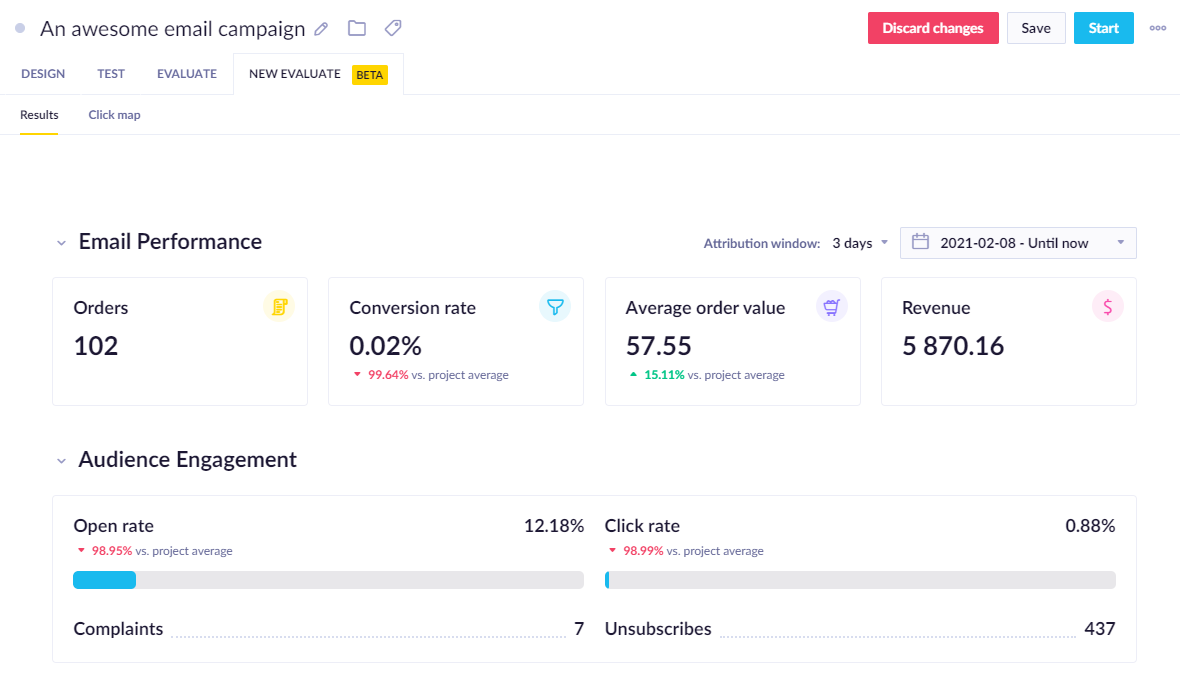
After starting a campaign you will be able to evaluate its performance. Under the NEW EVALUATE tab, you will find an out-of-the-box dashboard containing different data and tools that are useful for evaluating your campaign. Under the Results sub-tab, you will find all key metrics for evaluating your email campaign in a comprehensive and easy-to-read layout. Clicking on the Click map sub-tab will allow you to preview and use click heatmaps for analyzing your customers' interactions with the campaign.
Legacy Evaluate
Under the tab
EVALUATEyou can still access our legacy email dashboard, which will be deprecated in the future.
Tracking
Email campaigns generate campaign events for all customers in the audience of the campaign, covering actions from the email being sent from Bloomreach Engagement to customers opening and clicking the email. Learn more about email campaign tracking and bounce management.
Clone to another project
This feature allows you to clone Email campaigns to other projects you have access to. Read more about cloning.
Updated about 1 year ago
