Safari push notifications
Warning
This guide applies to Safari v15 and earlier. This documentation is outdated but kept for reference.
To set up browser push notifications on Safari v16 and later as well as other browsers using the Push API, please refer to Browser push notifications.
Safari Push Notifications require quite an elaborate setup of the key infrastructure. The following diagram shows the happy-path steps required for a JS SDK and Safari browser to successfully register for push notifications into Apple APNS and Bloomreach Engagement Platform:
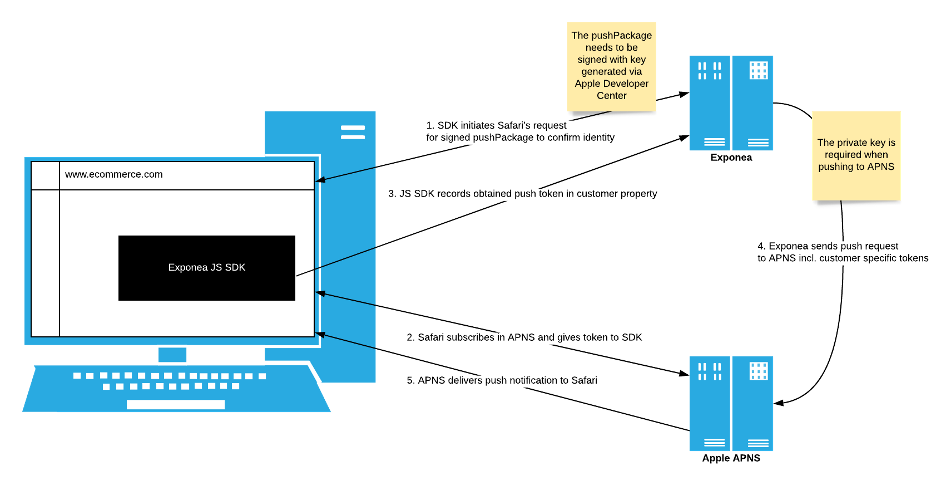
The picture above shows that Bloomreach Engagement essentially needs two configuration properties:
- APNS credentials to enable Bloomreach Engagement to push into APNS
pushPackage.zip, which sets up the Safari browser for the given domain
Both of the properties can be obtained from Apple Developer Center, which requires users to have paid access to the portal.
Configure the push
The following steps will describe how to configure Safari Push Notifications for a fictional website www.ecommerce.com:
What do you need
- Paid access to Apple Developer Account
- Mac OS computer, with:
- PHP installed on your computer
- Certificate Signing Request (see later)
Setup steps
Register the website push ID
Website Push ID is a unique identifier of the domain, which is composed of a reversed domain name and the prefix web.
Example for www.ecommerce.com: web.com.ecommerce
- Log into Apple Developer Account.
- Go to section Certificates, Identifiers & Profiles .
- Go to the Identifiers menu.
- Switch to Website Push IDs in the select box.
- Hit the
+button.
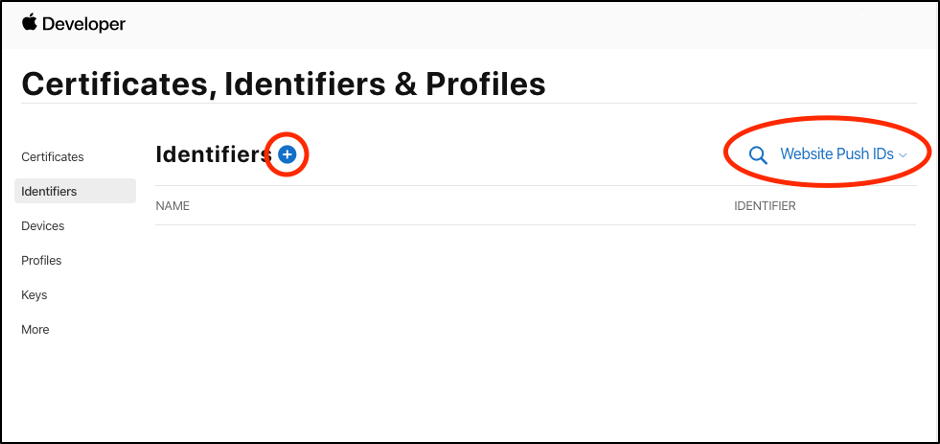
- Enter the Description and Identifier.
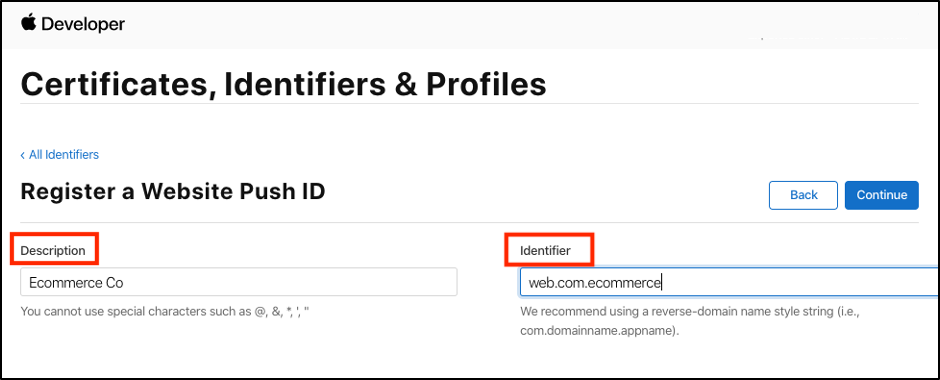
- Click Continue and Register.
- The new Identifier should appear in the list.
Generate the website push ID certificate
In order to prove to the Safari browser that Bloomreach Engagement can be used to register for push notifications, you need a certificate which is later used for signing with pushPackage.zip.
- Continue where you left off, and click on the name of the Ecommerce Co identifier.
- Click on Create Certificate.
- Upload Certificate Signing Request (if you don’t have one on your team, create a new certificate.
- Click Continue.
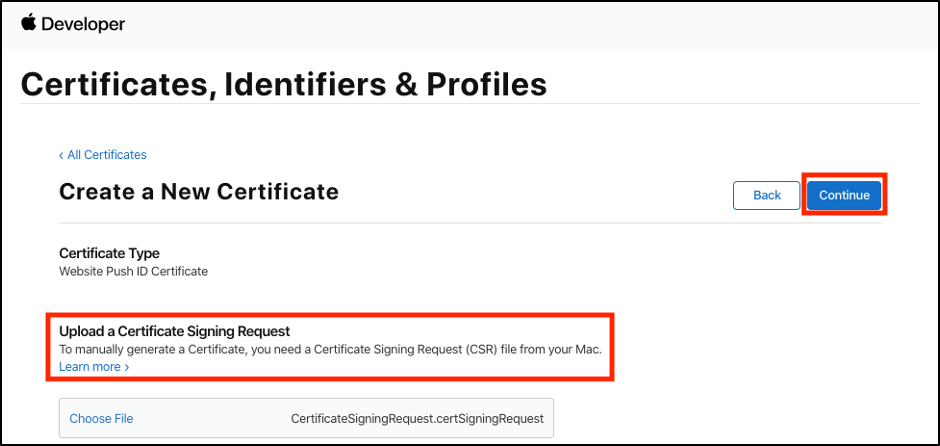
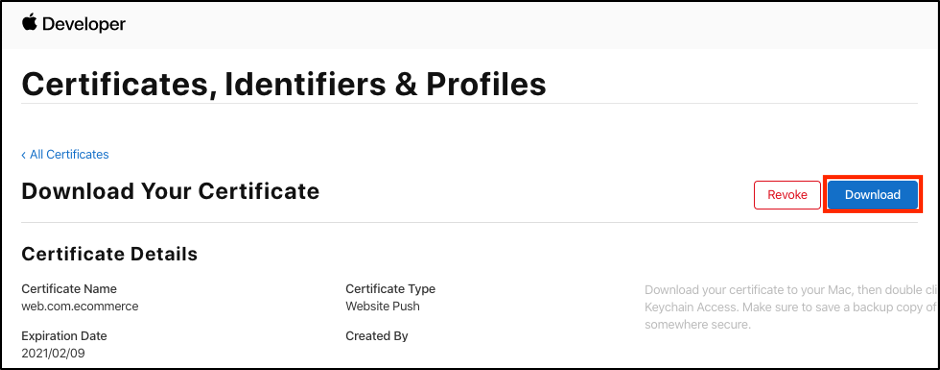
- Click Download and save
website_aps_production.cerfile on the disk.
Convert the CER file to P12 using Keychain Access
In order to sign the pushPackage, you need a certificate and private key together in P12 format. You need to convert the CER file downloaded from Apple Developer Center in the previous step to P12 format.
- Open the Keychain Access application from the
Applications > Utilitiesfolder. - Import the certificate file (CER file) by selecting
File > Importand locating your CER file provided by Apple. - Select the
Certificatescategory and locate the certificate that you just imported. - Expand the arrow next to the certificate to show the key.
- Select the key.
- Select
File > Export Items… - Name the export and ensure that the file format is “Personal Information Exchange (.p12)”.
- Click on
Save. - Provide a password to protect the export. This password will need to be provided to services that will use the certificate
- Click on
OK. - Provide your Mac password to enable the export.
- Click on
Allow. - The P12 file should now exist in the location you selected in step 7.
Generate the pushPackage
pushPackage.zip is a file that contains instructions on how Safari should handle push notifications from Bloomreach Engagement. It also proves ownership of the domain by verifying the signature of the generated package.
Generate website.json
You will need the website.json file to generate the pushPackage.zip. Since it is critical to get website.json right, Bloomreach Engagement has a tool to help you with its creation:
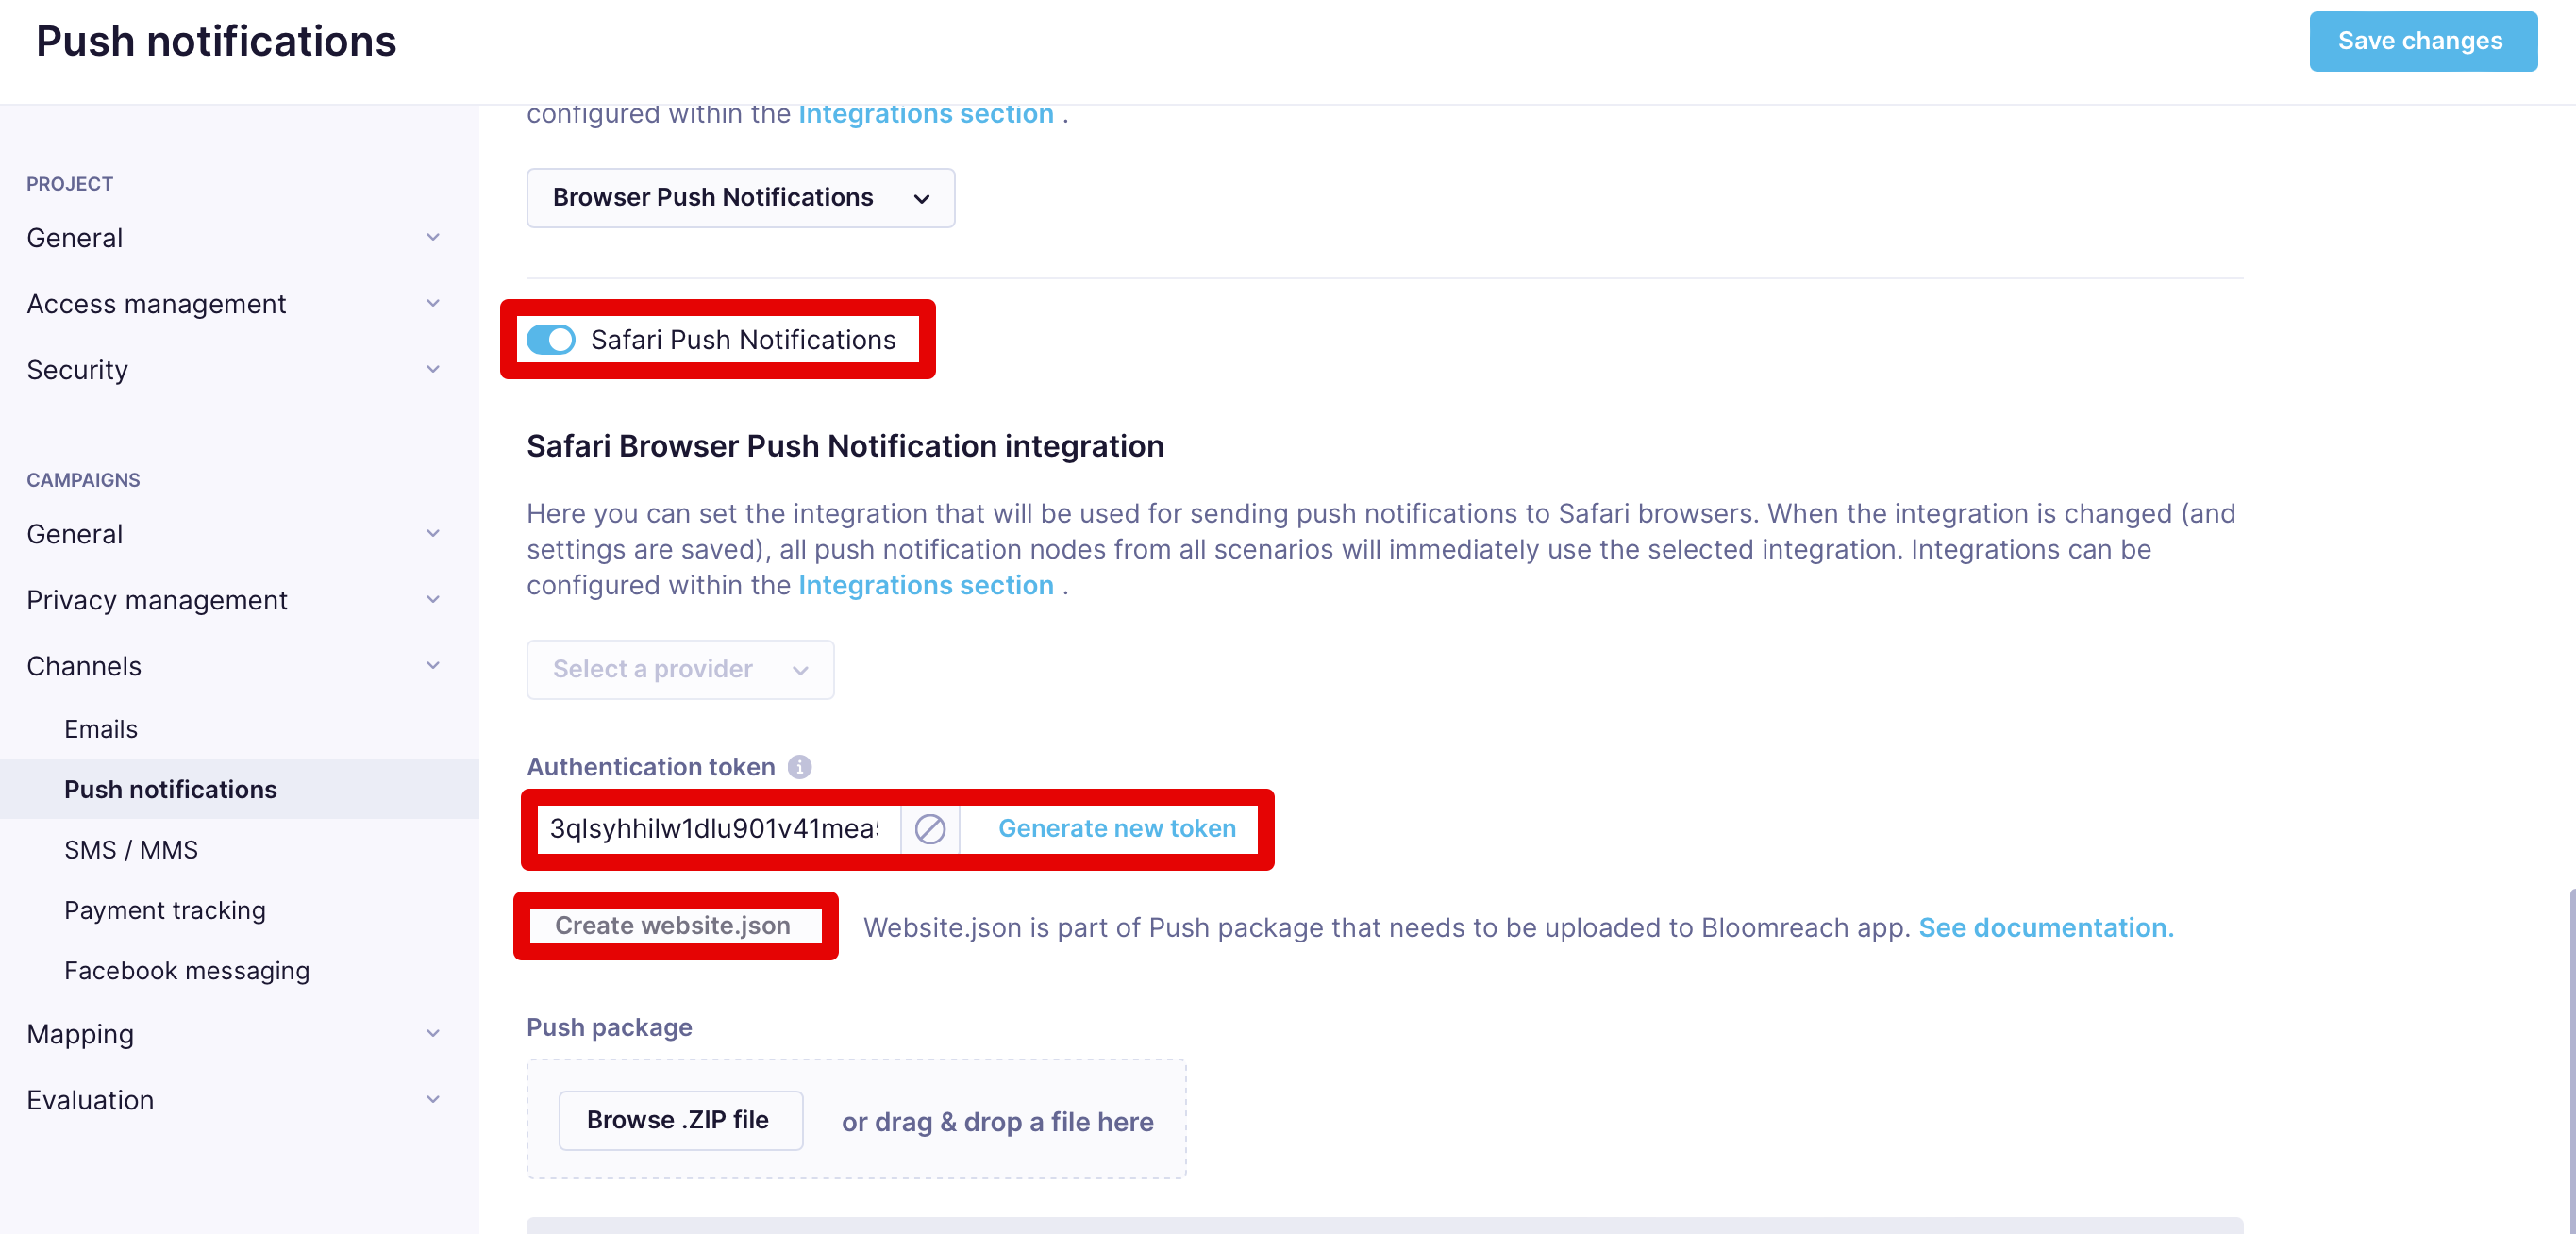
- Go to the Project Settings > Channels > Push notifications.
- Switch Safari Push Notifications ON.
- Set up the Safari Push Notification integration, which requires:
- Team ID
- Key ID
- ES256 Private Key
- Web Push ID
- Generate a new Authentication token (it is a random token, so you may use your own).
- Click on
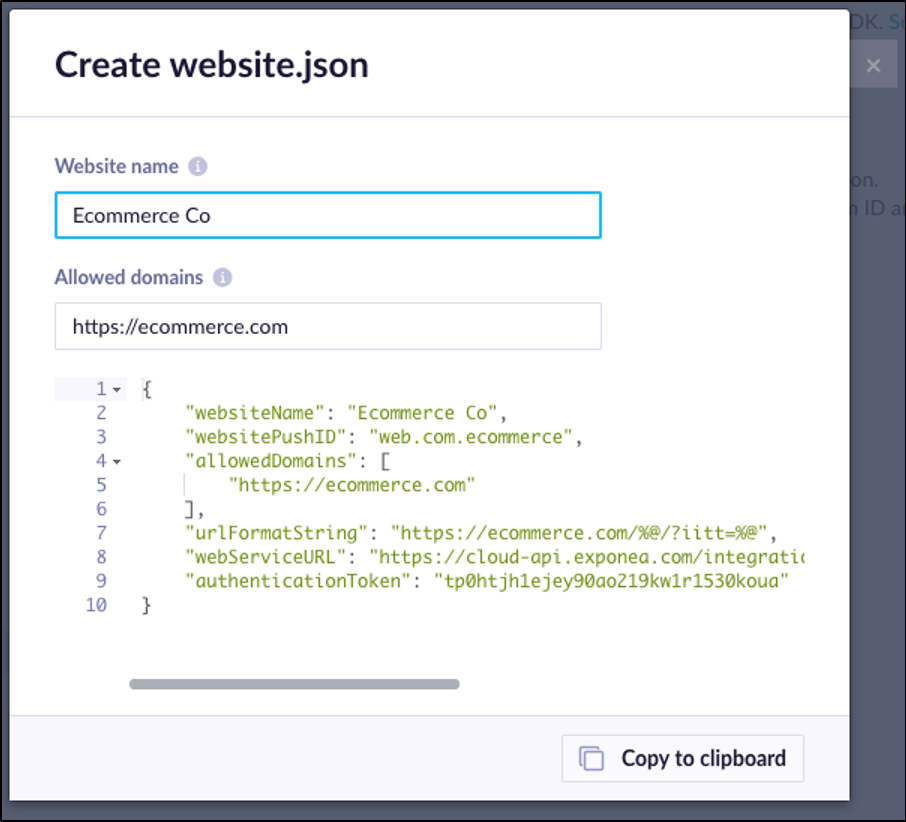
Create website.json, this opens a modal:
- Enter Website name
- Click
Copy to clipboard - Create a new website.json file on your disk and paste the contents of the clipboard
Do not close the tab with Bloomreach Engagement push notification settings. You will be finishing the configuration later.
Generate pushPackage.zip
Once you have generated website.json , you can finally generate pushPackage.zip :
- Make sure you have PHP installed on your system.
- Download and extract the Companion File.
- Change
createPushPackage.phpline with$certificate_pathvariable declaration to point atP12 fileyou generated in previous step. - Create a folder with the following minimal structure:
pushPackage.raw/
  	icon.iconset/
  	icon_128x128.png
  	[email protected]
   	icon_16x16.png
    [email protected]
    icon_32x32.png
    [email protected]
		website.json
		createPushPackage.php
- Run php
createPushPackage.phpfrom the directory same ascreatePushPackage.phpscript. It must be on the same path level as the .raw folder. The command phpcreatePushPackage.phpcreates two forms of the folder: one unzipped and one zipped. - New directory is created in format
pushPackage<timestamp>together with the ZIP archive with the same contents, for example:
pushPackage1580817868/
    icon.iconset/
    icon_128x128.png
    [email protected]
    icon_16x16.png
    [email protected]
    icon_32x32.png
    [email protected]
manifest.json
signature
website.json
You can see that two new files were generated:
manifest.jsoncontains checksums of all files in the package to ensure their consistency, while the signature is a package signature created by yourP12.
pushPackage1580817868.zipis the file you will need.
Configure Bloomreach Engagement for Safari Push Notifications
As was mentioned above, you need two credentials to make Safari Push in Bloomreach Engagement work, and those are pushPackage.zip (which you just generated in the previous step) and the APNS key. Now you will generate APNS key and then configure everything in Bloomreach Engagement.
Generate the Push Key
- Go to Keys section of Apple Developer Center.

- Click the
+button. - Enter the name, e.g. “exponeaAPNS”.
- Check the Apple Push Notifications service checkbox.
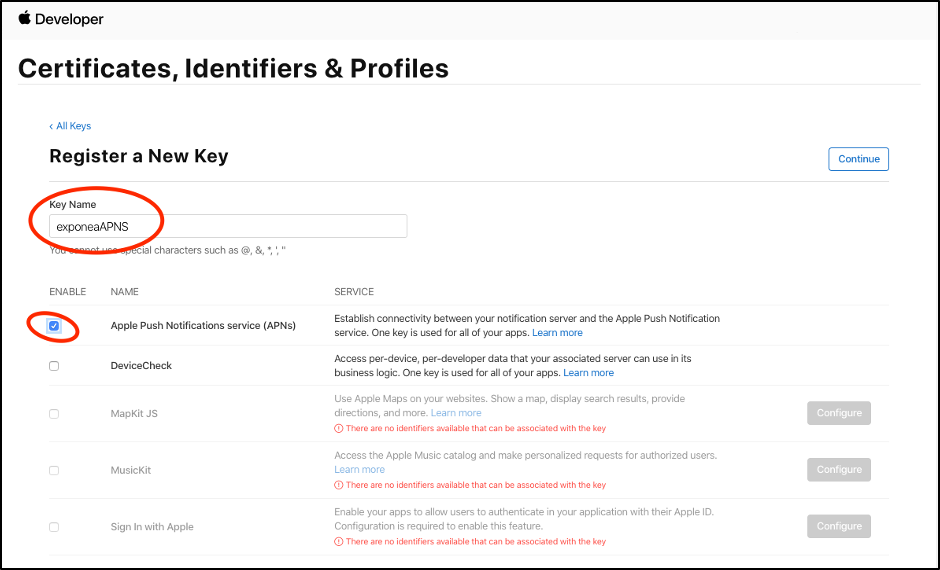
- Click
Continueand thenRegister. - Make a note of (or copy out) the following information as you will need them later; (see screenshot):
- Team ID (in the right top corner)
- Key ID (in the key details section of the page)
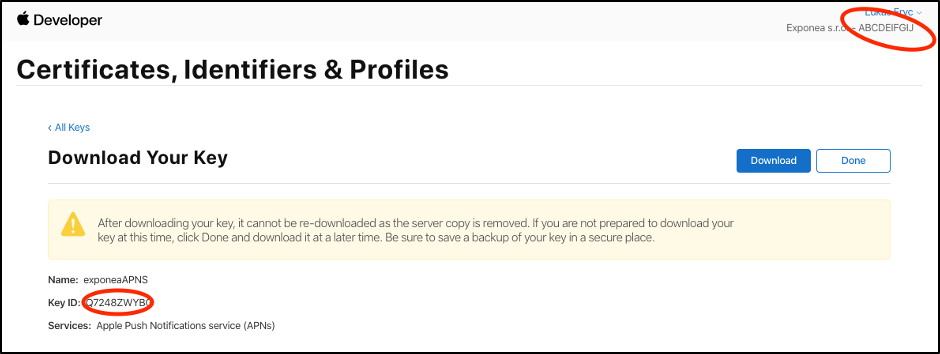
- Download the
P8 key.
Make sure to store it properly, as you cannot download it again. However, you can revoke it and generate a new one.
Configure Exponea APNS and Push Notifications
- Go back to the Bloomreach Engagement tab and open
Project Settings > Channels > Push notifications. - In the
Apple notificationssection, enter:
- Team ID (as noted in previous step)
- Key ID
Open theP8 fileand paste its entire contents into theES256Private Key
Leave the Application Bundle ID empty if you do intend to configure iOS Push Notifications
- You have already entered the Web Push ID and generated an Authentication token, but to remind you, you need the following values:
- Web Push ID :
web.com.ecommerce - Authentication token: (as generated, you can also find it inside website.json file)
- Push package
- Click on the
Browse .ZIP file. - Select the ZIP
pushpackage1580817868.zipas generated in one of the previous steps.
- Click save
The settings should be saved, and the ZIP file successfully uploaded.
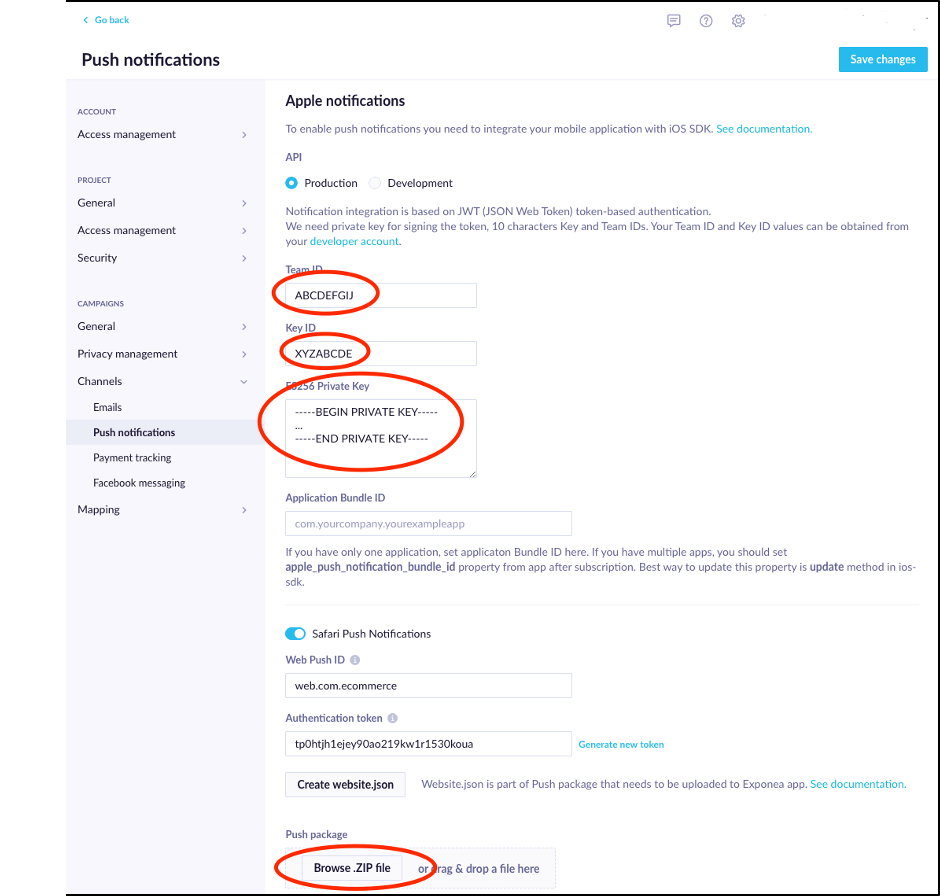
If you made an error in configuration, the ZIP file might fail to upload.
- The last step is to update the Web integration code, so click
Get updated tracking snippetfrom the Web integration link - notice the new push/safari/websitePushID section.
Copy the code to your webpage. - Notice the List of error logs from the last 7 days link.
The modal opens with a list of errors detected in the integration in the the last seven days - you may need it when troubleshooting when Safari push notifications do not work.
Trying Safari Push notifications
The simplest way to test the Safari Push is to create a Push Notification web layer from the template available in the Weblayers section and then define the Scenario which pushes to that client.
Create Push Subscribe weblayer
- In Bloomreach Engagement, go to Weblayers > Create New.
- Select the Push Subscribe template.
- Make sure to target only your test user in Settings > Audience.
- Start the weblayer (the confirmation dialog should clarify that you are targeting this weblayer only to 1 customer).
- Navigate to your website.
- Weblayer should be shown and allow you to subscribe.
- After clicking
Subscribe, you will be presented with Safari’s confirmation dialog; here, you clickAllow. - Your customer should be
safari_push_notification property- you can verify that in theCustomers > Customer view. - Close the website to try the Push in the next step.
Send Scenario with Push Notifications
In order to verify the push, close the website that you have opened in the last step and define the following Scenario:
- In Bloomreach Engagement, go to Scenarios > Create New.
- Add a
Nownode. - Add
Conditionand configure it with a Customer Filter :
Select customers matching attribute:safari_push_notificationis set - Add
Otherand select Browser push notification.
Add Title, Message, and URL Params:
- Each URL param replaces
%@placeholder inurlFormatStringsection in your website.json file (except the last one) - Sample:
PredefinedurlFormatString=https://static.qa.gdev.exponea.com/%@/?iitt=%@
iitt=%@placeholder is defined by Bloomreach Engagement.
So, when you enter URL Params =ABC
The user will land athttps://static.qa.gdev.exponea.com/ABC/.
- Save the scenario.
- Start the scenario and confirm that it targets only one customer.
Updated 6 months ago
