

Shopify App v2 User Guide
Loomi AI for ShopifyThis page describes our previous Shopify integration. The guidance on this page doesn't apply if you are using Loomi AI for Shopify via Data hub.
Loomi AI for Shopify is our latest Shopify integration that powers both Discovery and Engagement through Data hub. If your store is connected via the Loomi AI for Shopify app in Shopify, follow the Loomi AI for Shopify documentation in Data hub instead.
Getting started
There are two kinds of Shopify integrations, either headless or headful. For headful implementations, using Shopify Liquid as the templating language, this connector offers several controls in the visual theme editor. For headless implementations, the connector is not supported and we recommend customers using the headless starter kit tools available like the sample code, web SDK, limitless UI components and more.
To integrate with Shopify two integrations need to be in place.
- The feed needs to be provided with catalog data from Shopify into Discovery catalogs. Our developer community offers a starting point for integrations using the feed reference architecture for new implementations.
- The pixel and search use-cases are covered out of the box through the Shopify marketplace integration. This gives access to the theme editor and configurability of core search functionality within the Shopify dashboard. Extensions can be made using Shopify’s Liquid templating language. For an overview of the supported features, go to our functional specification.
Setup the integration
Installation
The app can be easily installed from the Shopify App Store. Head to the Bloomreach Discovery v2 Shopify app page and click Add app. You will be prompted with an Authorization screen. Click Install to install our application on your store.

Linking the app to your Bloomreach account
When getting started with Bloomreach, you will first work with the Bloomreach team to create an account, import your product feed, configure searchable attributes and get your search APIs live.
Once you finish the initial account setup and configuration, you will receive access to your environment from the Bloomreach Support team. You can then use your Bloomreach account to authenticate with your Shopify app. To do this, enter your Bloomreach account credentials into the Shopify app. Your credentials are found on your Bloomreach Dashboard, under the Setup > DevStudio > Account information menu item.
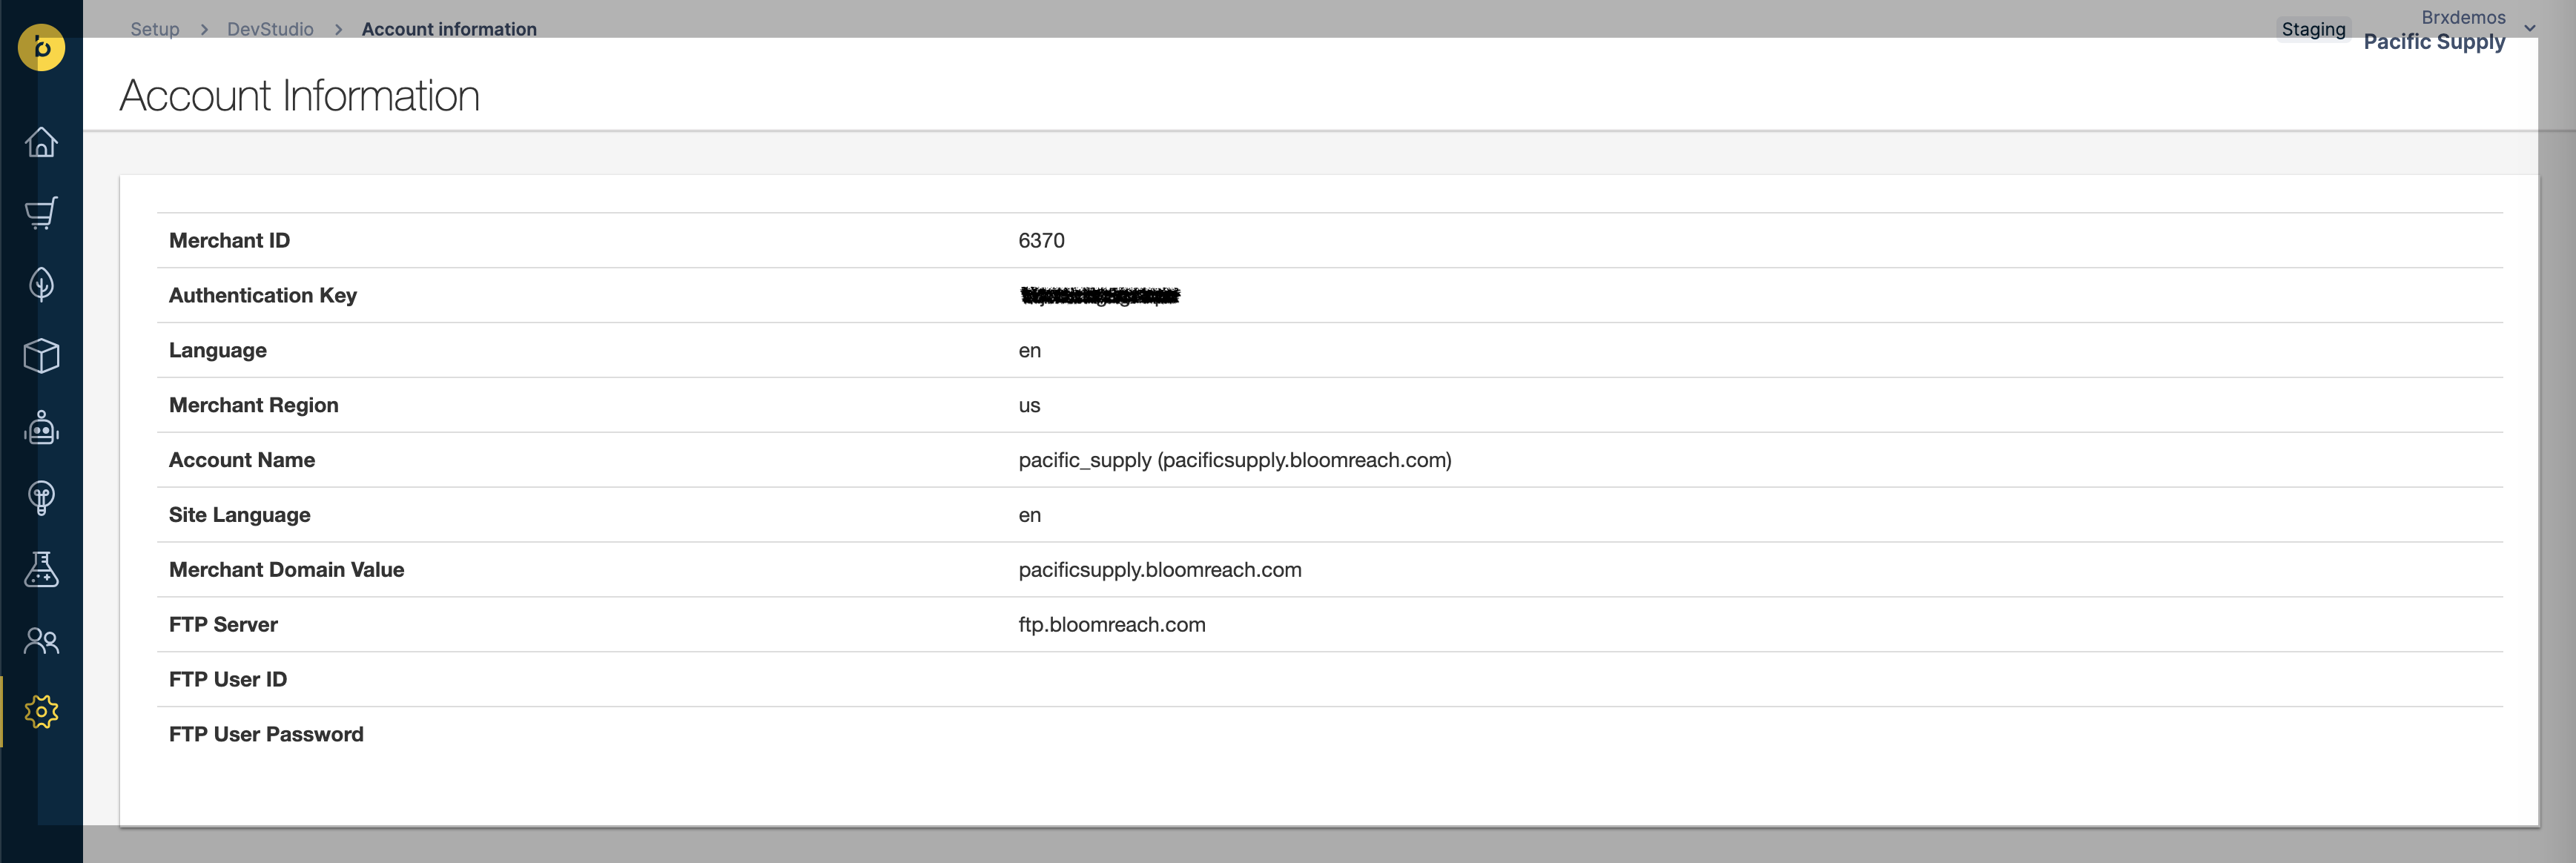
Copy the keys into the Shopify app credentials form on the Settings page:
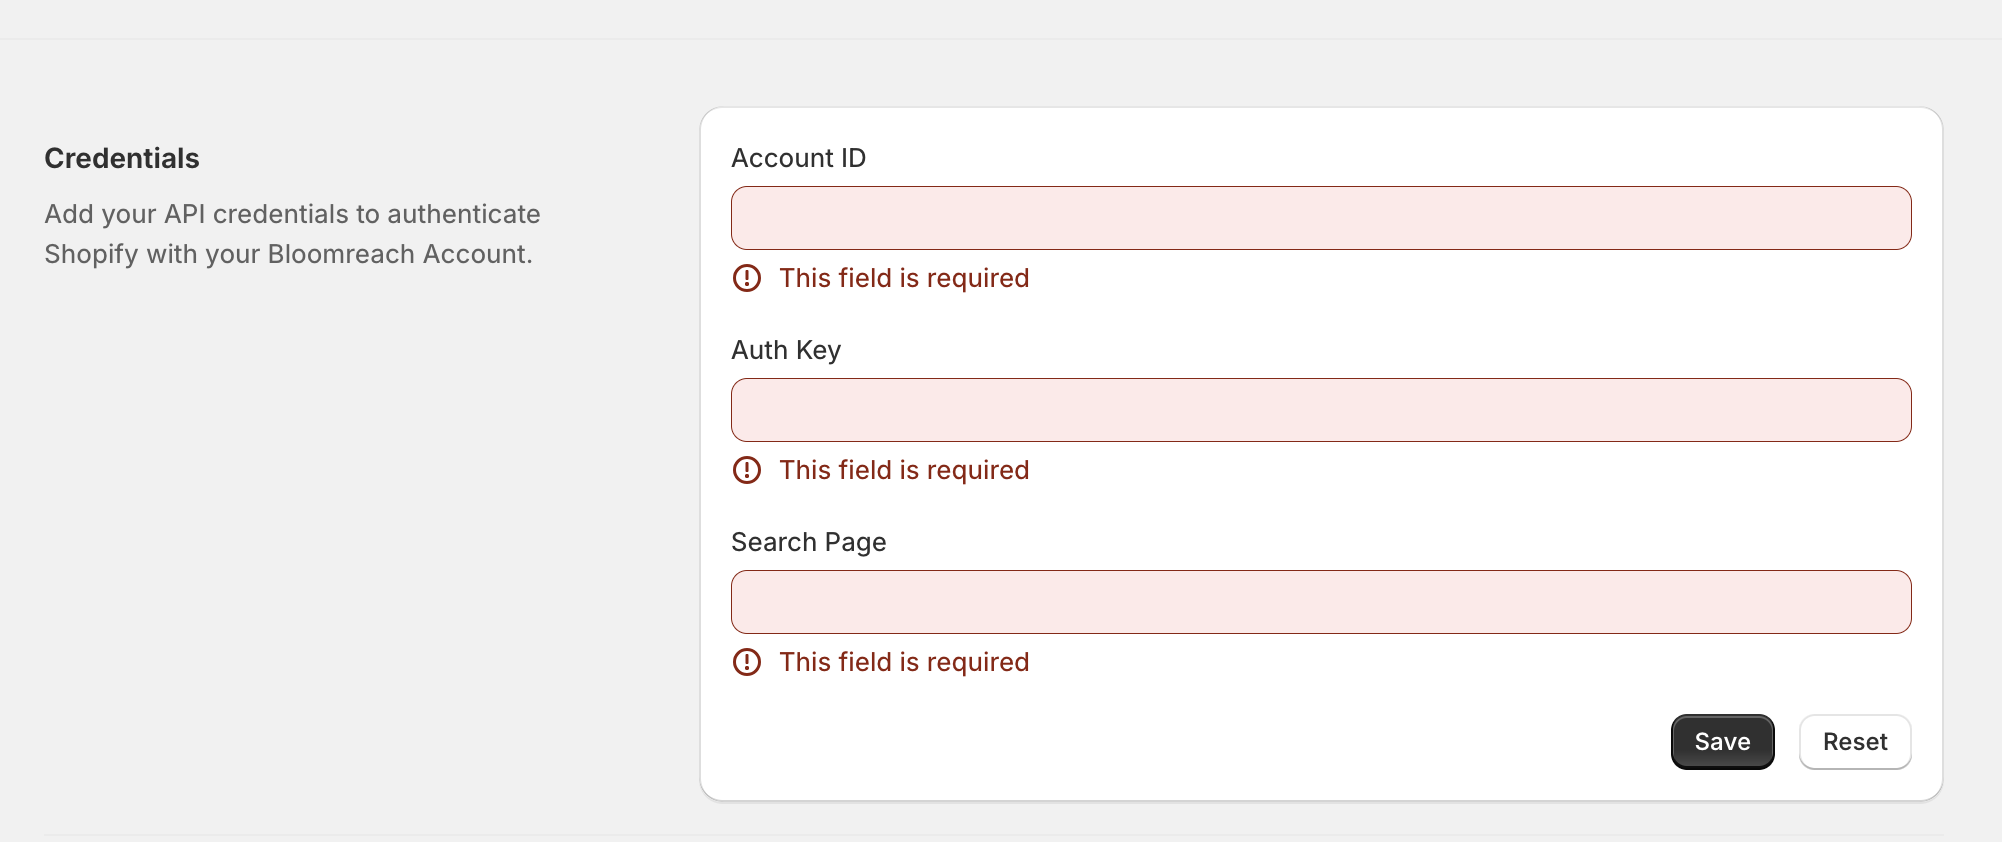
The following fields are all needed for a successful integration:
- Account ID (Merchant ID)
- Auth Key
- Search Page
Here you have to enter the Search Results page URL. It is required by the app to correctly generate redirect links. Check the following scenarios to see how to set it:- If you do not use Shopify markets, you can use either a relative (example:
/search/) or absolute (example:https://[store-domain.com]/search/) value; - If you use domains or subdomains for Shopify markets, please use ONLY a relative value, and DO NOT check the Automatically adjust for subfolders checkbox;
- If you use subfolders for Shopify markets, you can use either a relative or absolute value, and check the Automatically adjust for subfolders checkbox, which will automatically insert the subfolder for the storefront’s localization (example:
/fr-ca) into the search URL; - If you have a mixed setup (using both (sub-)domains and subfolders), you can use a relative value, and check the Automatically adjust for subfolders checkbox.
- If you do not use Shopify markets, you can use either a relative (example:
Setup Bloomreach product catalog(s)
PrerequisiteYou must have already created at least one Product Catalog in Bloomreach.
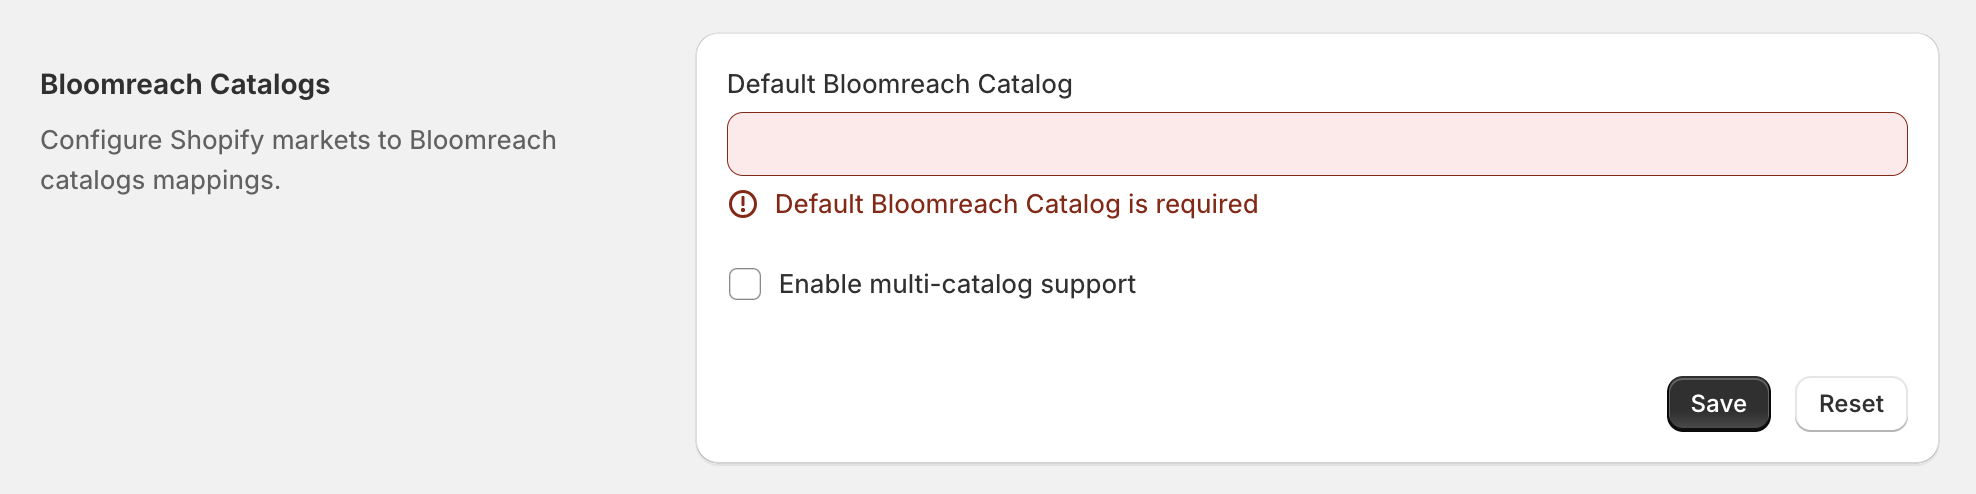
The connector app supports both a single catalog and multiple catalogs setup in Bloomreach. Either way, you need to first configure a default Bloomreach product catalog, which should contain all the products in your Shopify store. In most cases, it's your Account Name (such as "pacific_supply") in the Account information above. Depending on your Bloomreach account setup, you may choose another catalog in Bloomreach's Catalog Management feature as your default one:

Fill the catalog's name in the settings form below:
(Optional) Setup multiple catalogs
The Shopify connector app supports multi-lingual and -country use-cases using Shopify’s markets support. The following product catalogs setup scenarios are good to keep in mind:
- Each Discovery product catalog must contain the same products as a Shopify Market, and represents one of the language(s) in that market.
- For example, a Bloomreach product catalog mystore_na_en may contain the same products as in the Shopify Market North America, with the localization language English (en).
- It is not necessary to map all Shopify Market/language combinations to Bloomreach product catalogs. For those without a Bloomreach product catalog specified, the default product catalog will be used. However, the search experiences on those markets/languages might be affected.
- If two or more Shopify markets share the same products, and contain the same language, they may also share the same Bloomreach product catalog.
If your Bloomreach account contains product catalogs that satisfy the above criteria, you can map them in the connector app, and take advantage of different product catalogs for your storefronts across multiple markets and languages. To do that, first select the Enable multi-catalog support checkbox in the Bloomreach Catalogs section, and the catalogs form will appear:
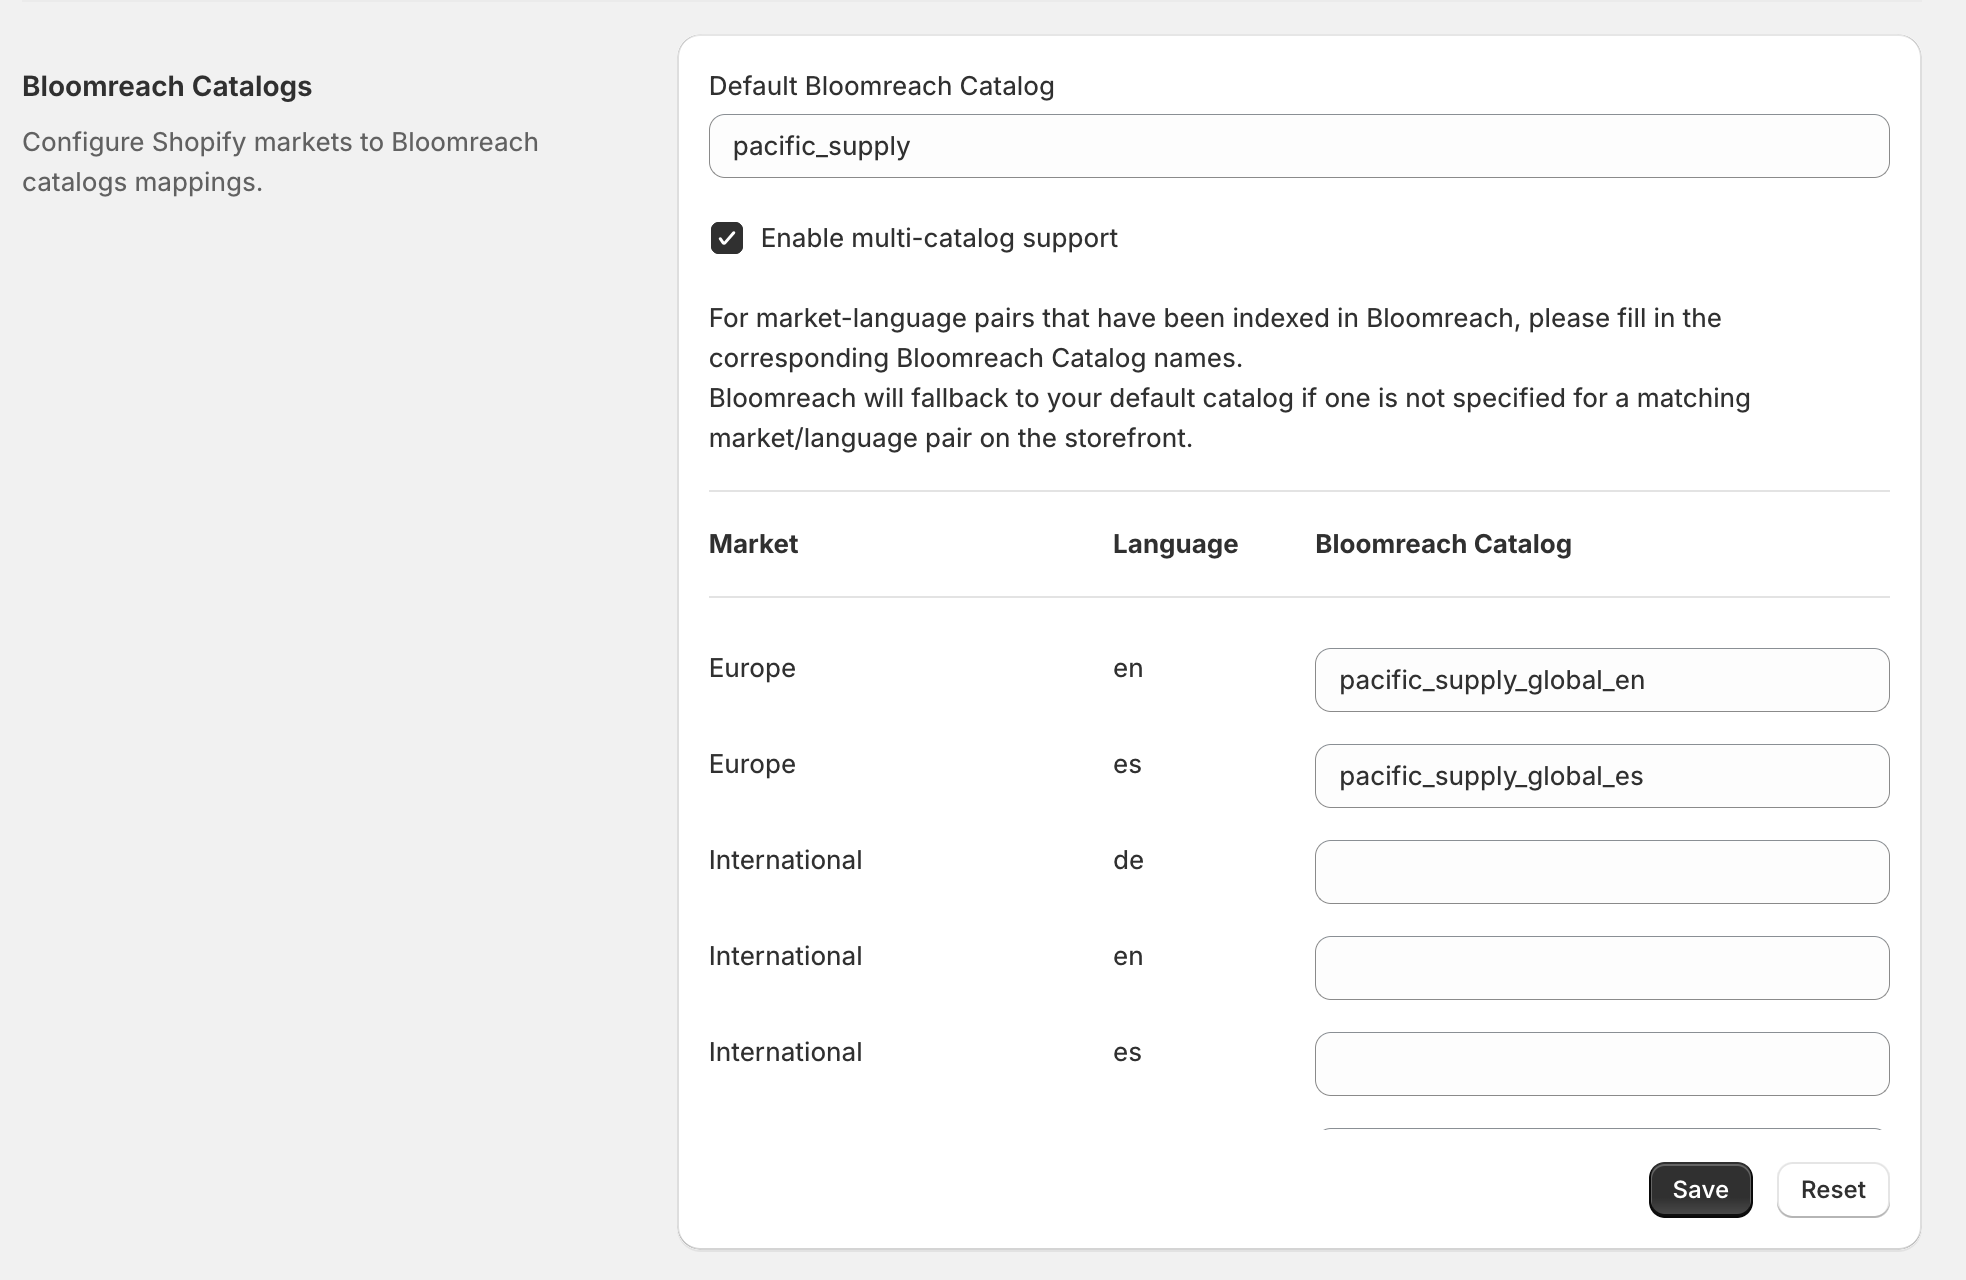
The form should list all Shopify Market and language pairs in your store, and you can selectively fill in the corresponding Bloomreach product catalog for each of them. When your users land on a storefront using a particular market and language (usually determined by the URL), the Bloomreach product catalog for that market/language pair (or the default catalog if not found) will be used for your search experiences.
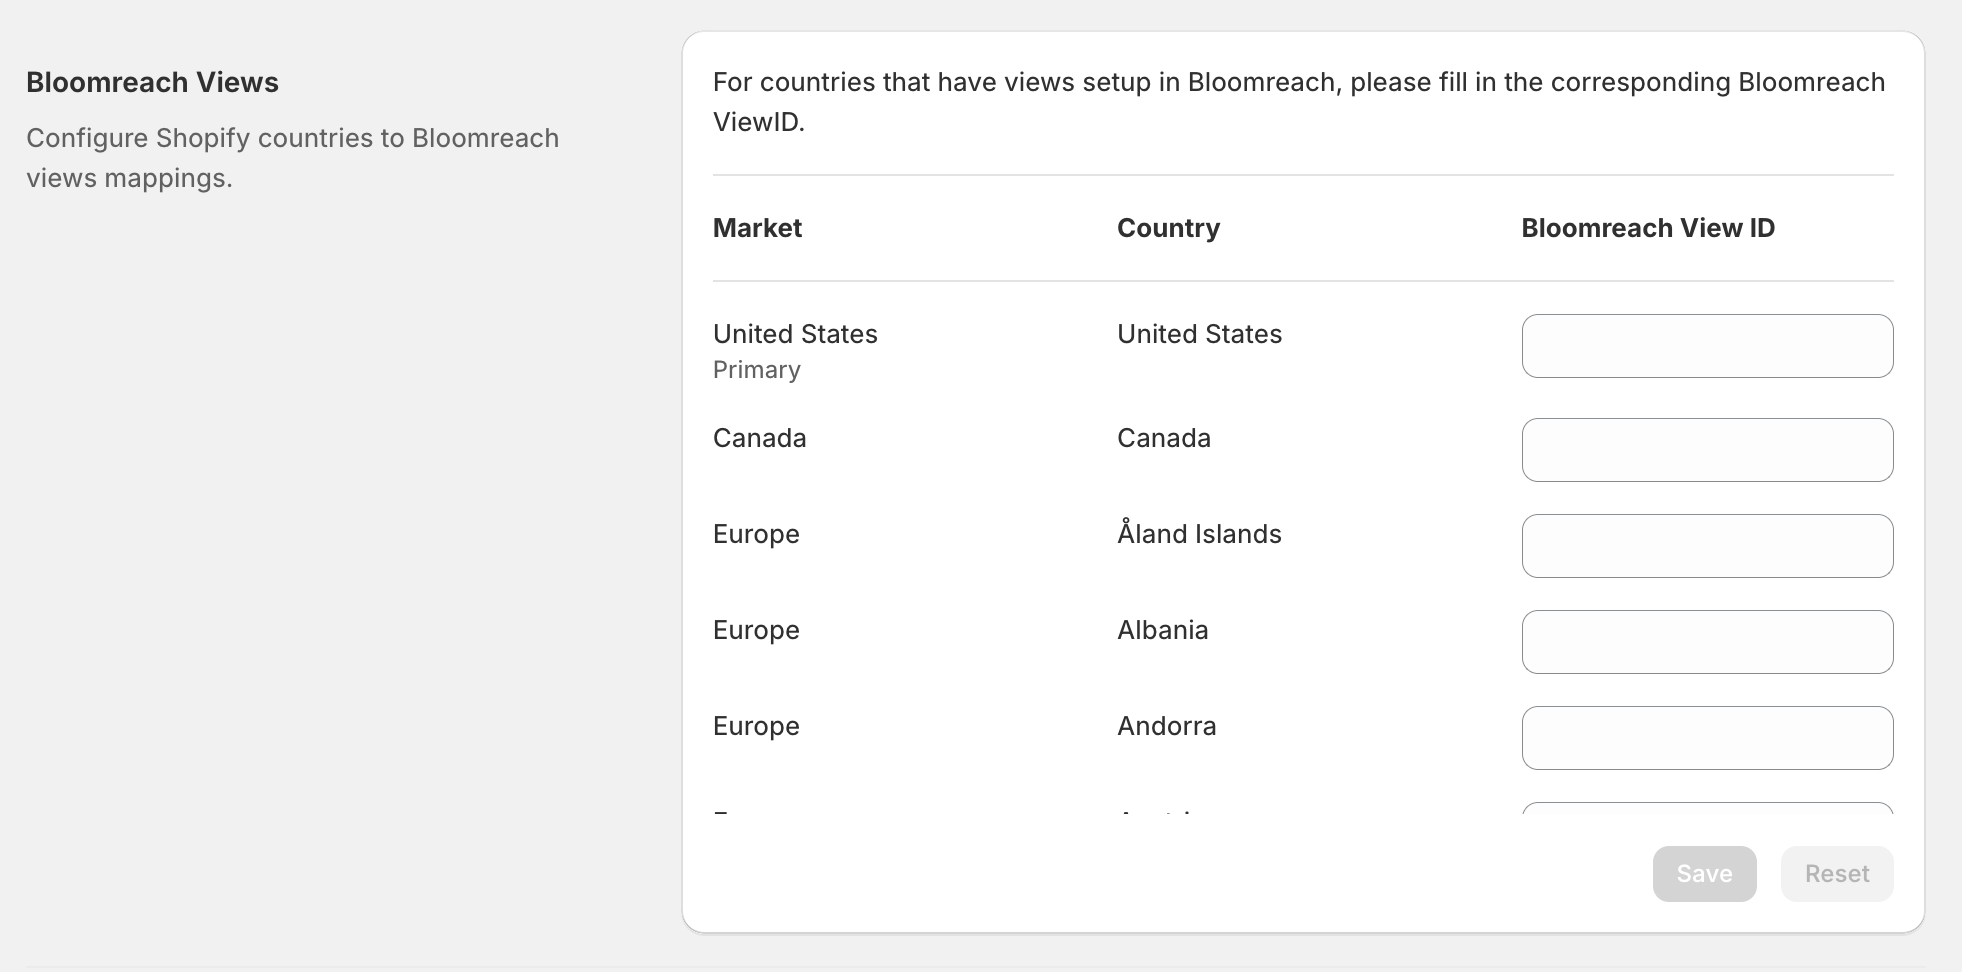
(Optional) Setup Bloomreach views
Views allow you to display products with some different data variations across your customer base depending on who’s viewing the products or content. They are virtual snapshots of a catalog with distinct representations of a product or variant.
The connector app supports the following Bloomreach views setup scenario:
- The view should be based on countries. For example, you can have a Bloomreach view US that contains product variations for selling in the United States.
- It's possible that two or more countries share the same view, given that they have the same product variations.
If your Bloomreach account contains views that satisfy the above criteria, you can map them in the connector app, and take advantage of different views for your storefronts across multiple countries. To do that, fill in the corresponding Bloomreach view ID for the countries in the Bloomreach Views form, which is a parameter passed through the feed. When your users land on a storefront for a particular country (usually determined by the URL), the Bloomreach view for that country (if available) will be used for your search experiences.
(Optional) Select a working theme
You can select one of the installed themes in your Shopify store as your working theme. That theme will be used when you click the "Add App Embeds" or "Add App Block" button in each component's page (See sections below). If you don't select any theme, the current (published) theme will be used by default.
NoteYou can always use Shopify's theme editor to add an App Embeds/Block to any theme. The buttons merely serve as shortcuts.

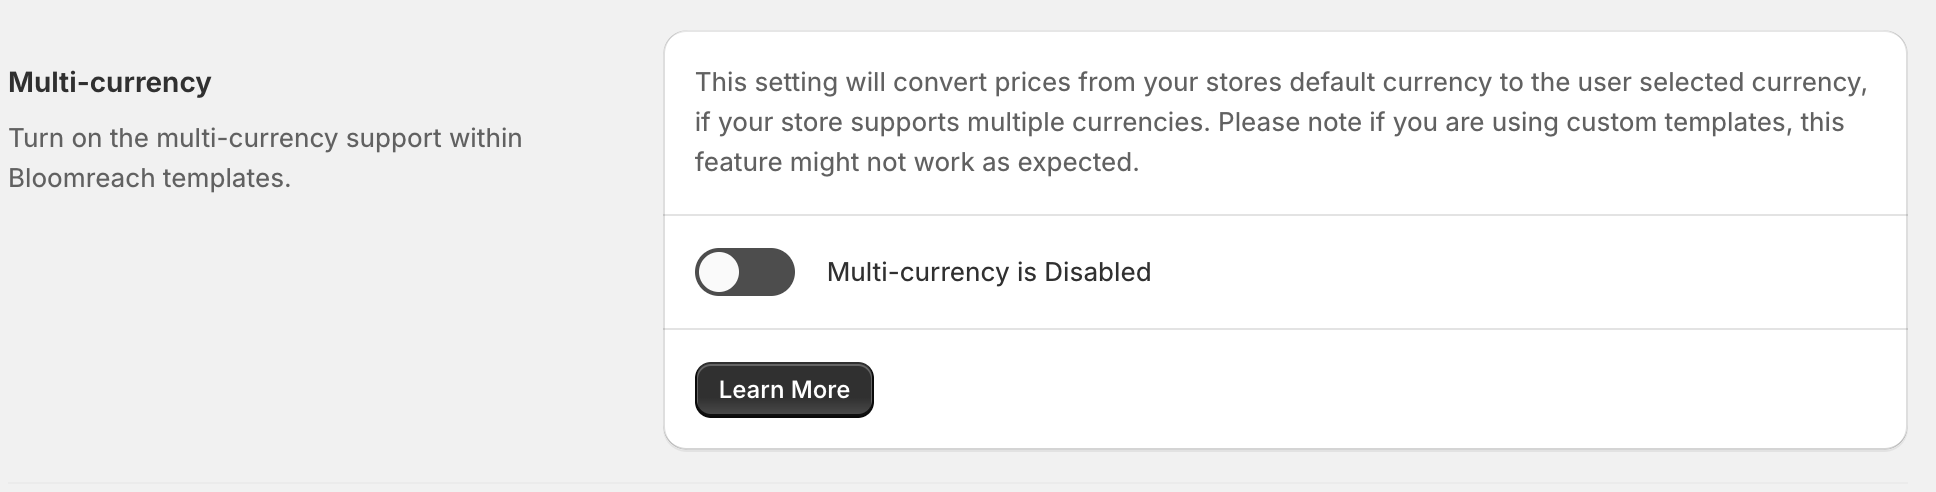
(Optional) Enable multi-currency support
If your store supports multiple currencies for a market, you can turn on the multi-currency support in the connector. When enabled, the displayed prices in your search results powered by Bloomreach will be converted from your store's default currency to the user selected currency (local currency). You can learn more about currencies in Shopify here.
Note
- Bloomreach always stores prices in the default (store) currency.
- If you are using custom templates, this feature might not work as expected. You can refer to the default templates on how to properly utilize this feature (implemented by the
format_moneyJS function).
Configuration of the app
Once the app is installed you can start configuring it.
There are nine pages with configuration options:
- Home: News and Analytics panel.
- Indexing: Information about indexing.
- Search: Search settings and theme installation.
- Autosuggest: Autosuggest settings and theme installation.
- Collections: Collections settings and theme installation.
- Recommendations: Recommendations Widgets settings and theme installation.
- Pixel: Pixel theme installation.
- Optimize: Information regarding search relevance.
- Settings: Bloomreach account and other app settings.
The Settings page has been covered in Getting started. The next few sections will go into details about configuring the Bloomreach features (Search, Autosuggest, Collections, Recommendations, and Pixels) supported by the connector app.
Enable Bloomreach Configurations App Embed Block
All Bloomreach features require a common support module, which is installed into the theme by enabling the Bloomreach Configurations App Embed. To do that, navigate to one of the feature's pages, and click on the Enable Bloomreach Configurations Embed Block button to enable it on your working theme. Below shows an example from the Bloomreach Search feature:
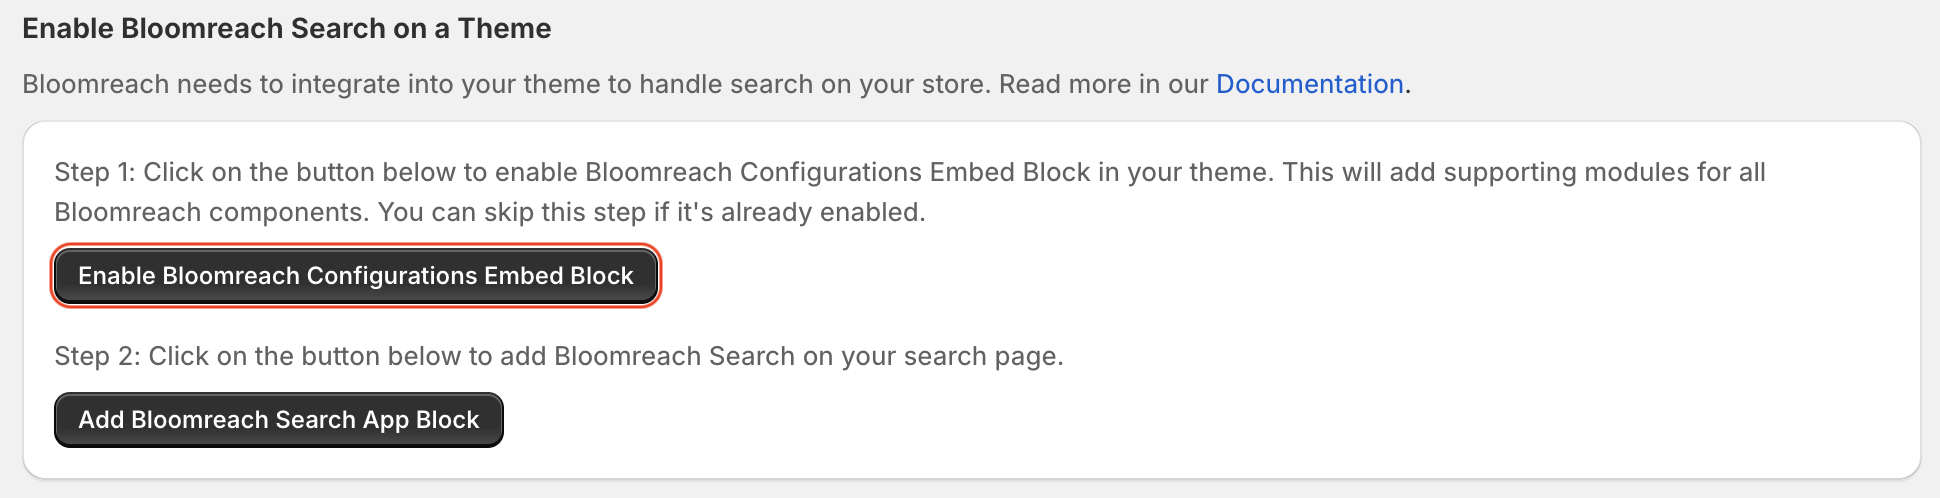
NoteYou only need to enable it once for all the features
Manually enable Bloomreach Configurations App Embed Block
You can also enable the app embed block manually on any theme. To do that:
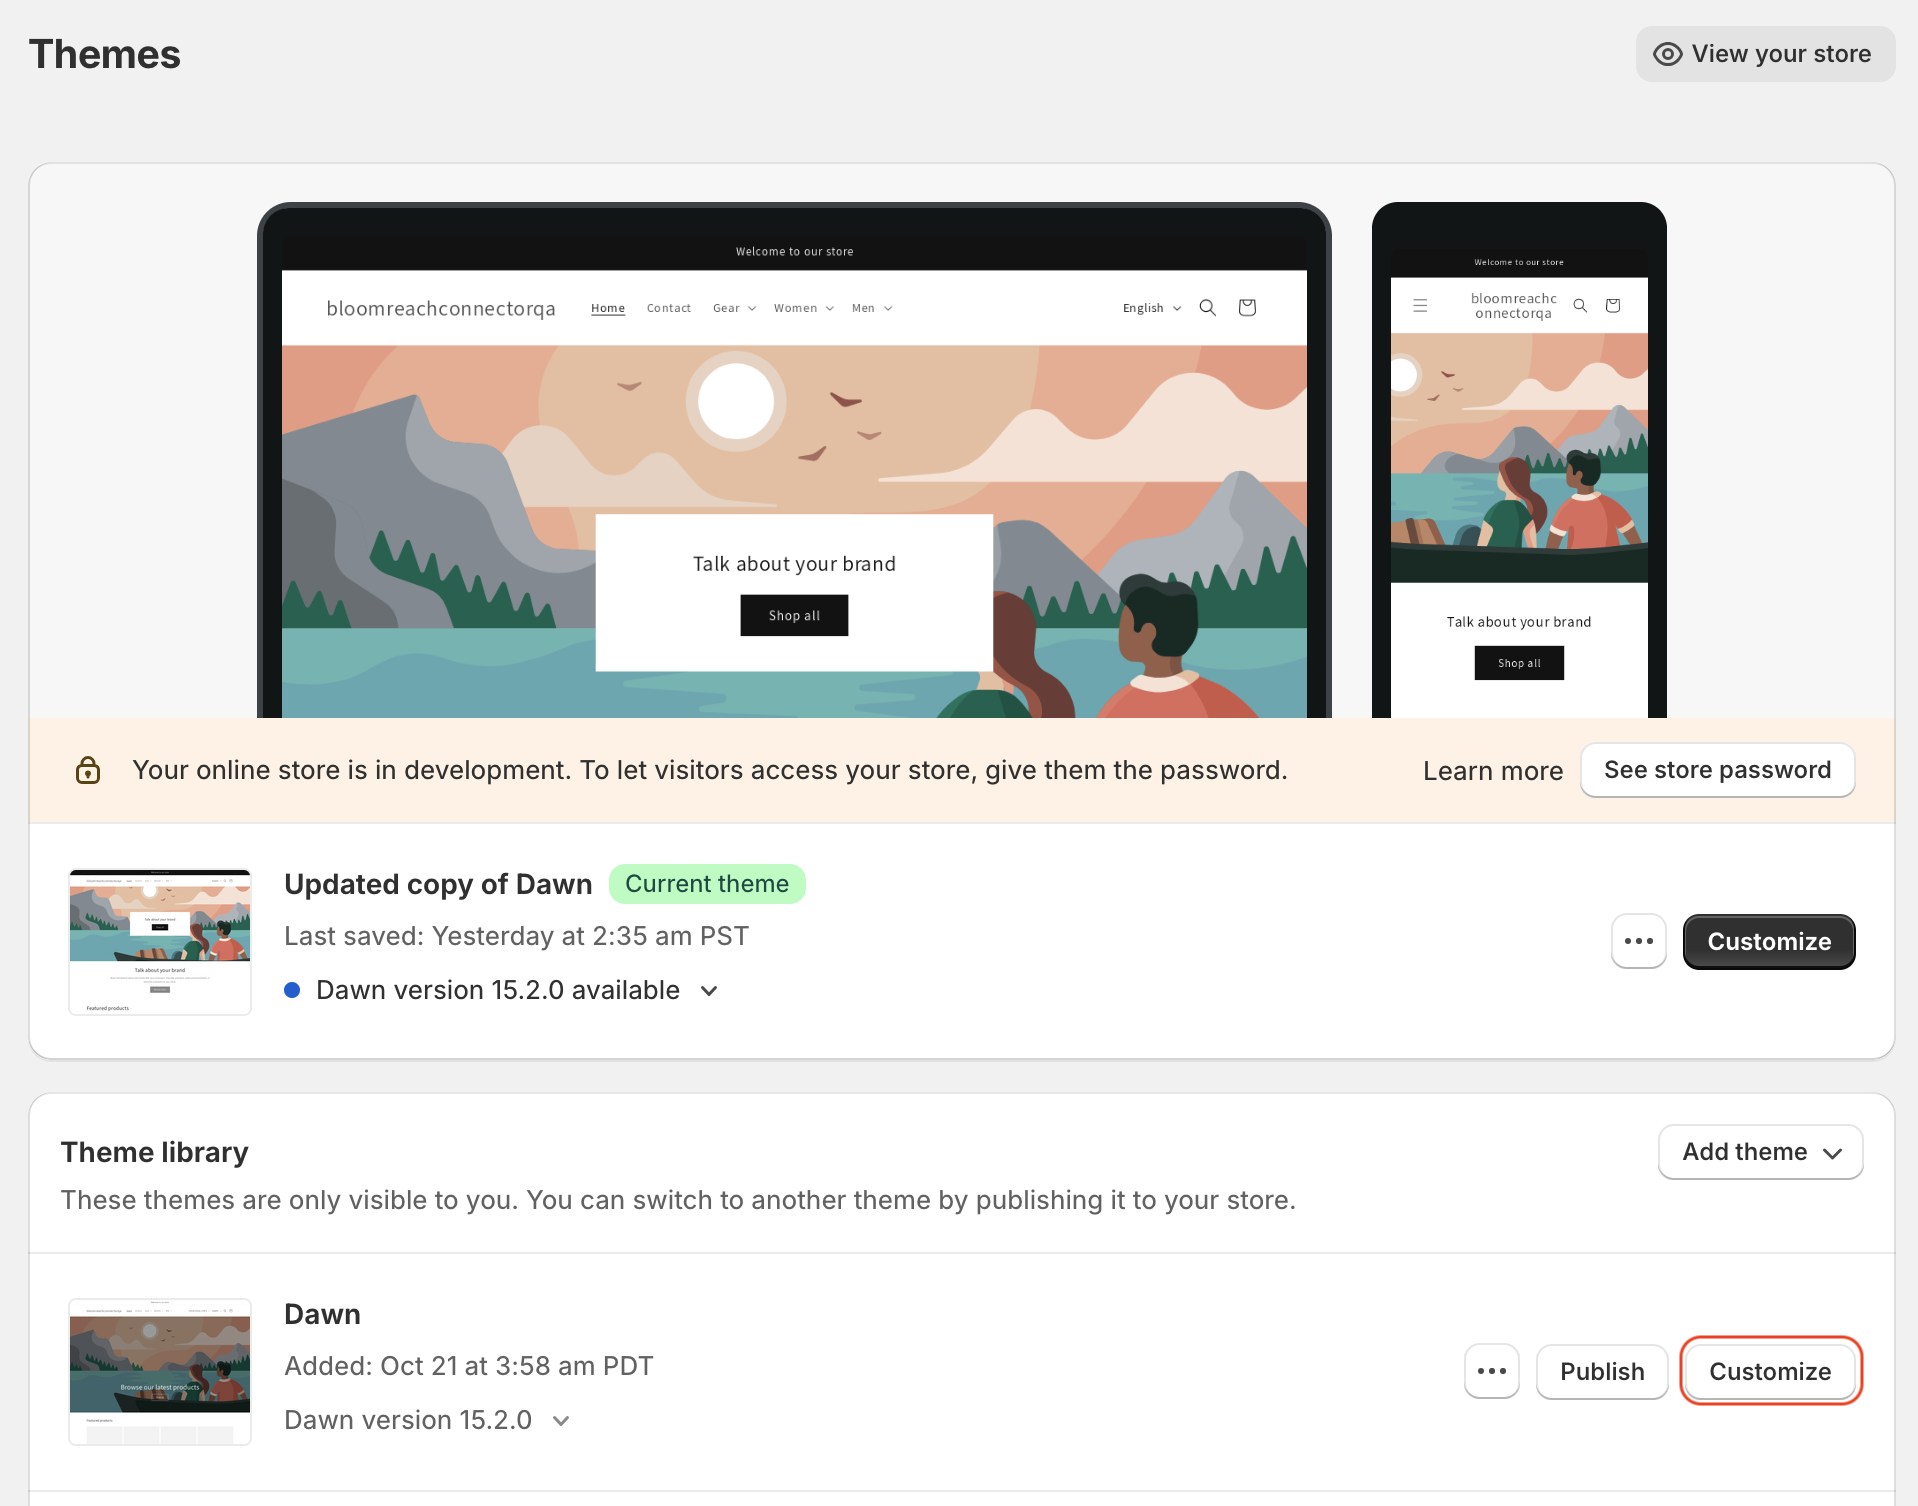
- Go to Shopify Themes, and click Customize next to a theme (it's recommended to customize an unpublished theme to avoid disruption to the live site);
- In the theme editor, click the App embeds icon.
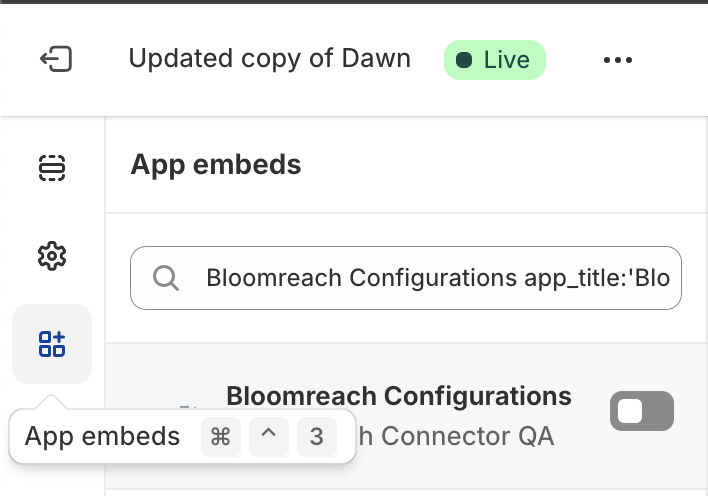
- Switch on Bloomreach Configurations to enable Bloomreach features support for the theme.
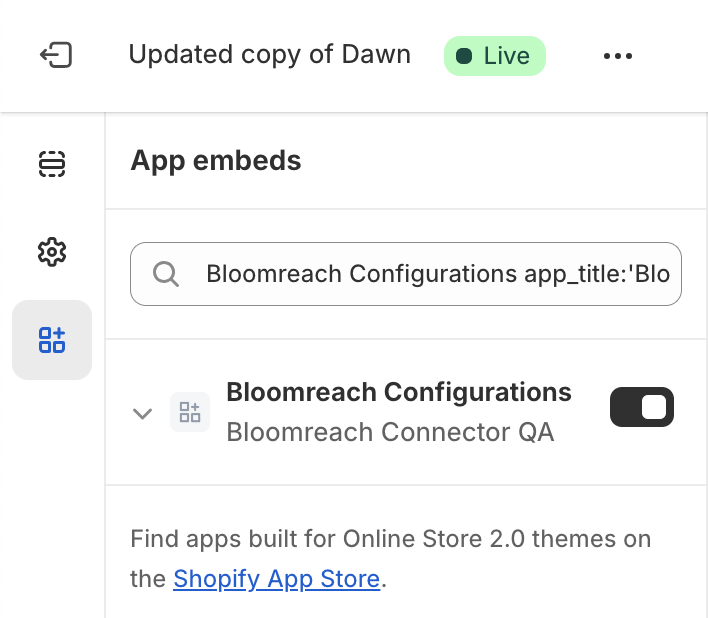
- Click Save.
Search/Collections
NoteMake sure you have enabled Bloomreach Configurations App Embed Block
Automatically enable on a theme
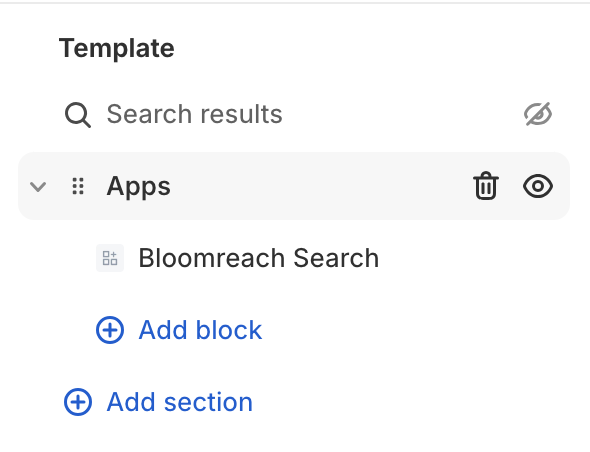
To customize and start using the Bloomreach search/collections feature, navigate to the corresponding page, and click on the Add Bloomreach Search App Block/Add Bloomreach Collections App Block button. It will open the Shopify theme editor in a new tab and add the corresponding Bloomreach feature app block to your working theme.

Showing the Bloomreach Search feature
Manually enable on a theme
You can also add the Bloomreach Search/Collections app block manually on a theme. To do that:
- Go to Shopify Themes, and click Customize next to a theme (it's recommended to customize an unpublished theme).
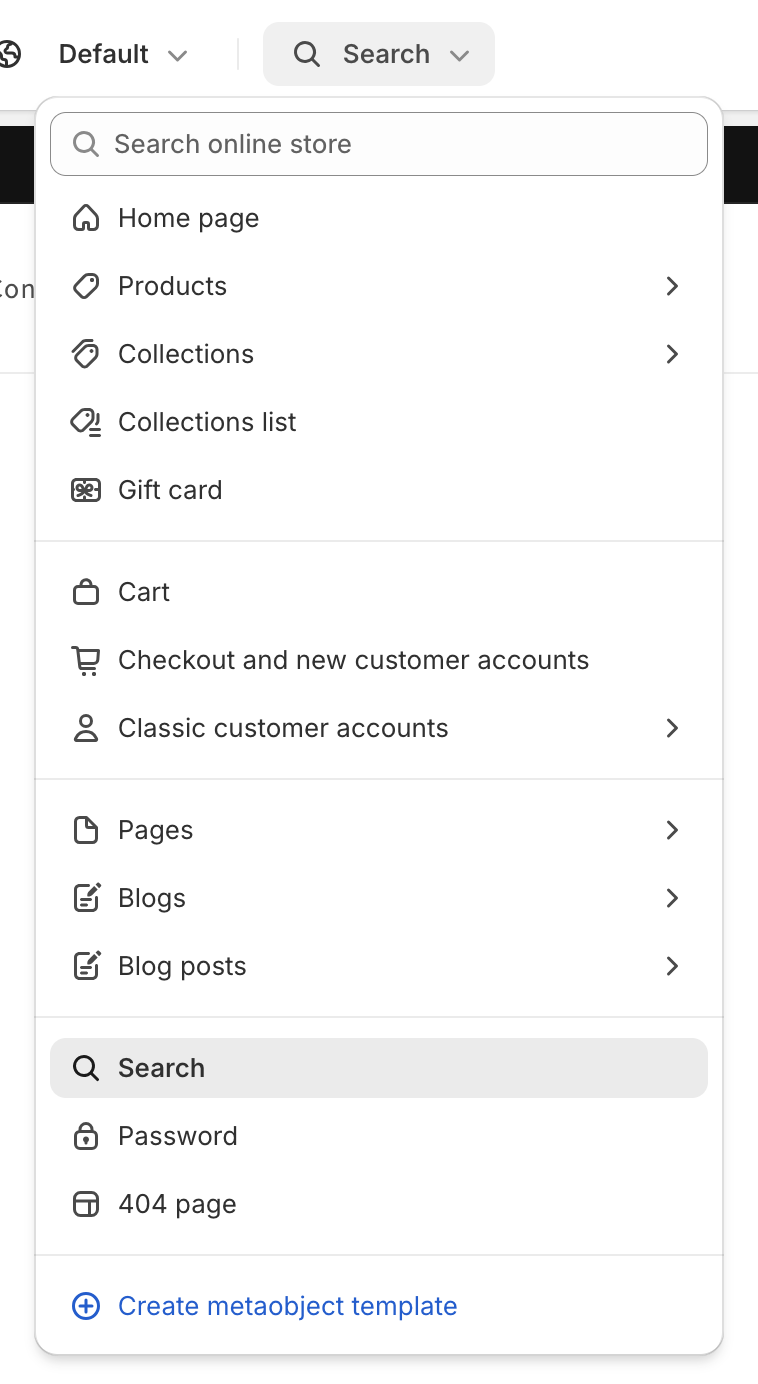
- Depending on the feature, switch to Search (for Search feature) or a Collections (for Collections feature) page using the page selector.
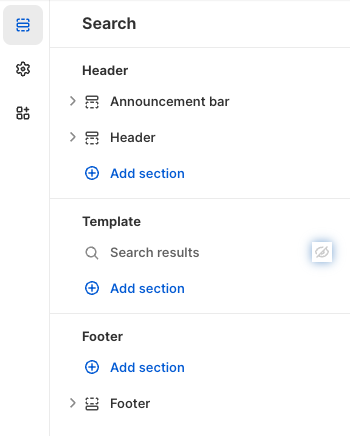
- In the theme editor, click the Sections icon.
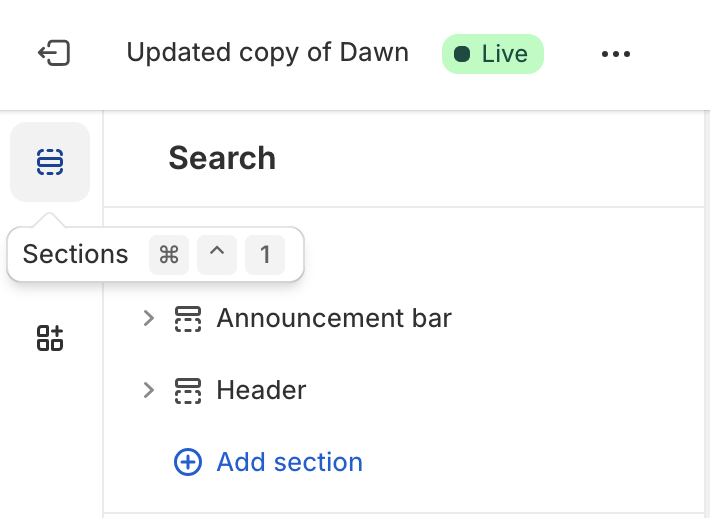
- Click Add section, Apps, and then Bloomreach Search or Bloomreach Collections.

- Click the “eye” icon to turn off the theme’s default Search results.
- Optional. To remove extra padding, click Apps and then turn off Make section margins the same as theme.
Customize default settings
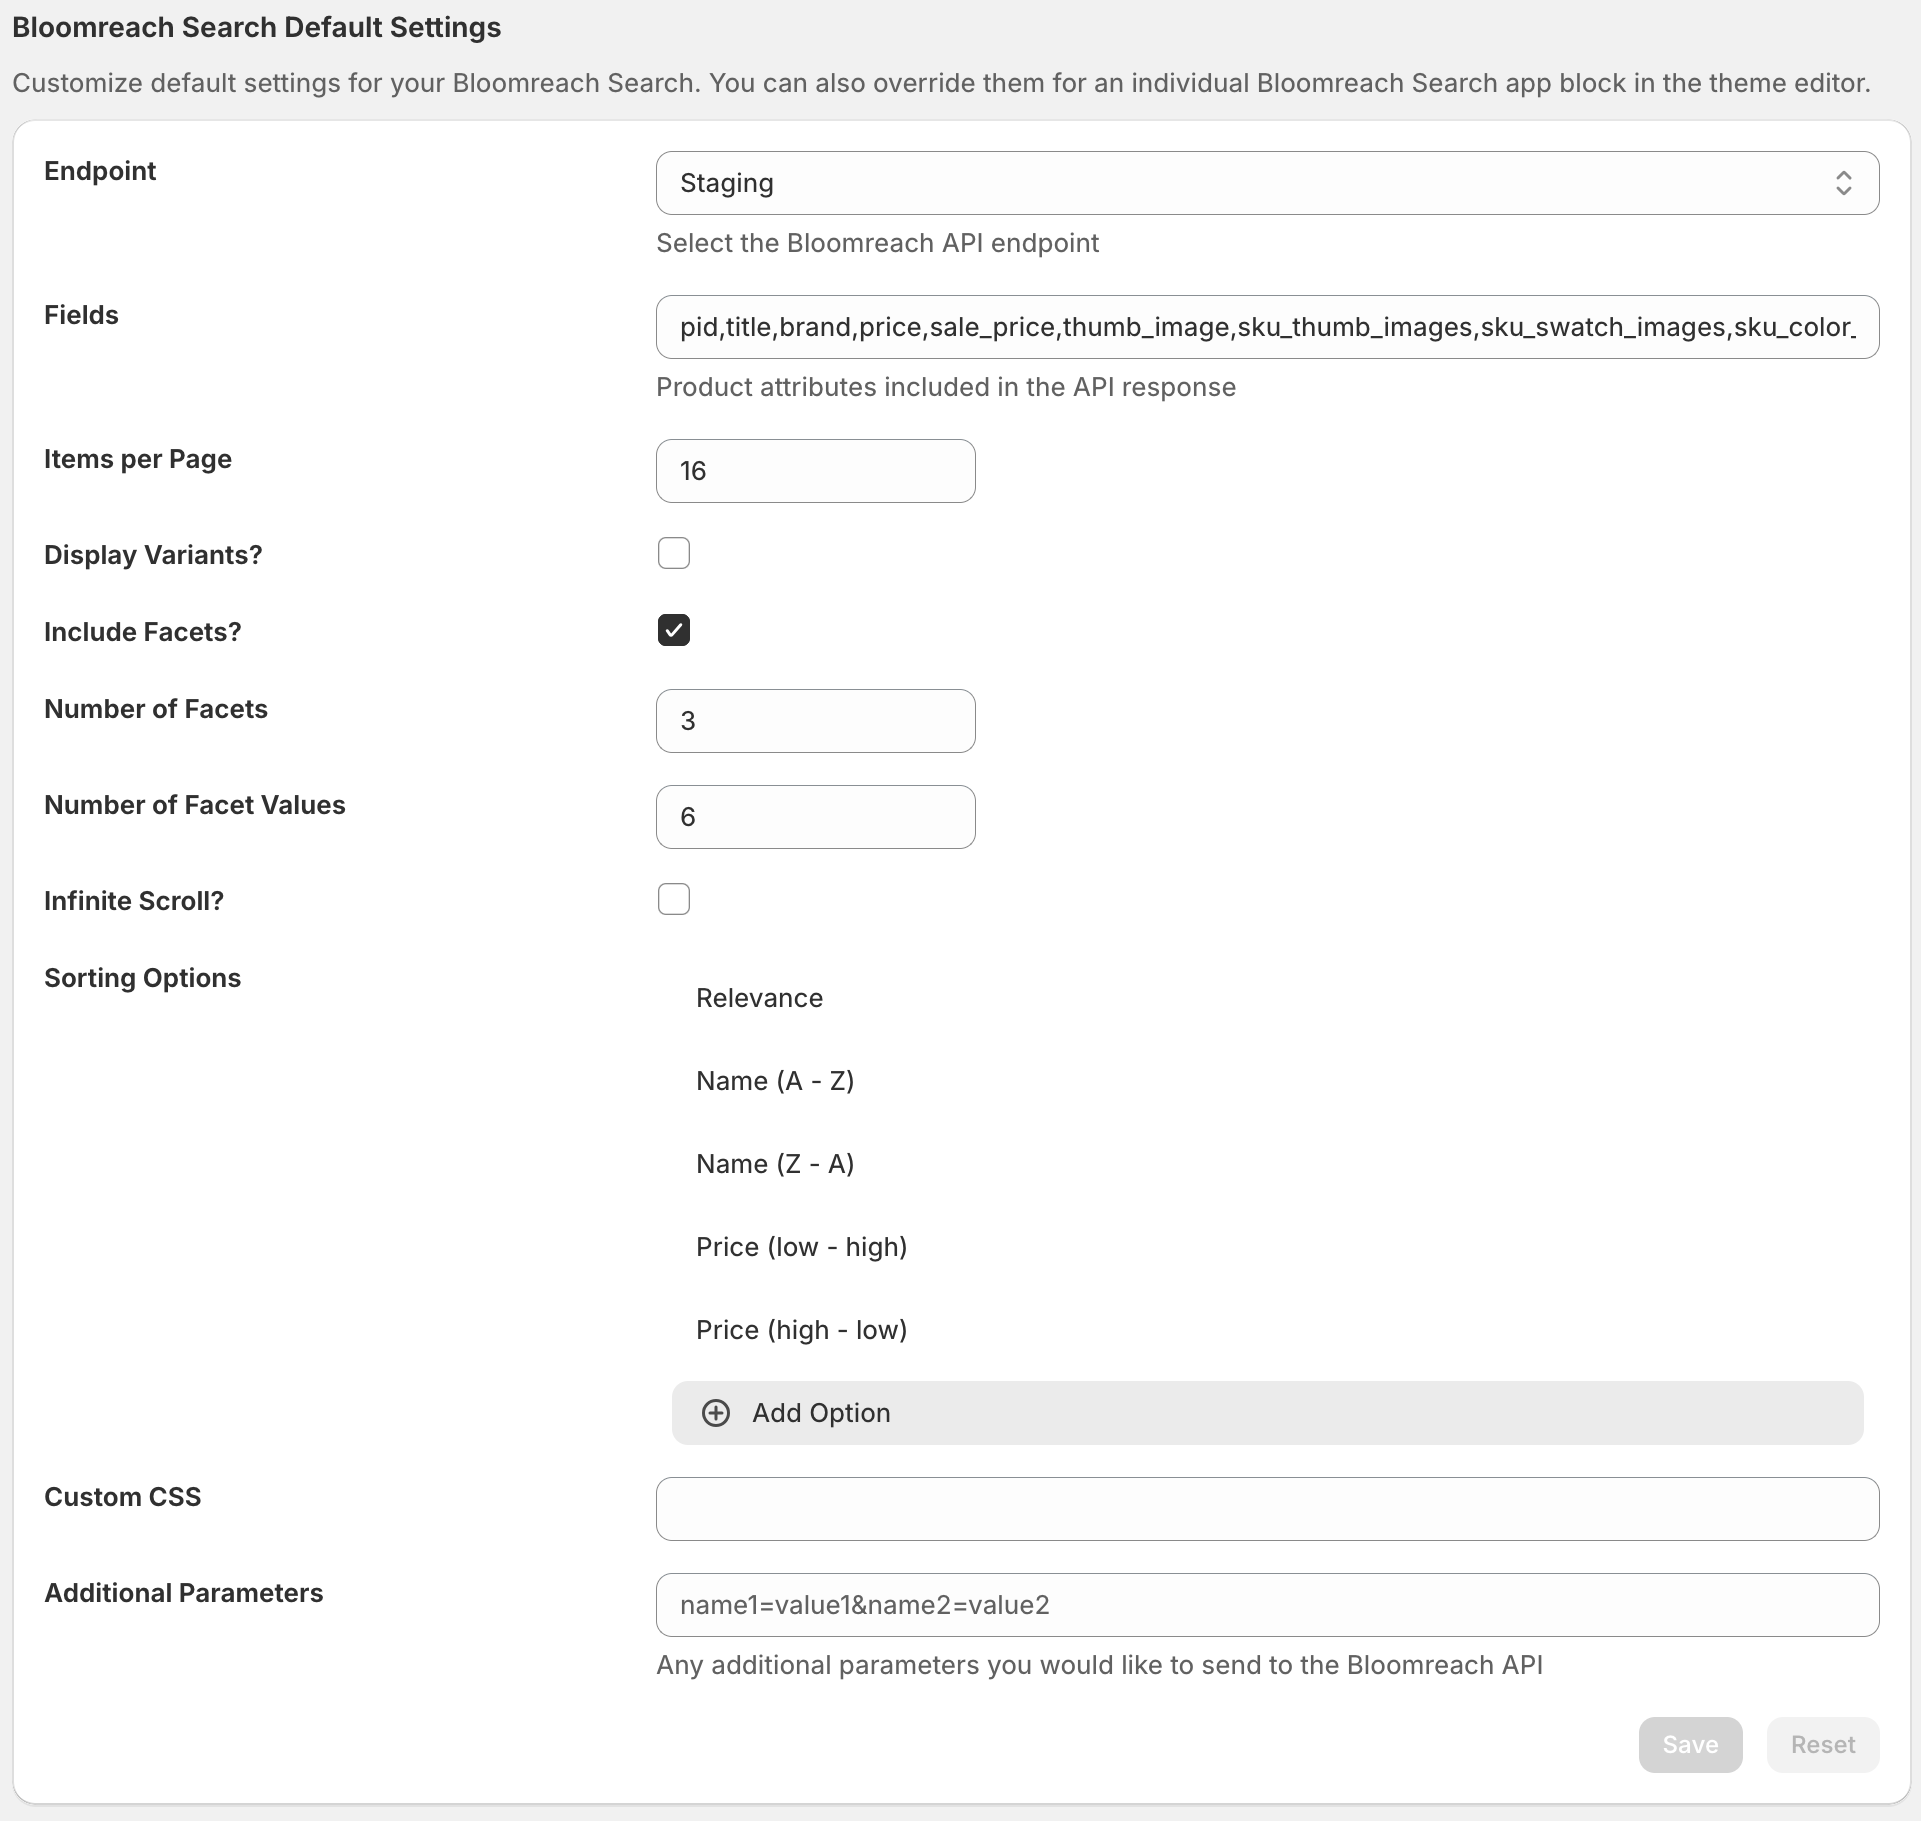
You can customize the default settings for the following options in the app. They will apply if you choose to use default settings in the app block.
- Endpoint - Choose the Bloomreach Discovery Endpoint for the search results/collections. Can be either Staging or Production.
- Fields - Set the product attribute fields that you want returned from Bloomreach, such as product IDs and prices.
- Items per page - Set the number of items per page you wish to display.
- Display variants? - Set whether you wish to display variants as individual products in the results.
- Include facets? - Set whether you wish to include facets in your results.
- Number of facets - Set the number of facets you wish to display.
- Number of facet values - Set the number of facet values you wish to display for each facet.
- Infinite scroll? - Set whether you wish to enable infinite scroll on your search results/collections pages.
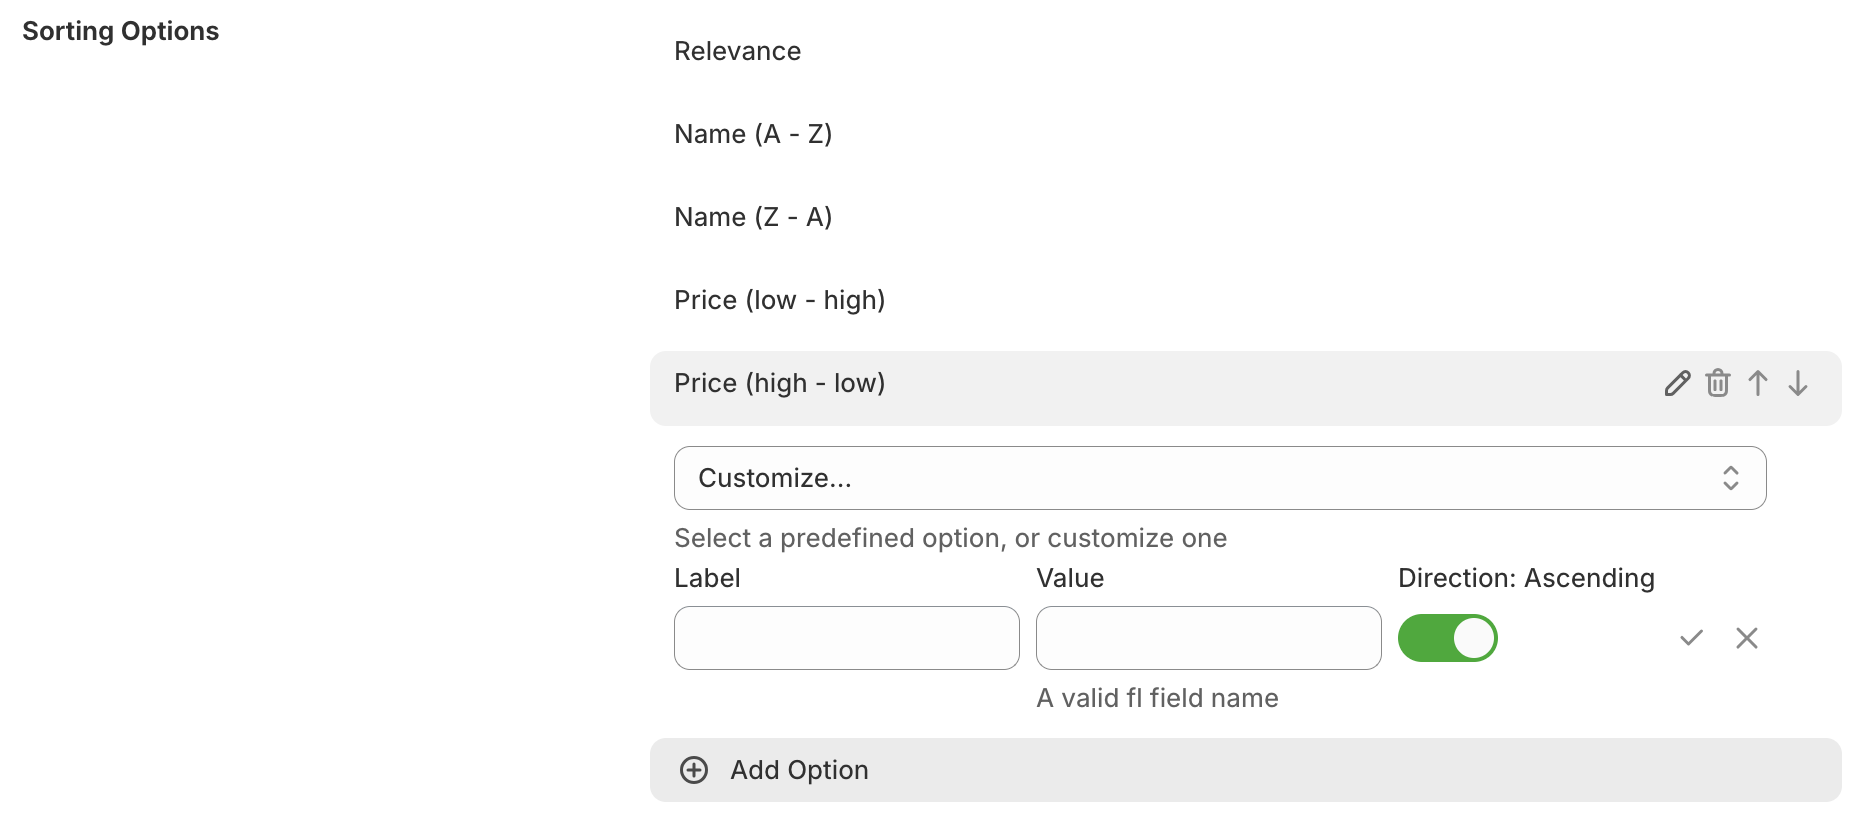
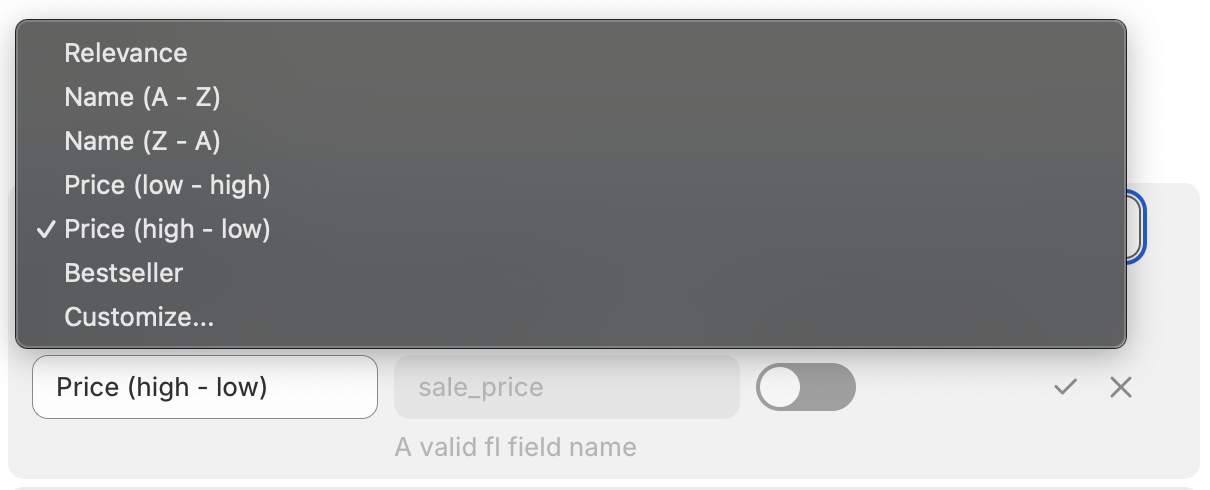
- Sorting options - Customize sorting options: You can:
- Add a pre-defined option;
- Add a customized option;
- Edit/remove an existing option;
- Change the display order of an option.
- Custom CSS - Add Custom CSS to alter the look of each feature.
- Additional parameters - Set Additional parameters that will be sent to Bloomreach search API.
App block settings
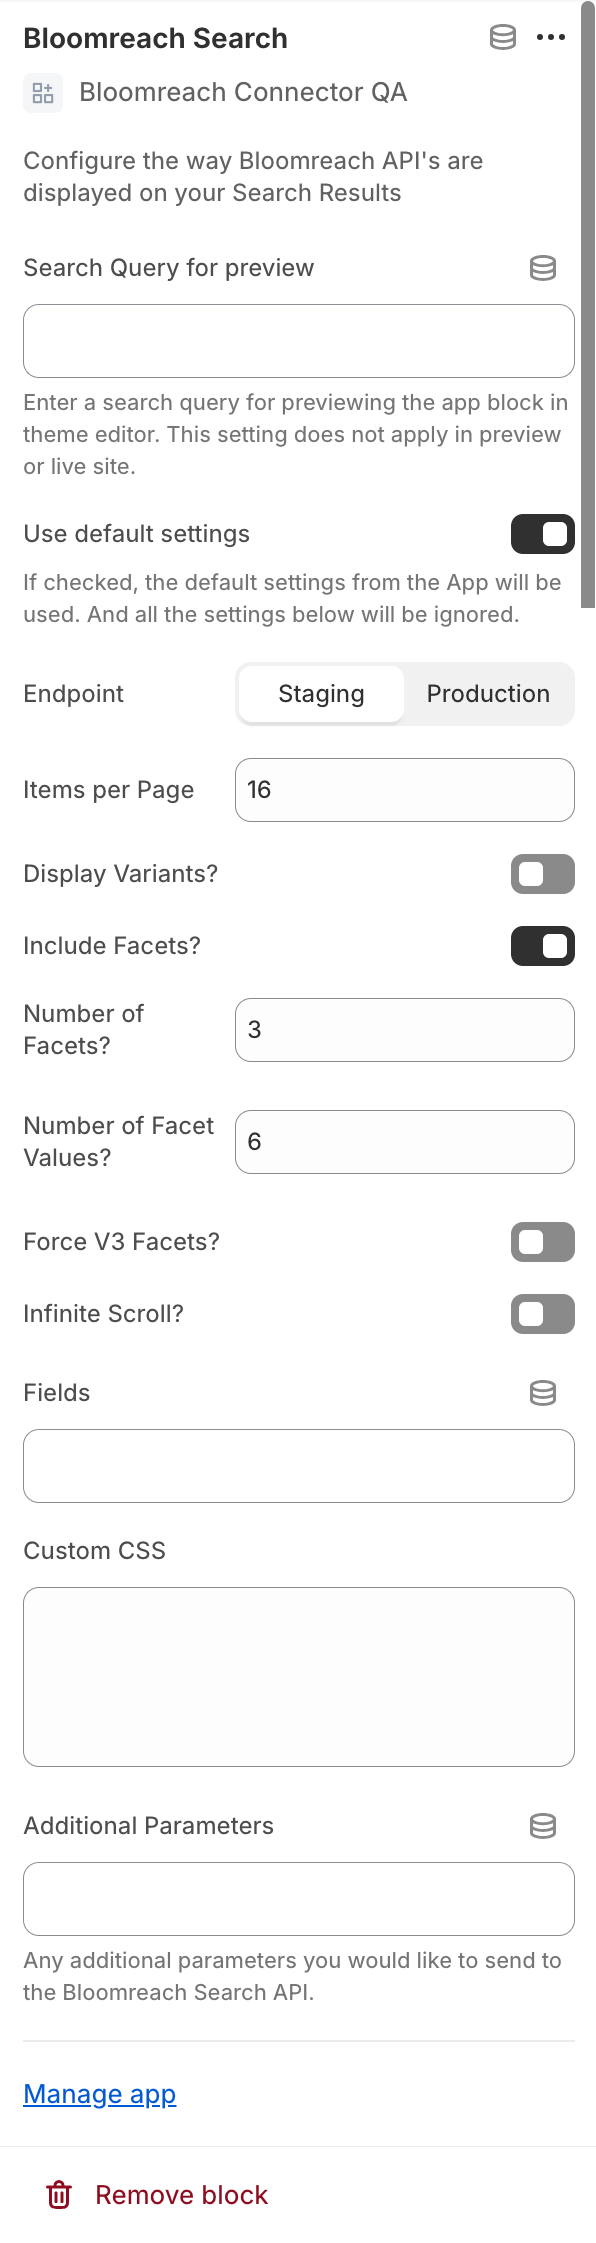
In each app block, you can choose to use the default settings (configured in the app) or override them with settings in that app block. In addition, you can set the following option only in the Bloomreach Search app block:
- Search Query for preview: Bloomreach Search app block works by capturing the search query in the URL. However, in the theme editor, there isn't such a search query available when you switch to the Search page, so the app block would normally render as a blank placeholder. With this option, you can now set a test search query to use in the theme editor only. So it can render the product grid even in editing mode. Naturally, this setting does not affect the preview or live site.
Customize templates
You can customize the templates for Bloomreach search/collections to better suit your storefront design. You can also customize the templates for each Shopify market individually. To do that, navigate to the corresponding page, then go to the Template or Product List Template section:
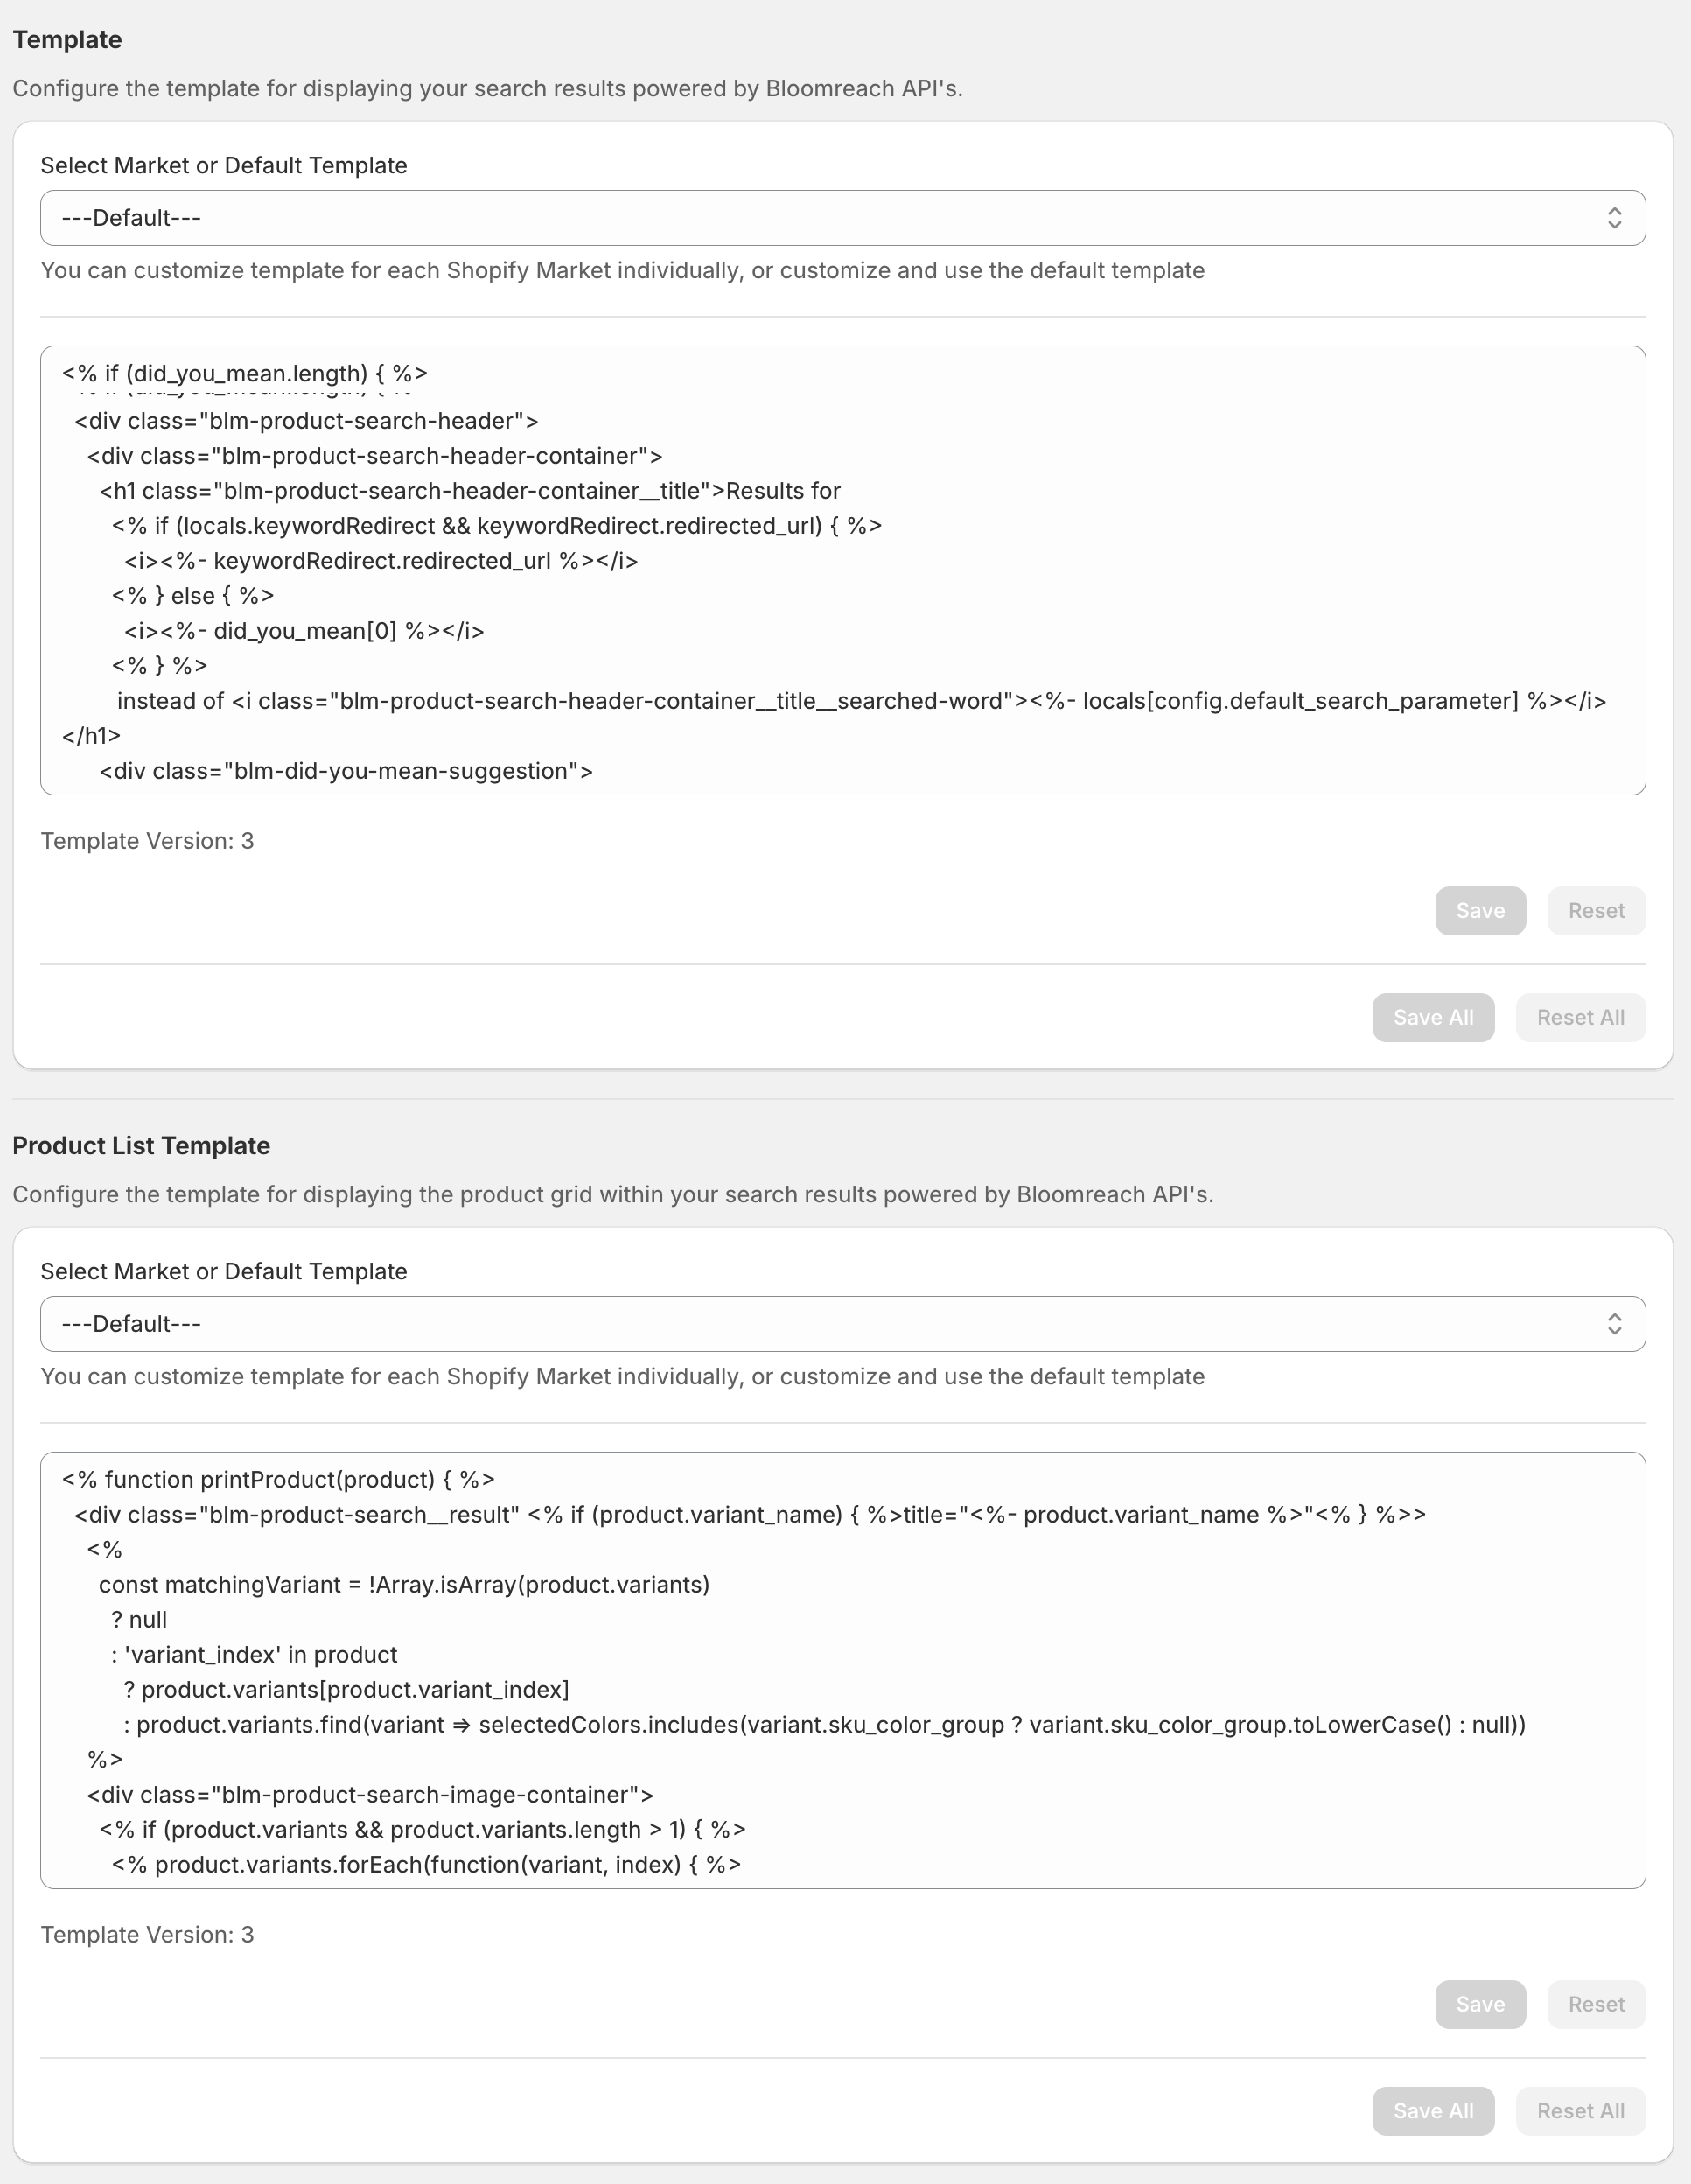
- To customize the default template, choose ---Default--- from the Select Market or Default Template dropdown menu.
- To customize the template for a market, choose the market from the Select Market or Default Template dropdown menu. The primary market for your store is marked by (Primary).
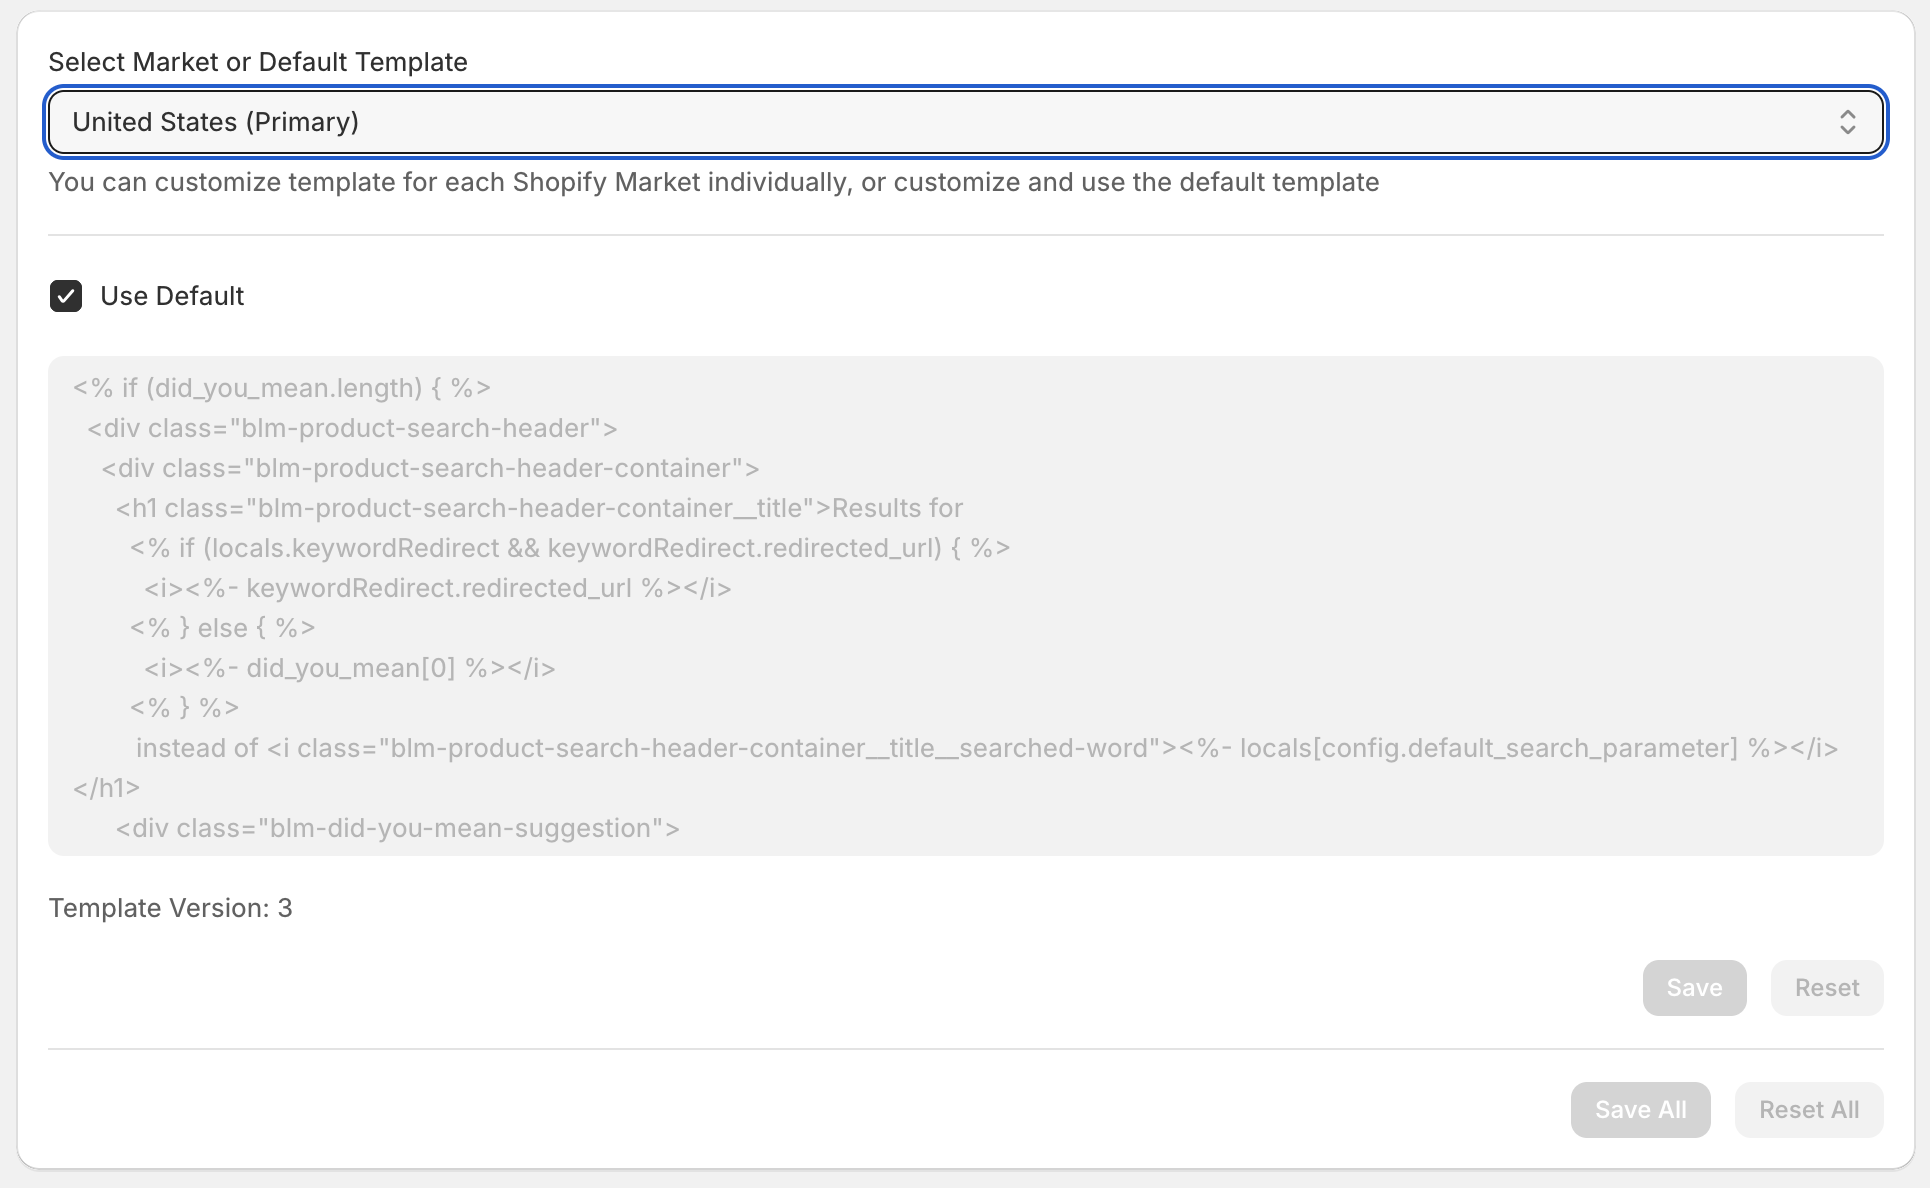
- When customizing the template for a market, you can check the Use Default checkbox to use the default template, or uncheck it to edit the template just for the selected market. By default, all markets are using the default template.
- The Template is used for product grid containers (including facets, sorting dropdown, pagination, etc.), while the Product List Template is used for each item in the product grid.
- The templates are based on EJS format.
When you have finished editing each template in the text box, click the Save or Save All button to persist your changes.
Updating the template version
Bloomreach may release new templates from time to time. Those may contain new features, bug fixes, new API supports, etc. When the app detects a new version for a template, you will be notified with an info box like below:
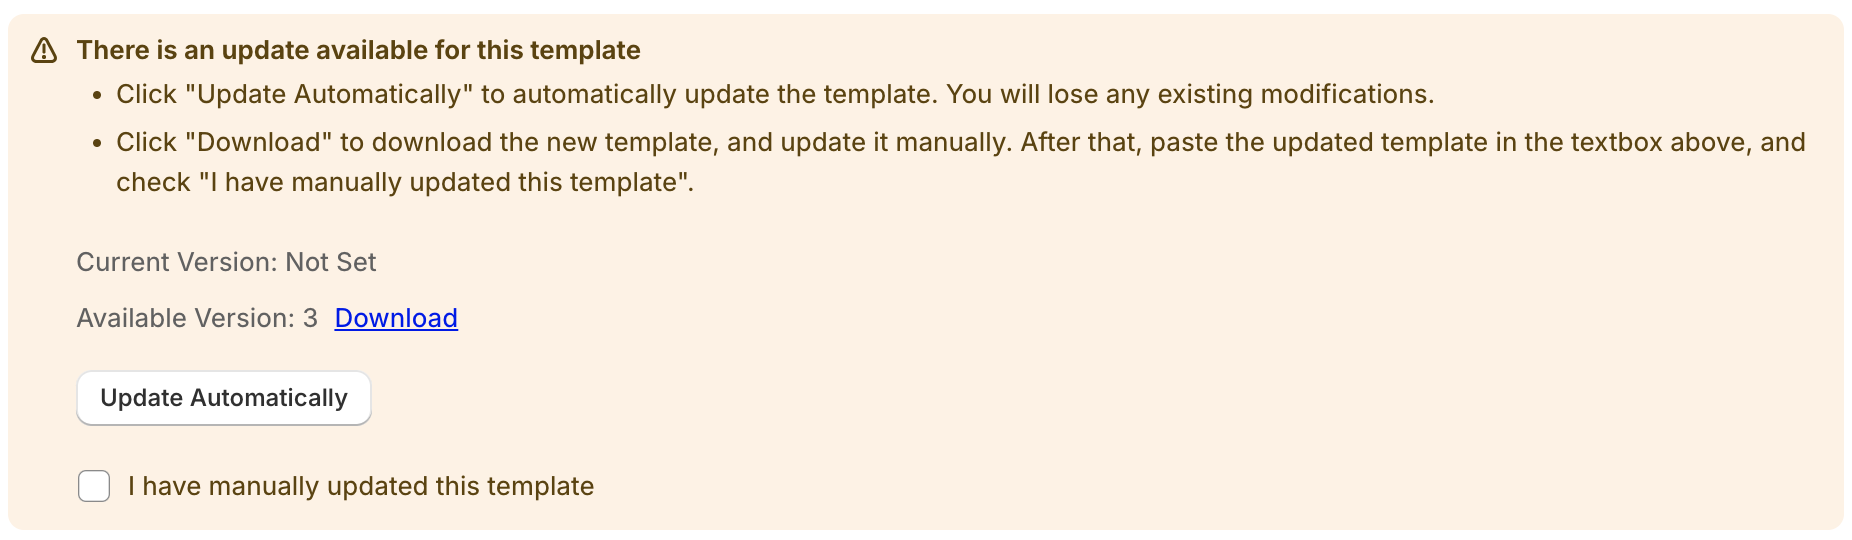
You then have two options to proceed:
- If you haven’t customized this template, or do not want to keep your customization, you can click Update Automatically. Then the new template will overwrite the current template.
- Or, you can click the Download link to download the new template, and customize it offline to fit your needs. After that, paste your updated template to the textbox, and check I have manually updated this template. Then click the Save button to persist your changes.
AttentionIt is NOT recommended to ignore this notification and continue using your old template. You may experience issues in your storefront.
Autosuggest
Automatically enable on a theme
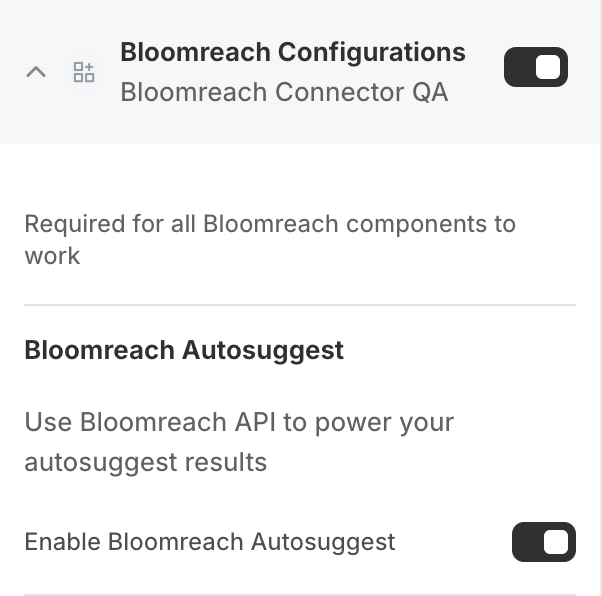
To customize and start using the Bloomreach Autosuggest feature, navigate to the Autosuggest page, and click on the Enable Bloomreach Configurations Embed Block button:

Next, in the opened theme editor, under Bloomreach Configurations app embed, turn on Enable Bloomreach Autosuggest, and click Save:
Manually enable on a theme
You can also enable Bloomreach Autosuggest feature manually on any theme. To do that:
- Follow the instructions to manually enable Bloomreach Configurations App Embed.
- Same as the automatic way, turn on Enable Bloomreach Autosuggest in the app embed, and click Save.
Customize autosuggest settings
In the app, you can customize the default autosuggest settings, or settings for each market individually.
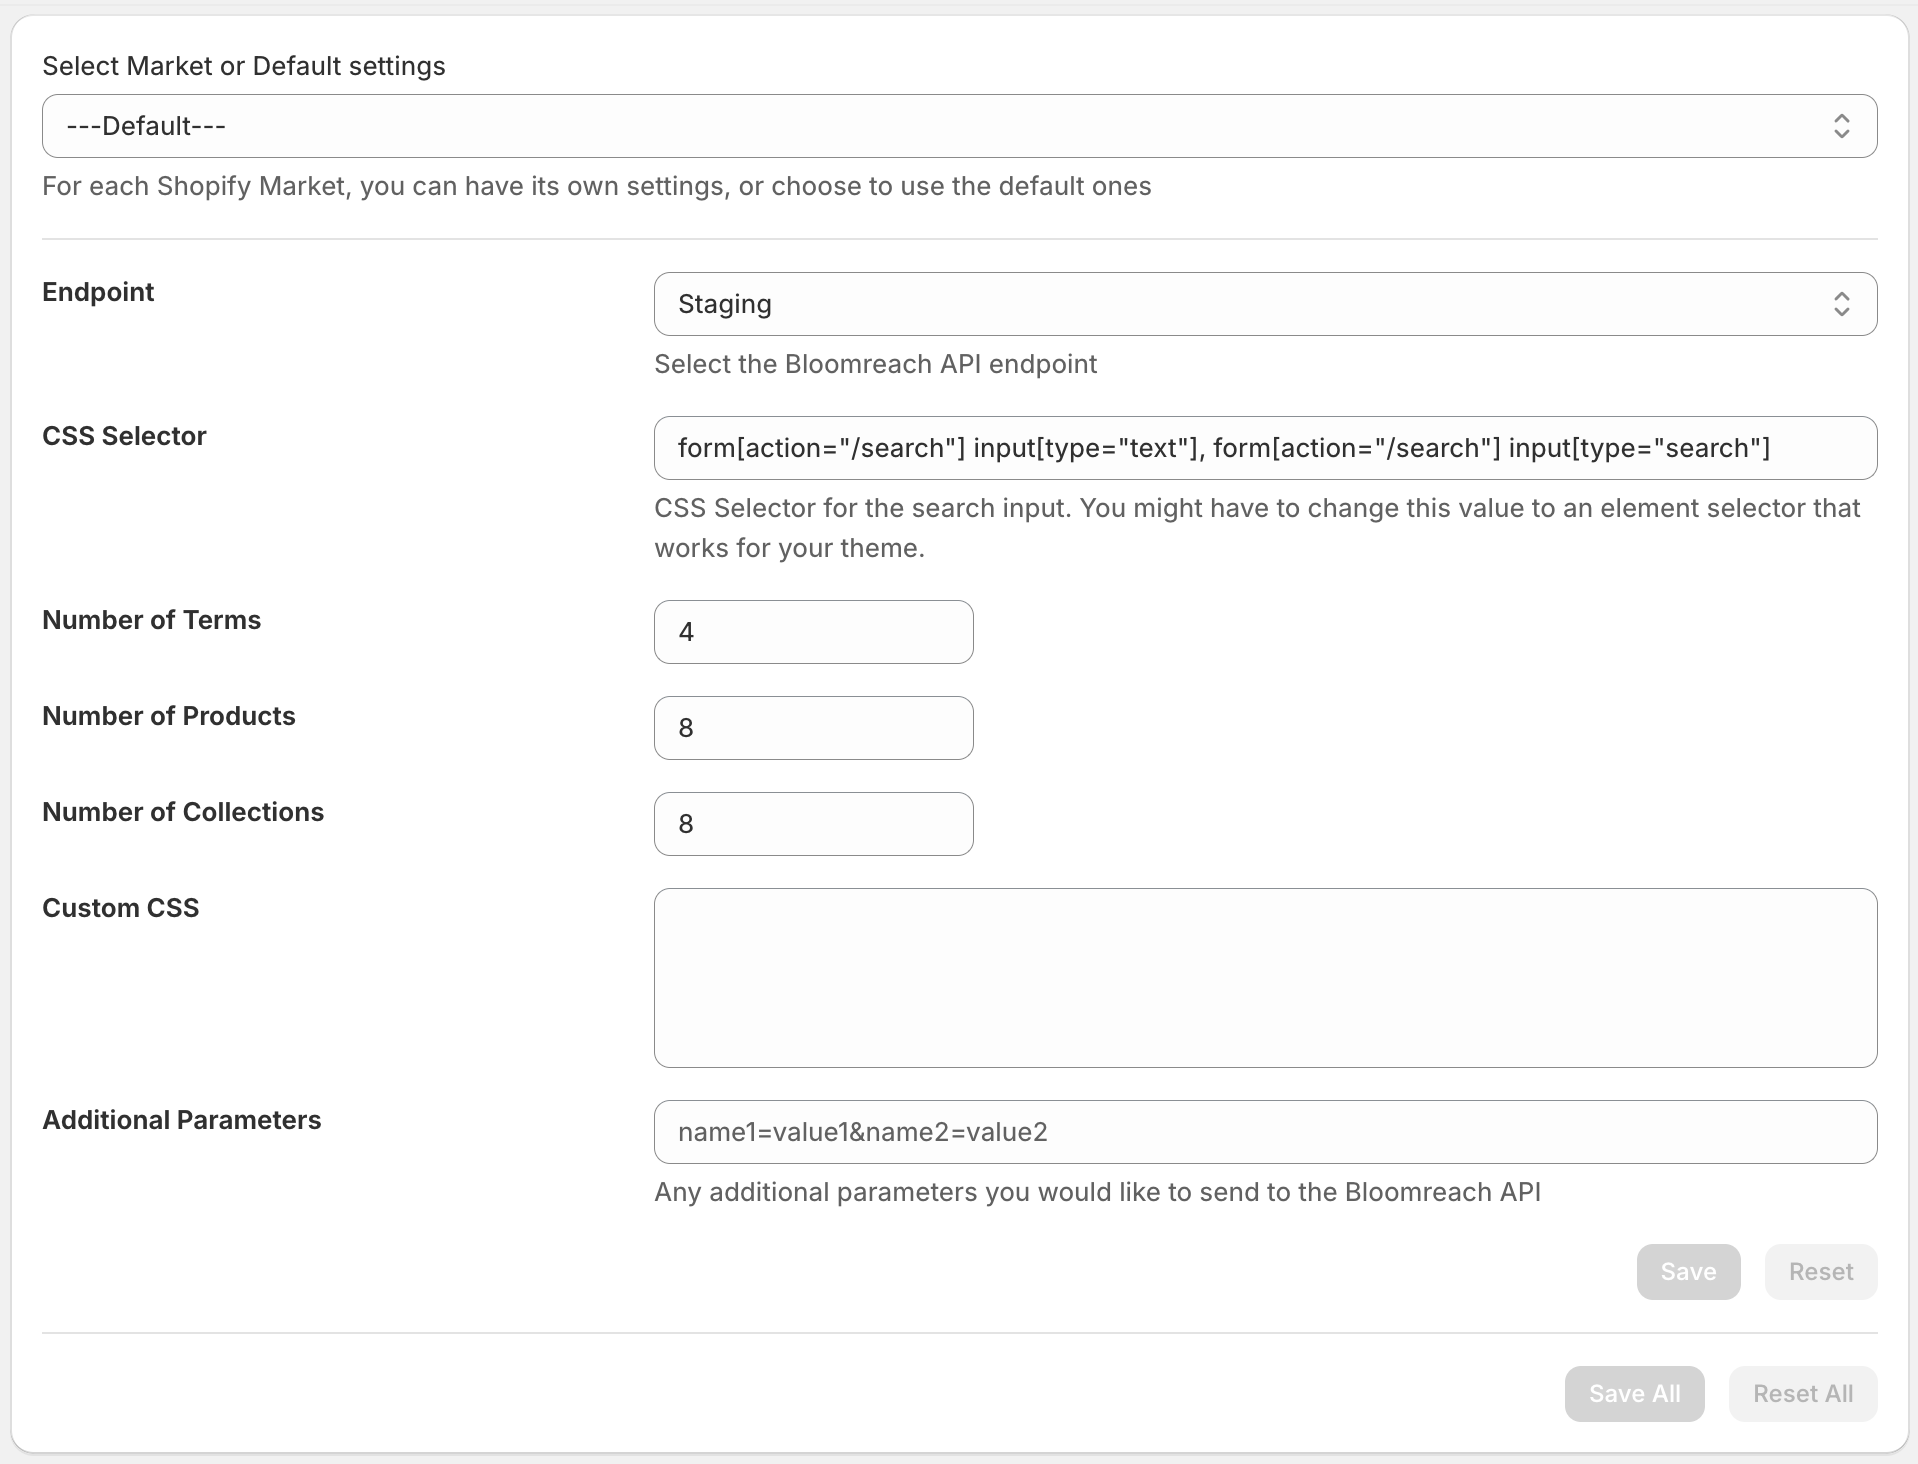
- To customize the default settings, choose ---Default--- from the Select Market or Default settings dropdown menu.
- To customize the template for a market, choose the market from the Select Market or Default settings dropdown menu. The primary market for your store is marked by (Primary).
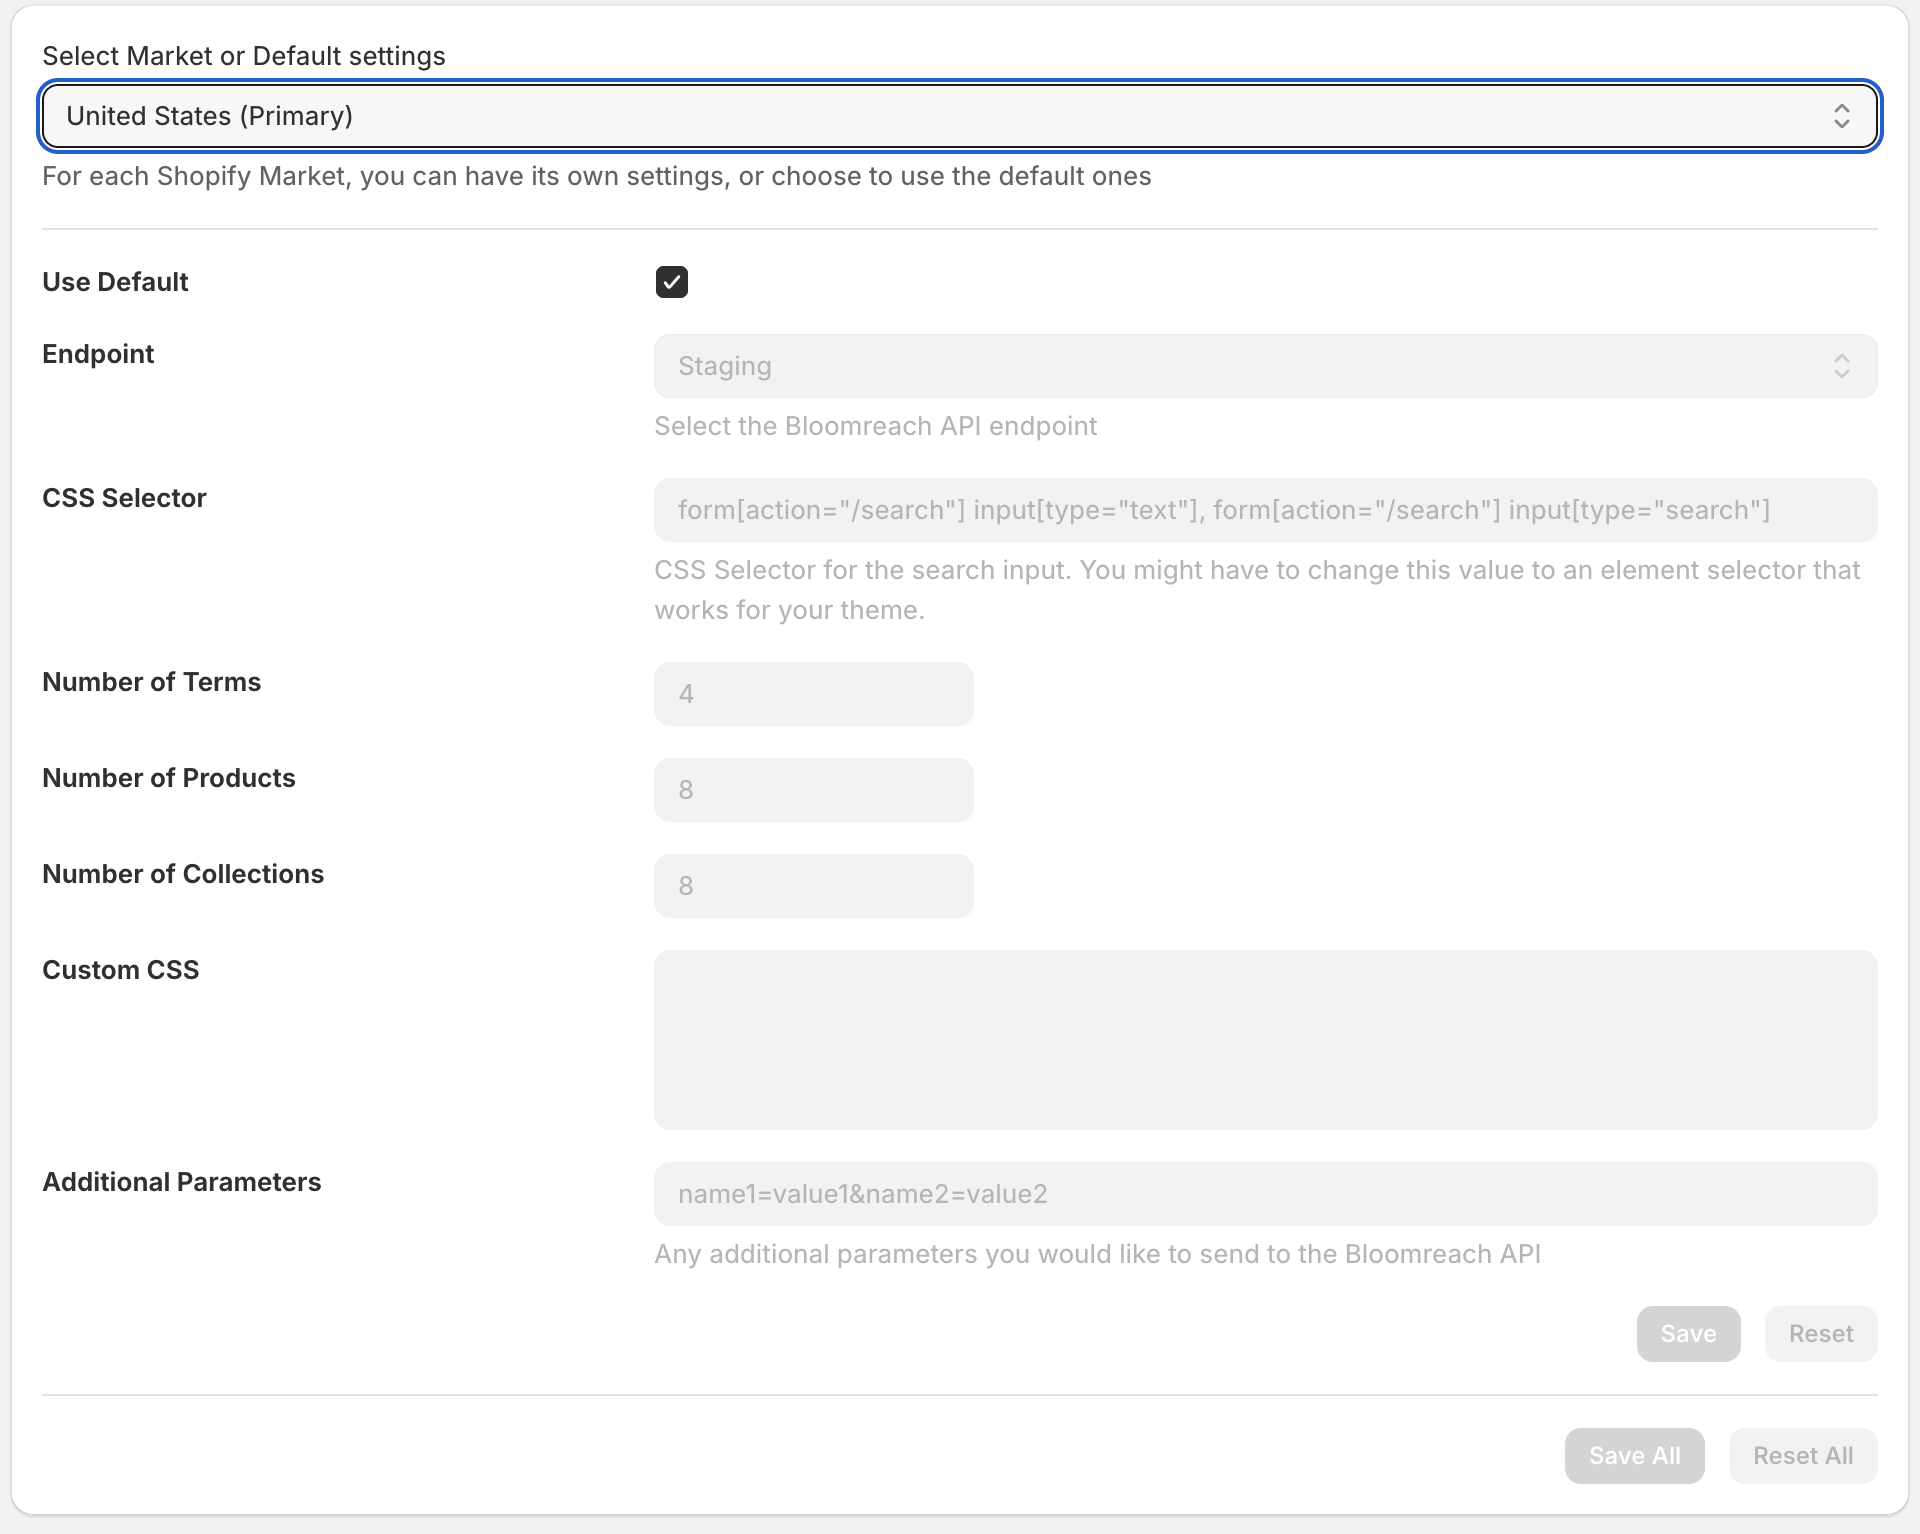
- When customizing the settings for a market, you can check the Use Default checkbox to use the default settings, or uncheck it to edit the settings just for the selected market. By default, all markets are using the default settings.
You can customize the following autosuggest settings:
- Endpoint - Choose the Bloomreach Endpoint for autosuggest. Can be either Staging or Production.
- CSS Selector - Set the CSS selector for the search input box you wish to use Bloomreach Autosuggest.
- Number of Terms - Set the number of terms you wish to display in the suggested result.
- Number of Products - Set the number of products you wish to display in the suggested result.
- Number of Collections -Set the number of collections you wish to display in the suggested result.
- Custom CSS - Add custom CSS to alter the look of the autosuggest feature.
- Additional parameters - Set additional parameters that will be sent to Bloomreach autosuggest API.
Customize templates
Similar to the Search/Collections, you can customize the template for Bloomreach autosuggest to better suit your storefront design in the Template section. You can also customize the autosuggest template for each Shopify market individually. The template is used for displaying the autosuggest dropdown box and is based on EJS format.
When you have finished editing the template in the text box, click the Save or Save All button to persist your changes.
Update template version
Likewise, when you see the notification that a new template version is available, you can choose one of the two options:
- If you haven’t customized this template, or do not want to keep your customization, you can click Update Automatically. Then the new template will overwrite the current template.
- Or, click the Download link to download the new template, and customize it offline to fit your needs. After that, paste your updated template to the textbox, and check I have manually updated this template. Then click the Save button to persist your changes.
AttentionIt is NOT recommended to ignore this notification and continue using your old template. You may experience issues in your storefront.
Recommendations
NoteMake sure you have enabled Bloomreach Configurations App Embed Block
Automatically add a widget to a theme
To customize and start using the Bloomreach Recommendations feature, navigate to the Recommendations page, and click on the Add Bloomreach Recommendations App Block dropdown. You can then select a widget from the menu. It will open the Shopify theme editor in a new tab and add the widget app block to your working theme.
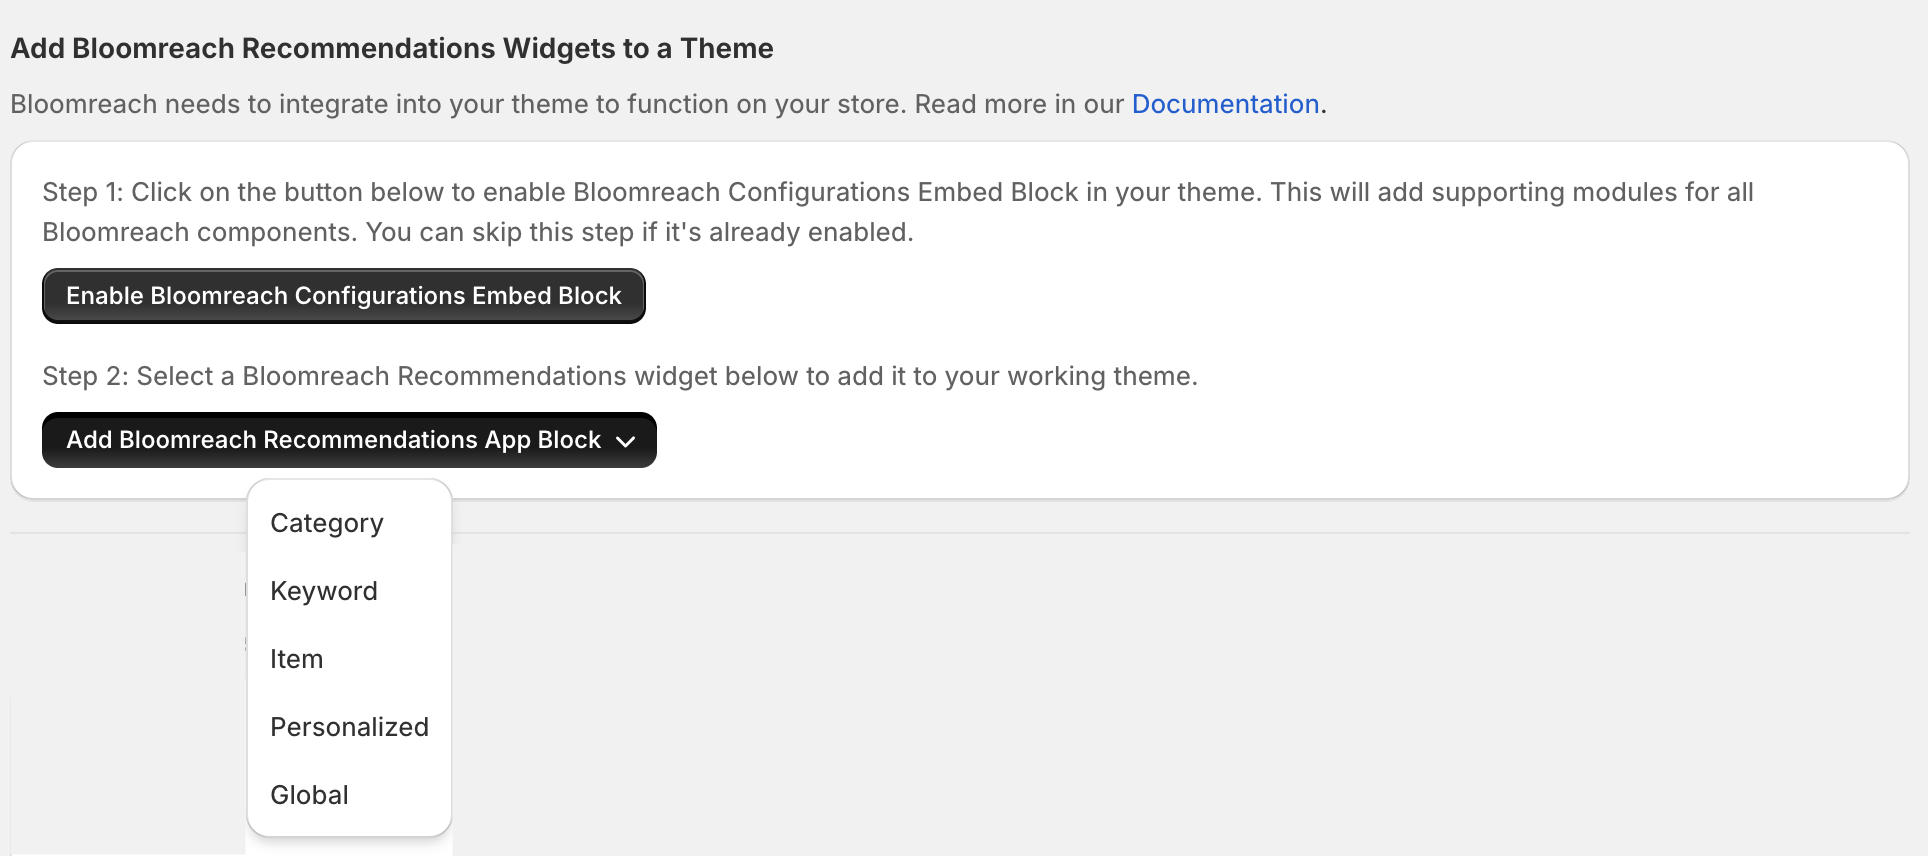
The app supports five widget types:
- Category
- Global
- Item
- Keyword
- Personalized
For example, if you have selected Category, a Bloomreach Category Widget will be added to the Home page by default. You can move the widget around in the page, or duplicate/hide/remove it just like any other Shopify app blocks in the theme editor.
Manually add a widget to a theme
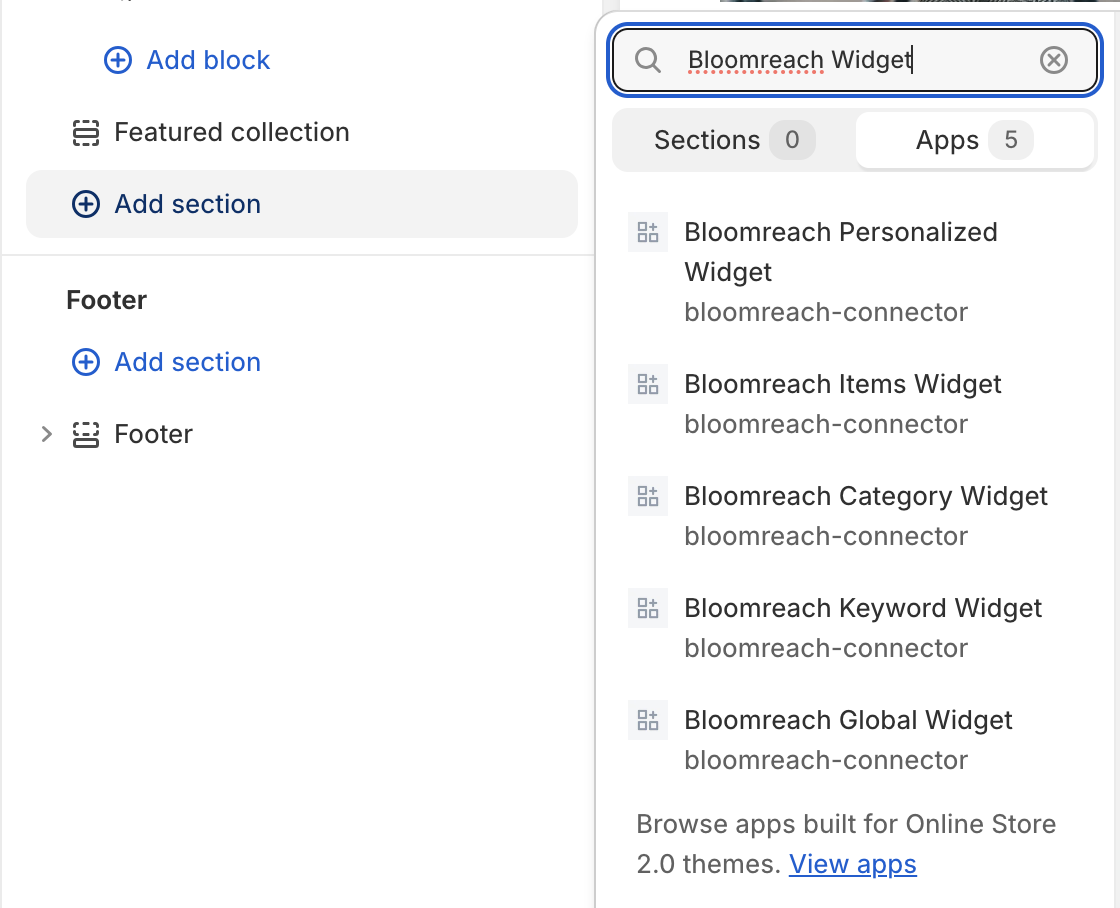
You can also manually add a Bloomreach Recommendations widget app block to a theme. To do that:
- Go to Shopify Themes, and click Customize next to a theme (it's recommended to customize an unpublished theme).
- (Optional) Switch to the page where you wish to add the widget using the page selector.
- In the theme editor, click the Sections icon.
- Click Add section, Apps, and then Bloomreach [widget type] Widget.
Customize default settings
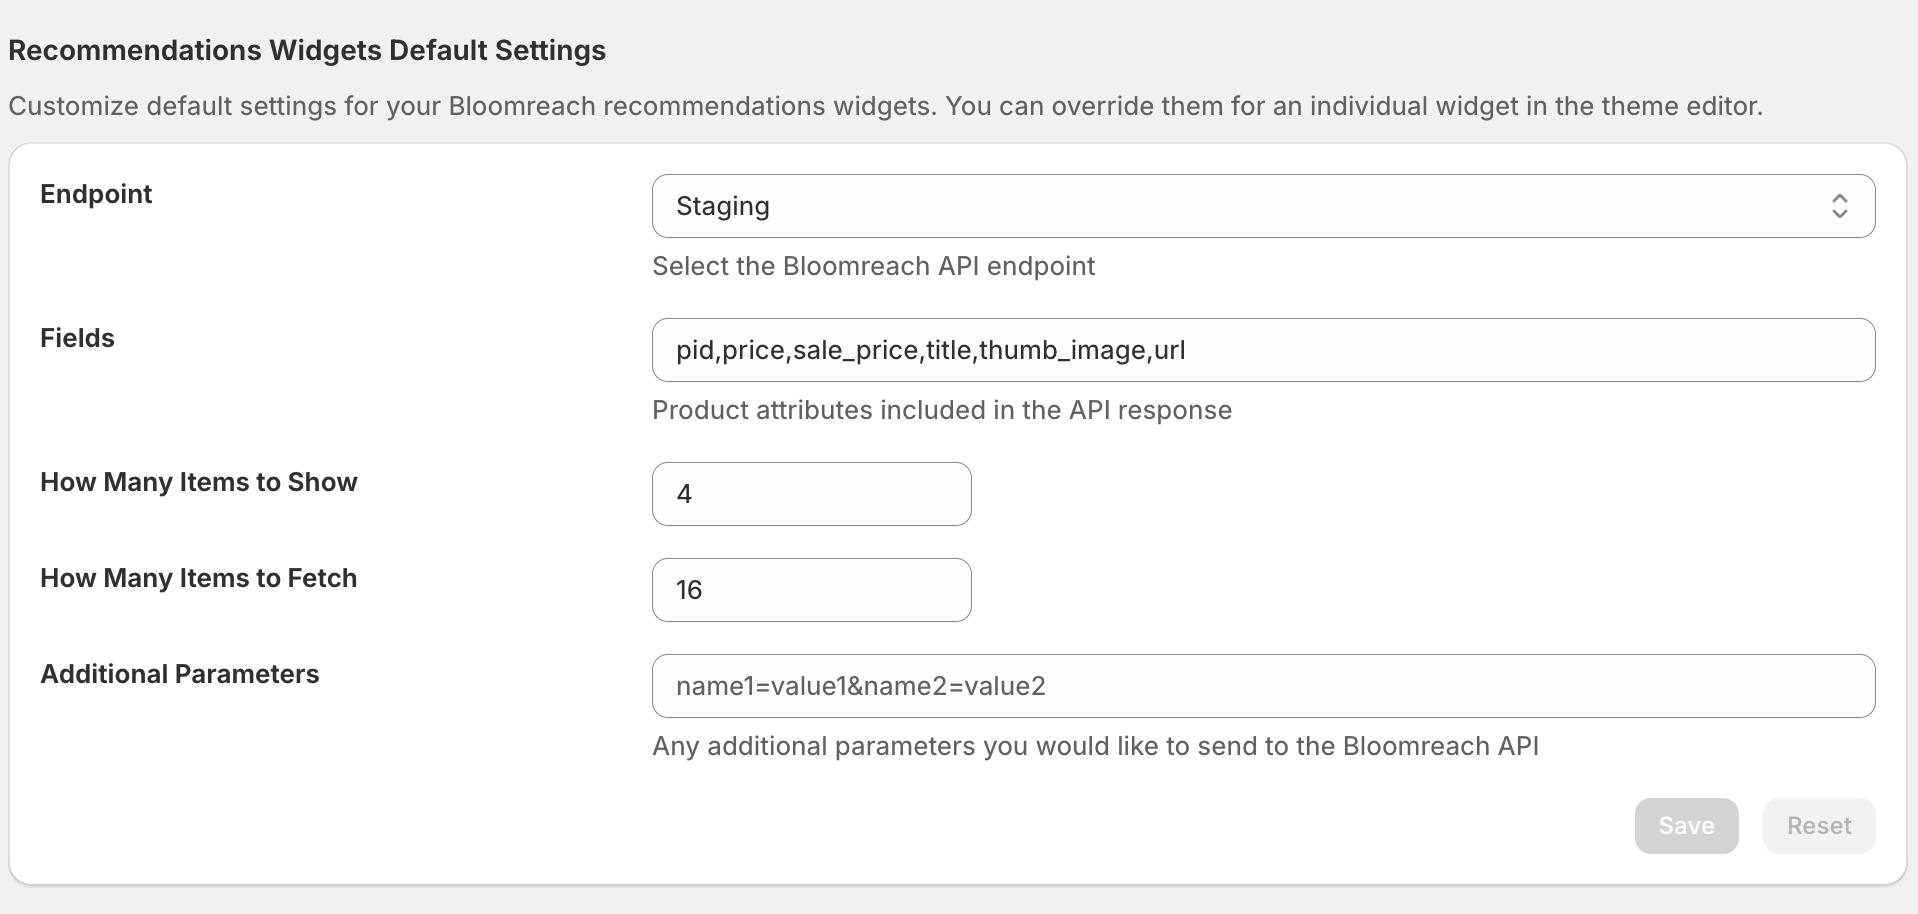
You can customize the default settings for the following options in the app. They will apply if you choose to use default settings in the app block.
The following options apply to all widgets in your store, and can only be customized in the app’s Recommendations page:
- Endpoint: Choose the Bloomreach Discovery endpoint for the widgets. This can be either Staging or Production.
- Fields: Set the product attribute fields that you want returned from Bloomreach, such as product IDs and prices.
- How Many Items to Show: Set the number of items to display initially in each widget.
- How Many Items to Fetch: Set the number of items to fetch totally for each widget.
- Set Additional Parameters that will be sent to Bloomreach Pathways & Recommendations API.
Customize settings for each widget app block
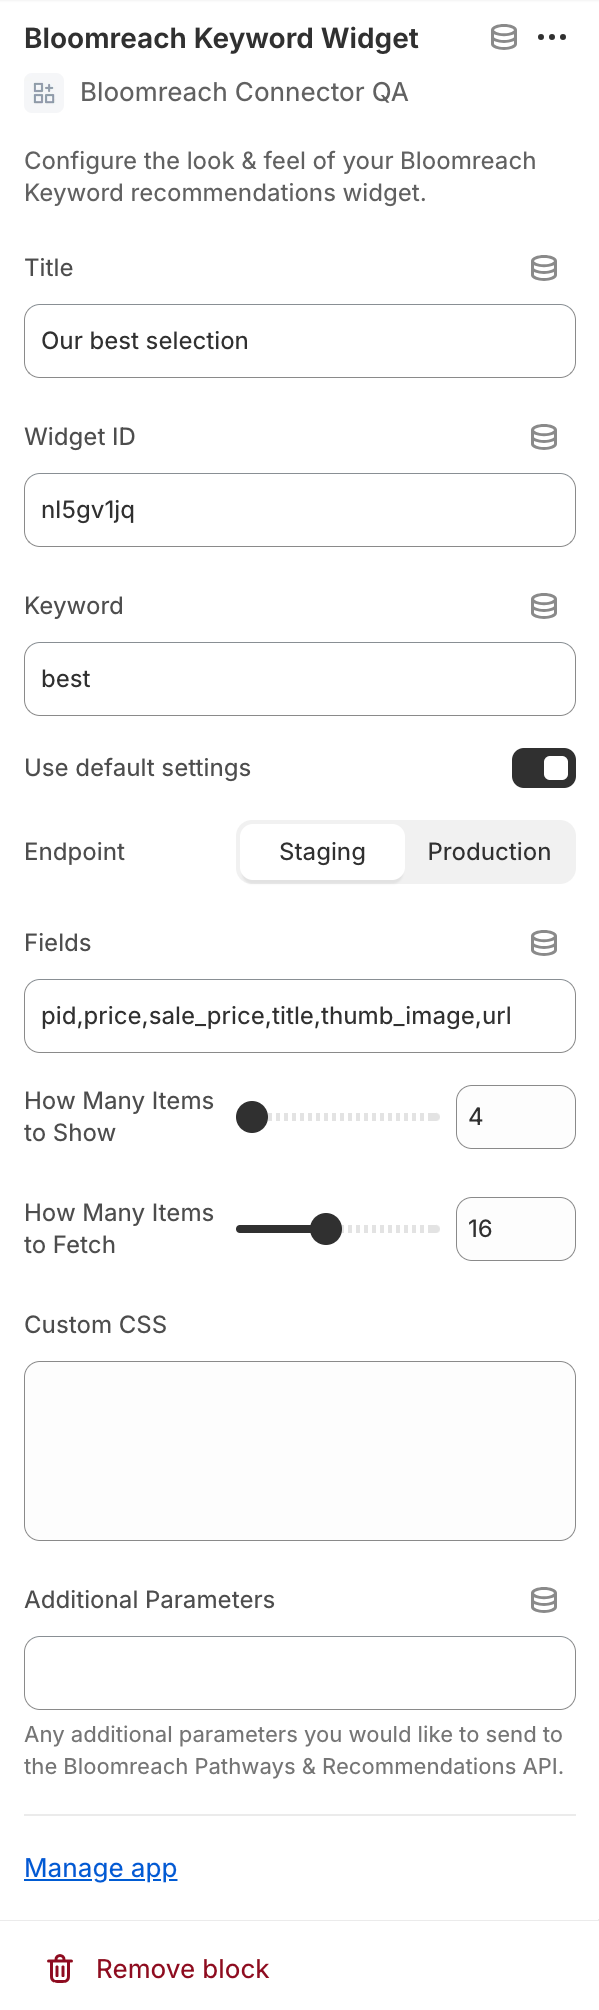
Showing settings for an Item Widget
In each app block, you can choose to use the default settings (configured in the app) or override them with settings in that app block. In addition, you can set the following options depending on the widget type:
| Widget type | Customization options |
|---|---|
| Category | |
| Global | |
| Item | |
| Keyword | |
| Personalized |
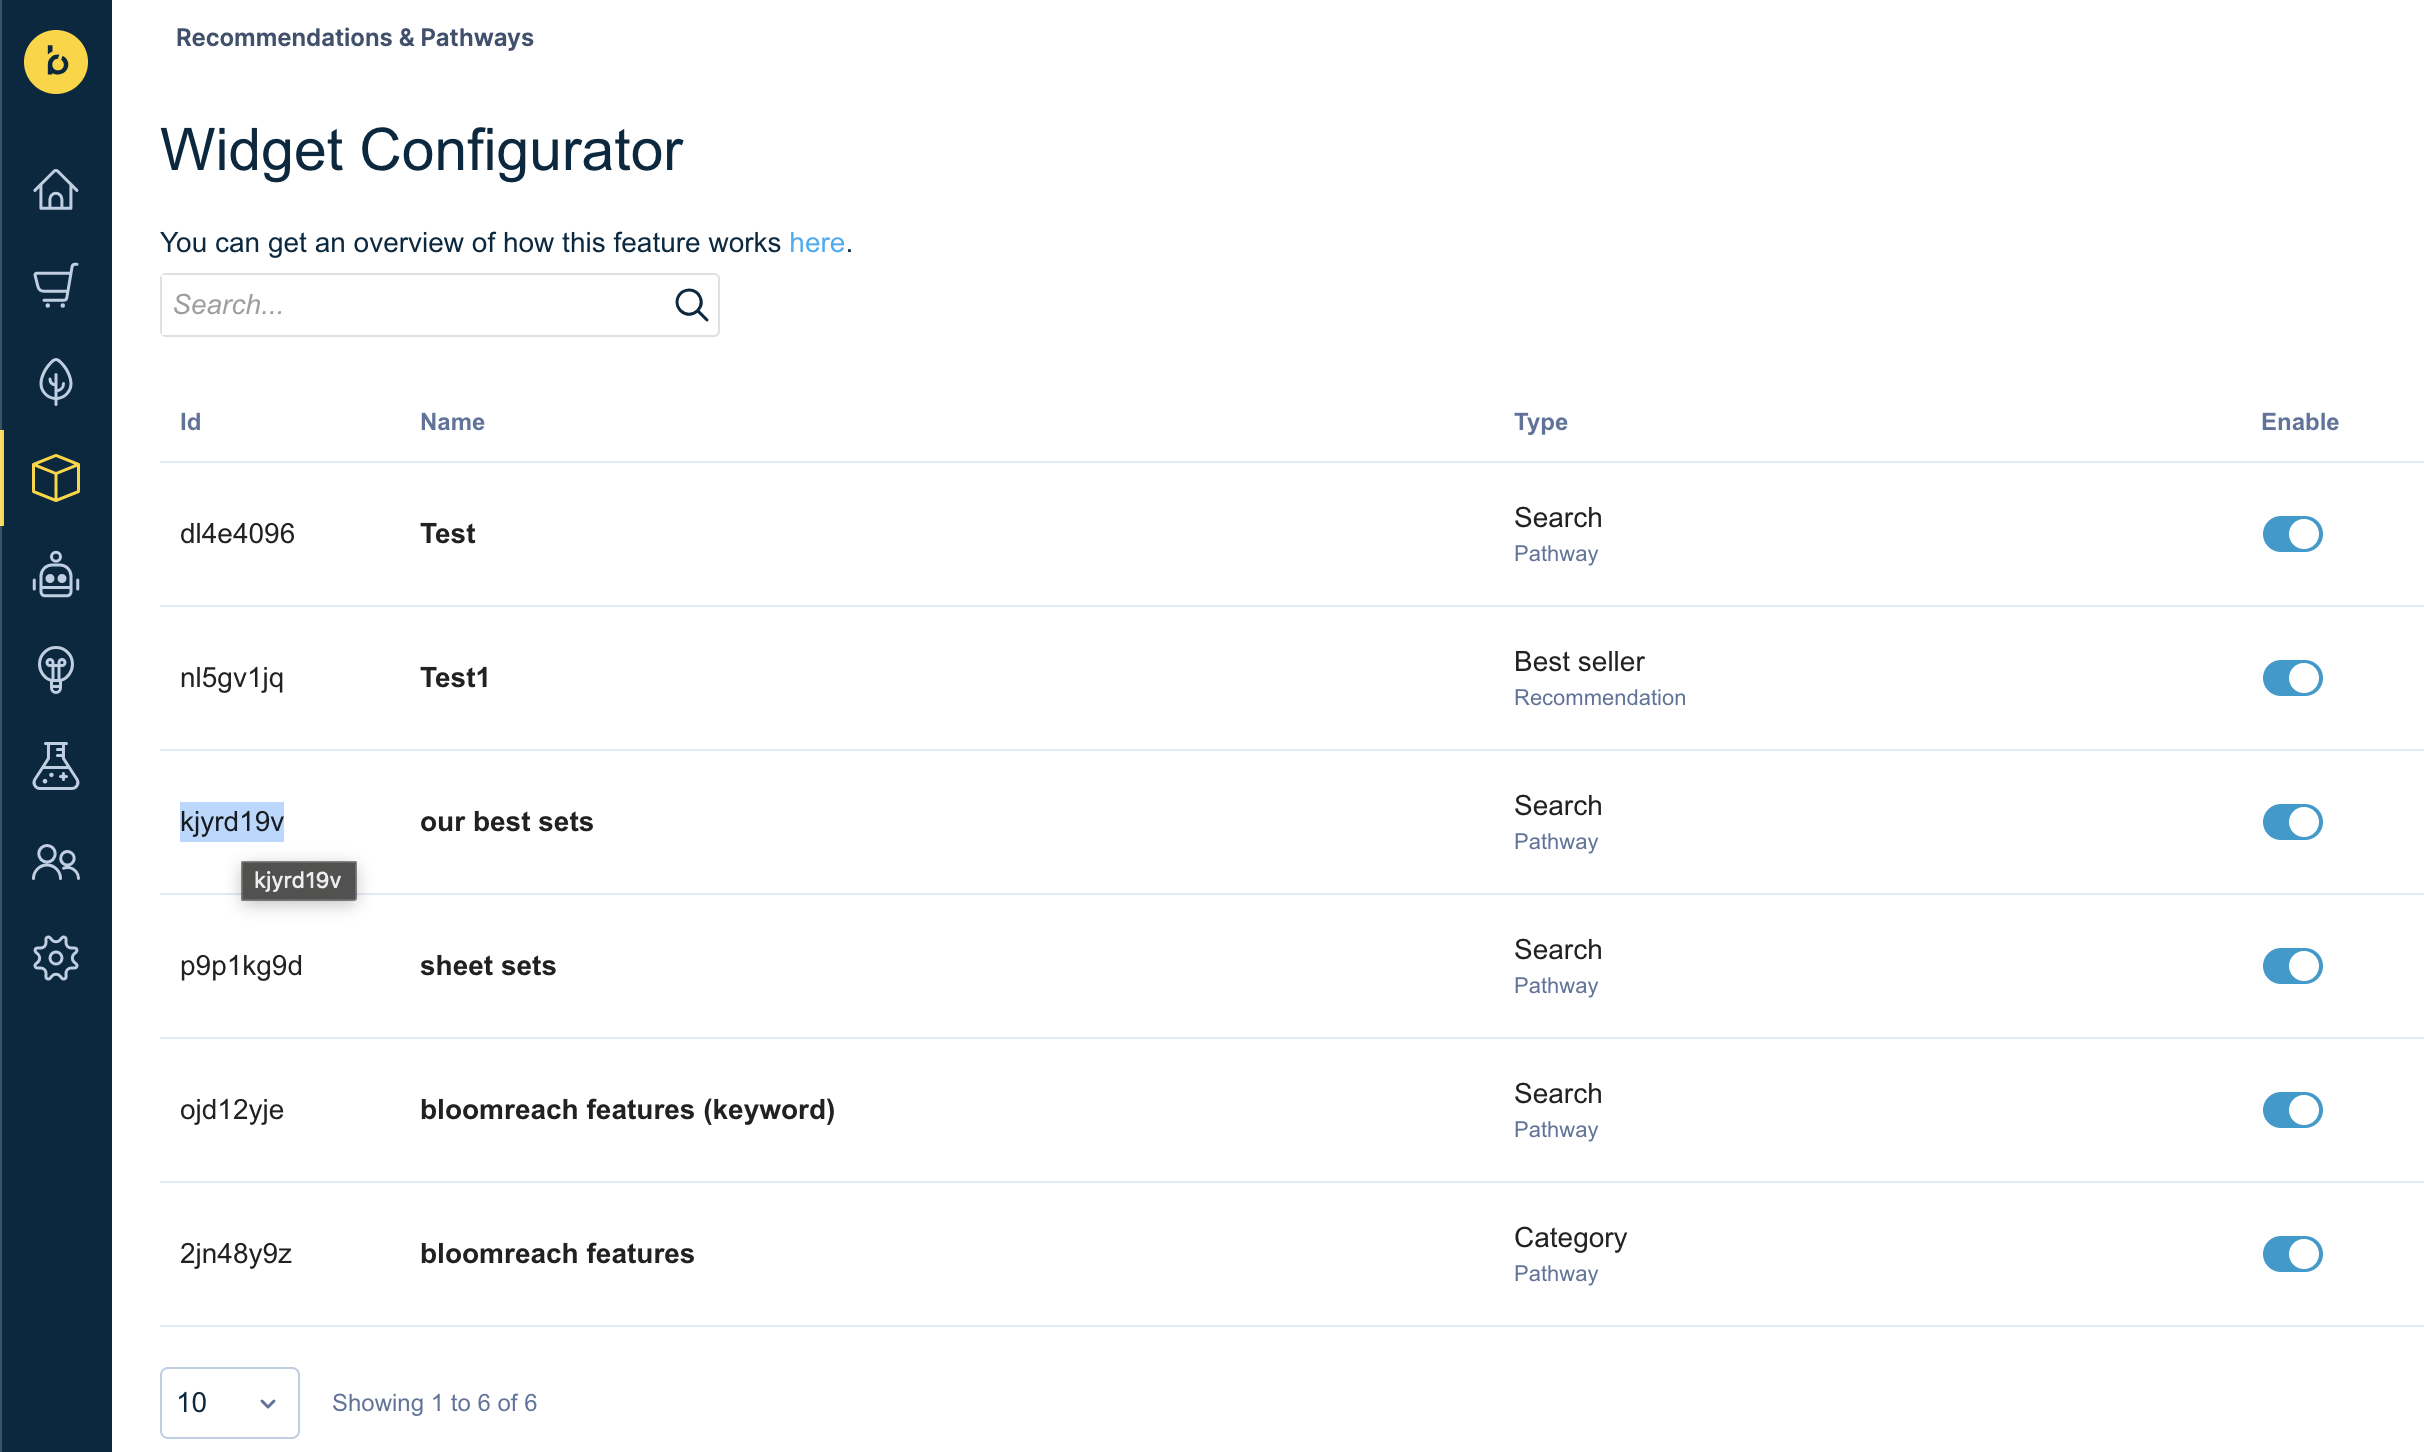
IMPORTANT: You must pair the widget added in Shopify to a widget you’ve created in the Bloomreach Dashboard using the Widget ID property. You can find it in the Bloomreach dashboard.
NoteAll widgets rely on information provided by the tracking pixel. If the pixel is not enabled for your store, your widgets will not display properly.
Customize templates
Similar to the Search/Collections, you can customize the template for Bloomreach Recommendations widget to better suit your storefront design in the Template section. You can also customize the recommendations template for each Shopify market individually. The template is based on EJS format.
When you have finished editing the template in the text box, click the Save or Save All button to persist your changes.
Pixel
Automatically enable on a theme
To start using the Bloomreach Pixel feature, navigate to the Pixel page, and click on the Enable Bloomreach Configurations Embed Block button:
Next, in the opened theme editor, under Bloomreach Configurations app embed, turn on Enable Bloomreach Pixel, and click Save:
Manually enable on a theme
You can also enable the Bloomreach Pixel feature manually on any theme. To do that:
- Follow the instructions to manually enable Bloomreach Configurations App Embed.
- Same as the automatic way, turn on Enable Bloomreach Pixel in the app embed, and click Save.
Customize pixel settings
Once enabled, the app will inject the pixel into your theme. The pixel will track users as they navigate and interact with your site. This information is passed back to Bloomreach and adds behavioral learning data to the Bloomreach algorithm.
In addition, you can customize the following options in the app embed settings:
- Enable debug mode: Flag the pixel data as test data for real-time debugging purpose. You can track debug events using Integration mode in Bloomreach Dashboard's Events Management. Note that debug events are discarded and don’t impact any production features. So you should turn this option off on your live site.
- Pixel Region: Define to which region the pixel should send the pixel data. The region is depending on what region your account is provisioned in: North America or Europe
- Product ID field: Specify the Shopify product field used as the unique product_id (pid) sent in your Bloomreach feed. Can be either handle or id. You should set this option based on your Bloomreach product feed data.
Page View Pixels
The app supports tracking 7 types of page view pixels:
- Home Page View: tracks home page views
- Product Page View: tracks product details page views
- Content Page View: tracks blog and article page views
- Category Page View: tracks collections page views
- Search Result Page View: tracks search result page views
- Conversion Page View: tracks checkout "Thank you" (conversion) page views
- Other Page View: tracks all other types of page views
Data collected by Page View Pixels
On each page view the Bloomreach pixel collects page specific data including:
- Page URL
- Customer ID
- Product ID
- Product SKU
- Product Name
- Order grand total
- Order item info (sku, qty ordered, name, unit price)
- Event type
Event Pixels
The app supports tracking the following types of event pixels:
- Add-to-cart Event: when user clicks an "Add to cart" button (requires customization on the "Add to cart" button)
- Search Event: when user submit a search query
- Suggest Event: when user clicks on a suggested term or product in the autosuggest popup
- Quick View Event: when user opens a product quick view (requires self-implementation of the "Quick view" button)
Search and Suggest events are captured automatically by Bloomreach. However, if you wish to capture Add-to-cart and Quick View events, you will need to make changes to the Add-to-cart and Quick View buttons throughout your themes.
For example, if you are using Shopify’s Dawn theme, you can track Add-to-cart events on your product page by editing the Snippets/buy-buttons.liquid file and adding the following html data attributes to the ProductSubmitButton button:
data-blm-add-to-cart<button
id="ProductSubmitButton-{{ section_id }}"
type="submit"
name="add"
class="product-form__submit button button--full-width {% if show_dynamic_checkout %}button--secondary{% else %}button--primary{% endif %}"
{% if product.selected_or_first_available_variant.available == false or quantity_rule_soldout %}
disabled
{% endif %}
>
<span>
{%- if product.selected_or_first_available_variant.available == false or quantity_rule_soldout -%}
{{ 'products.product.sold_out' | t }}
{%- else -%}
{{ 'products.product.add_to_cart' | t }}
{%- endif -%}
</span>
{%- render 'loading-spinner' -%}
</button><button
id="ProductSubmitButton-{{ section_id }}"
type="submit"
name="add"
class="product-form__submit button button--full-width {% if show_dynamic_checkout %}button--secondary{% else %}button--primary{% endif %}"
{% if product.selected_or_first_available_variant.available == false or quantity_rule_soldout %}
disabled
{% endif %}
data-blm-add-to-cart>
>
<span>
{%- if product.selected_or_first_available_variant.available == false or quantity_rule_soldout -%}
{{ 'products.product.sold_out' | t }}
{%- else -%}
{{ 'products.product.add_to_cart' | t }}
{%- endif -%}
</span>
{%- render 'loading-spinner' -%}
</button>If your theme also supports Quick View, you can repeat the Add-to-cart process and add the following html data attributes to the Quick View button:
data-blm-quickview
data-blm-quickview-sku="{{ product.selected_variant.sku }}"
data-blm-quickview-prod-id="{{ product.id }}"
data-blm-quickview-prod-name="{{ product.name }}"
<button name="quickview">
<span>
{{ 'products.product.quickview' | t }}
</span>
</button><button name="quickview"
data-blm-quickview
data-blm-quickview-sku="{{ product.sku }}"
data-blm-quickview-prod-id="{{ product.id }}"
data-blm-quickview-prod-name="{{ product.name }}"
>
<span>
{{ 'products.product.quickview' | t }}
</span>
</button>Widget Pixels
The app supports tracking the following types of pixels for Bloomreach Recommendations widgets:
- View Event: when a widget is displayed on a page
- Click Event: when user clicks on a product in a widget
- Direct Add-to-Cart Event: when user clicks the "Add to cart" button in a widget (requires custom widget template)
View and Click events are supported by the default Recommendations template. However, the default template does not feature an "Add to cart" button. You can customize the template to add such buttons to the Recommendations widget. And if you wish to capture the Direct Add-to-Cart Event event, you can add the following html data attributes to the buttons:
data-blm-widget-add-to-cartPixel Validator
To validate and inspect the data captured by Bloomreach pixel events, you can:
- Install the Bloomreach Pixel Validator for Google Chrome. For more details on the Pixel Validator, read the Pixel Validator documentation.
- Use the Events Management view to test Pixel Tracking with Debug Events.
Product feed delivery
Please refer to the Data Delivery milestone of the Discovery Technical Integration for guidance on delivering your feed via our Catalog Management APIs.
Our suggested approach is to use the community-developed Shopify Reference Architecture, which includes a set of reference codes that you can download, customize, and host.
This uses the most reliable and fast mechanism to pull the product feeds out of Shopify's Bulk Operations endpoint.
Migration from v1.x
Changes from v1.x
The v1.x versions of the Bloomreach Discovery Shopify App was using Shopify’s deprecated legacy Asset API to edit themes. However, When Apps are injected directly into themes using the assets API, merchant themes can no longer get updates with the latest features. In addition, they do not have an easy way to uninstall the snippets of code that apps have left behind, even after uninstalling, leading to slower storefront performance. Starting from 2023, Shopify asked all who are using Asset API to make changes to theme files, to transition to Theme App Extensions to ensure a better and safer merchant experience. As a response to this requirement, Bloomreach rewrote the app to use the new Theme App Extensions for adding Bloomreach components to your themes. This resulted in the following changes:
- v2 only supports Online Store 2.0 themes. If you are using a vintage theme and don’t wish to upgrade, you can still use the v1.x version of the app.
- Most of the component settings (such as CSS selector, number of items, etc.) have been moved from the app’s UI to the theme editor. You can use App embeds (for non-widget components) and App blocks (for recommendations widgets) to manage them in themes. For more information, please refer to Shopify’s official documentation. Some complex settings such as template management however, are still retained in the app’s UI. This is to ensure the best user experience.
- Because of the drastic changes in the app’s architecture and data storage, it’s not possible to update your v1.x app automatically to the latest version. Therefore we released v2 as a separate app to be installed. And you can follow the migration guide below for transitioning from v1.x.
Migration steps
Please follow the steps below to migrate your data from v1.x to v2:
NoteAs a safety measure, always backup your themes before making any changes. You can do that by duplicating or downloading the theme. It’s also a best practice to test your changes in a test store before applying it in production.
- Make a duplication of the theme(s) that you have edited with the v1.x app. They will later be used as a reference to reapply the changes.
- Install v2 version of the app following the installation instructions.
- Fill in your Bloomreach account details in the new app (you can also copy them from v1.x).
- If you have customized any templates, copy them to the corresponding places in the v2 app. You can follow the instructions for each component in Configuring the app.
- Uninstall the v1.x app. Make sure you have completely removed all files from the original themes. If you have any customization, make sure to revert them too. However, leave the duplicated themes from step 1 untouched.
- Use the duplicated themes from step 1 as reference, reapply the components and widgets to the original themes. You can follow the instructions in Configuring the app for each component/widget. Unlike the v2 app, the v1.x app only manages settings. So even if it was uninstalled, the components and widgets were left behind in the themes unless you chose to remove them.
- Fully test the themes with reapplied components and widgets. If everything seems good, you can delete the duplicated themes.
FAQs
How to disable the default Shopify autosuggest dropdown
After enabling the app, users can occasionally see both the default Shopify autosuggest & the Bloomreach Autosuggest on their frontend. Each Shopify theme handles the Shopify autosuggest slightly differently. To avoid this, we recommend hiding the predictive search overlay.
For example, if you are using Shopify’s Dawn theme, you can hide the default Autosuggest overlay by adding the following Custom CSS:
predictive-search .predictive-search { display: none !important; }Why am I seeing an empty widget with no products?
Widgets fetch product data (from your Bloomreach catalog(s)) via client side JavaScript. Because this process happens client side (in your browser) if there are breaking errors in your JavaScript code (unrelated to the connector) you could see an empty result set within some of your widgets.
If you have any concerns related to the functionality of the connector, try to make sure that you don't have any console errors in the browser before raising an issue with our support team.
Change Log / Release Notes
2.2.18
Sale Price Filtering
Merchants can now choose to use sale prices (instead of regular prices) for price range filters and sorting on Search and Category pages. When enabled, shoppers will see price filters and sort options based on the actual discounted price — making it easier for them to find products within their budget during sales or promotions.
To enable: go to App Settings → Search/Category → Use Sale Price.
Compatibility with Shopify's Latest API (January 2026)
Updated internal API calls to align with Shopify's latest platform requirements. No action needed — this ensures the connector continues to work reliably on all Shopify stores.
2.2.17
Beta Features toggle
A new toggle in App Settings lets merchants opt into beta features currently in testing. The first beta capability it unlocks is improved sort state management: the active sort option is now persisted in the URL and the default sort order is applied correctly on first page load.
2.2.16
Custom Sorting Options
Fixed a bug where custom sort configurations (defined in the theme block) were not being applied correctly due to a missing JSON filter in the Liquid templates.
2.2.15
Pagination Scroll Behavior
Fix for page scroll behavior when navigating between result pages. Clicking pagination no longer causes the viewport to jump to an unexpected position.
2.2.13
Product Thumbnail Images
Fixed an issue where product thumbnail images were not rendering correctly in search and category results.
2.2.12
Scroll Position After Filtering
After applying a filter, the page now scrolls back to the correct position in the product grid instead of jumping unexpectedly.
2.2.11
Price Filter on Collections Pages
Additional fix for the same price filter bug on Collections pages specifically (rapid filter clicks causing stale price data in the API call).
2.2.10
Price Filter Reliability
Fixed two bugs where the price filter would get "stuck" in search requests after clicking filters quickly — affecting both Search and Category pages. Also fixed the "Clear All" button to properly reset price filters.
Autosuggest Template Customizations
Custom autosuggest templates were reverting to default when the search box lost and regained focus. This is now fixed.
2.2.9
Fixed page scroll position after changing filter(s) so the shopper remains at the expected place on search and collection pages.
2.2.8
Fixed sorting on search and category pages
2.2.6
Event dispatcher for other Apps:
/**
*
* The Bloomreach search module dispatches a custom event 'bloomreach:searchResults:updated'
* whenever search results are redrawn. Other apps (like wishlist) can listen for this event
* to know when to reinitialize their functionality on the new product tiles.
*
* Example usage in another app:
*
* // Listen at document level
* document.addEventListener('bloomreach:searchResults:updated', function(event) {
*   console.log('Search results updated, refreshing app components');
*   console.log('Number of products:', event.detail.resultsCount);
*
*   // Re-initialize your app's functionality for the updated search results
*   initializeWishlistHearts();
* });
  */
2.2.1
Settings for pixel to toggle region: EU or US
2.2.0
- Added support for Bloomreach Discovery multi-catalog and multi-view, based on Shopify Markets.
- Allow default configurations in the App for Search, Collections, Autosuggest, and Recommendations components.
- Allow market-specific configurations in the App for Autosuggest components.
- Allow market-specific templates for all components. Existing templates are treated as defaults.
- Changed Search and Collections components from App Embeds to App Blocks. Their App Block configurations can override the default ones from the app, similar to how Recommendations widgets work.
- Combined Autosuggest and Pixel App Embeds to one "Bloomreach Configuration" App Embeds, which functions as a master switch for all Bloomreach components. This avoids repeated defining of the global config object.
- Moved Autosuggest configs to the app. This allows per-market configurations.
- Changed pixel implementation to use Shopify Webpixels. This removes the needs for custom scripts in checkout pages (for conversion pixels).
- Other usability changes.
- Fixed Infinite scroll issues.
2.1.1
- Fix customized Autosuggest template not loaded by the storefront.
2.1.0
- Added support for Bloomreach Discovery Facet Response V3.
- Remove the useless
sortparameter from autosuggest to avoid potential API issues. - Fix Pathways & Recommendations widgets not picking up the
fieldsconfig.
2.0.0
- Completely rewriting of the app using the new Theme App Extensions.
- Removed usages of the Assets API. This is a breaking change.
1.0.10
- Pass Dynamic IDs to Recommendations Widgets
- Remove character limits on input boxes
- Add HTML, CSS, & Fields customization to Recommendation Widgets
- Add version 2.1.0 of the SDK (Add user driven customization support for Recommendation widgets)
1.0.9
- SDK version 2.0.6 (Remove scroll to top when performing search & category page loads, fix incorrect scrolling behavior when filtering)
1.0.8
- Node version update, Shopify authentication update.
- SDK version 2.0 (separate API client & UI Template code. Fixed infinite scroll behavior, swatch loading function)
1.0.7
- Performance updates when saving new values in the Shopify app
1.0.6
- SDK version 1.3.2 (enable brSegmentation value to pick up data from Bloomreach Engagement for personalized searches)
- Show SDK version & App version in the UI
- Enable Staging / Production endpoint selectors.
1.0.5
- Add HTML & CSS Customization capability for Search & Categories
1.0.4
- Add HTML & CSS Customization capability for Autosuggest
1.0.3
- Fix pixel inconsistencies for Recommendations widget.
1.0.2
- New App upgrade process to upgrade between new versions.
1.0.1
- Initial version - includes ability to inject sample UI into Shopify app front end for Search, Category, Recommendations, & Autosuggest calls into a Liquid powered Shopify theme.
Updated 3 months ago