

Personalization studio
Apply 1:1 personalized product ranking on search results or category pages.
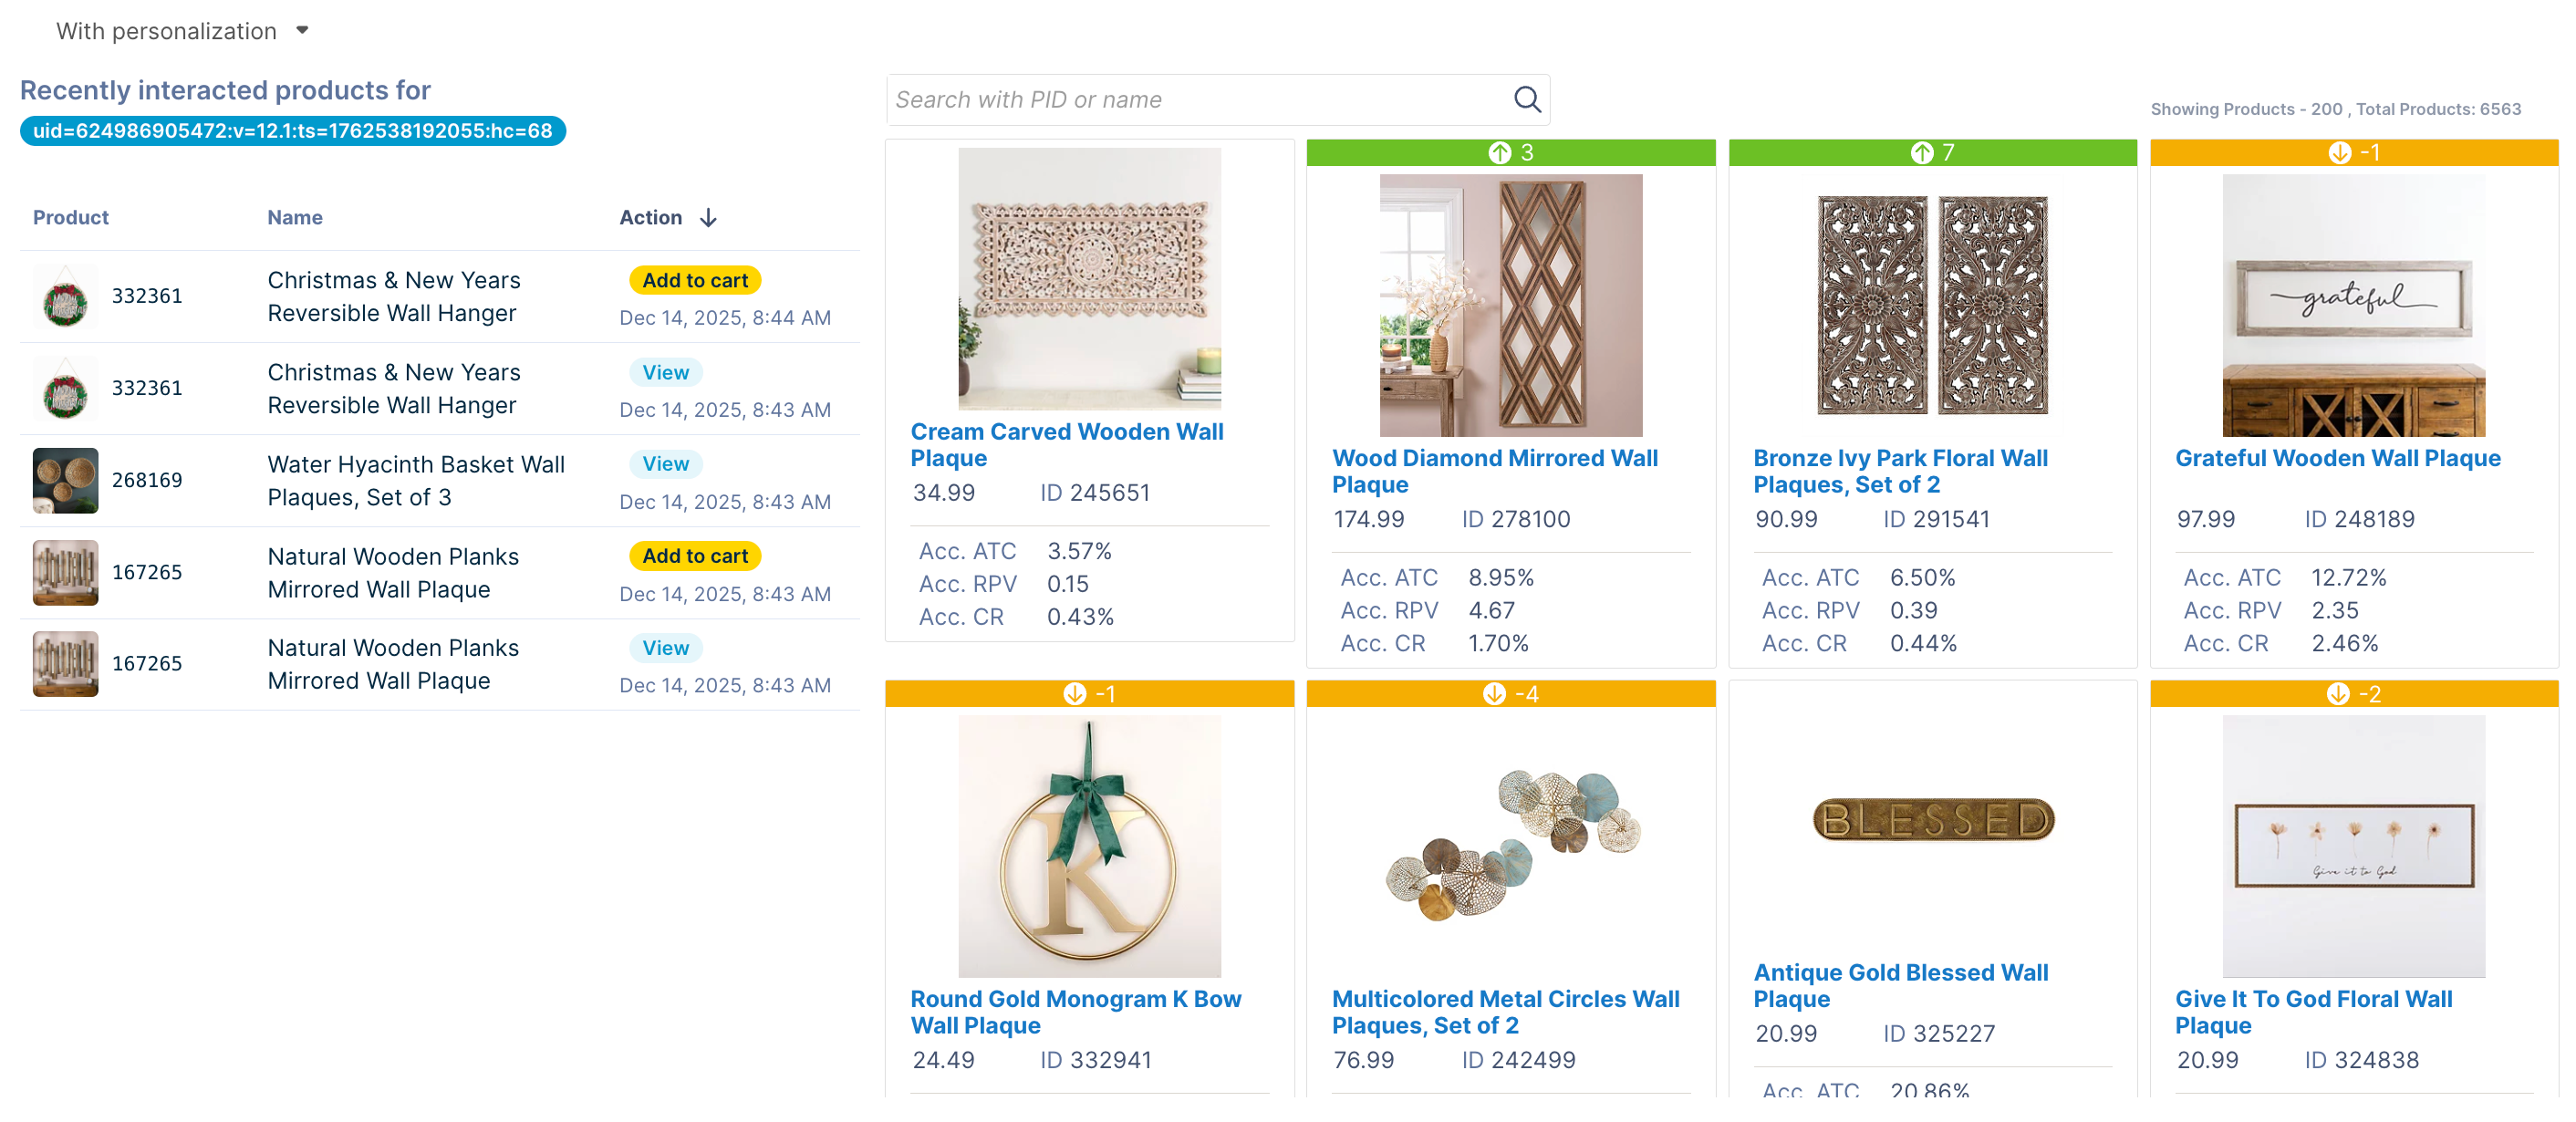
Introduction to 1:1 Personalization
Enable 1:1 Personalization on your site to dynamically rank products differently for each shopper, in an order that is most relevant to their preferences. This personalized product ranking makes finding products easier and can encourage shoppers to make a purchase.
For example, Bloomreach observes how a site visitor (new or returning) interacts with different products. If they tend to view and buy shirts from certain brands over others, our algorithm will boost the products of the preferred brands in the search results for similar queries like “formal wear” for this particular shopper.
User profile creation
1:1 Personalization uses user data from Bloomreach Pixels to create an anonymous user profile of the site visitor. User journeys are created by monitoring the user’s interactions with different products and pages.
- If it is a returning visitor and has an existing
user_id, their long-term profile will be remembered for up to three months. - If it is a new visitor, the
br_uid_2(cookie2) parameter from the Pixel is used to create their short-term profile for up to one month.
NoteMore information on the data collected by the user cookie and its sensitivity can be found in Pixel data protection.
Attribute affinity personalization
For each user profile, the Attribute affinity model operates by monitoring the user’s interactions and remembering affinities for different product attributes like brand, color, size, etc. It automatically learns which attributes are relevant for creating and matching affinities.
ImportantNumeric attributes are not used for personalization right now.
The feature uses a multi-attribute personalization approach. Here are the key objectives it achieves:
- It can track the user’s preferences on different pages based on context.
For example, a ‘Dresses’ page might identify a preference for color or size, while a ‘Perfumes’ page might focus on brand preferences. - It can transfer relevant affinities from one query or category to another related one.
For example, if a shopper shows a preference for “size: S” on a ‘Dresses’ page, this preference can also influence related categories like ‘Gowns’ but not unrelated categories like ‘Sandals’.
Behavioral Sequence personalization
The Behavioral Sequence model uses AI to personalize product recommendations by analyzing patterns in shopper behavior. The model trains on the historical user interactions captured through tracking Pixels, learning the relationships between products and shopping patterns.
For each site visitor, the model captures a sequence of their interactions—such as product views, add-to-cart actions, and purchases—and uses the shopper’s demonstrated preferences to re-rank products based on the trends in its training data.
When encountering new shoppers, the model identifies exact or similar interaction patterns and products from its training data. If the predicted products appear in the recall set, they receive a ranking boost, ensuring relevant products surface higher in search results or categories.
How the Behavioral Sequence model works
The system builds its intelligence from training data collected through tracking pixels across all channels—mobile apps, web apps, and other touchpoints.
The model begins personalizing for a user after capturing a minimum of 3 interactions by default within a session.
To ensure that the most recent in-session data is captured, a user’s interactions are discarded after 3 hours of inactivity.
The default values for minimum interactions and inactivity are suitable for driving RPV, as determined through internal testing and validation. For specific use cases, these can be configured by discussing with your CSM (Customer Success Manager) or raising a Support ticket.
The system maintains a series of up to 64 interactions per shopper, continuously refining its predictions as new behaviors are observed.
Example scenario
A shopper visits your fashion site and views three products in sequence: a navy blazer, white dress shirt, and leather oxford shoes. After these 3 initial interactions, the Behavioral Sequence model activates and searches its training data for similar patterns. It identifies that previous shoppers with this interaction sequence often purchased formal accessories and coordinating pieces.
When this shopper searches for "work attire," the search query still returns the standard recall set—all products matching "work attire" in your catalog. However, within this recall set, the model re-ranks products based on the shopper's behavioral sequence. Leather belts, dress socks, and silk ties receive ranking boosts because shoppers with similar blazer-shirt-shoes viewing patterns frequently purchased these items. The same applies when browsing category pages—the accessories category still shows all accessories, but formal accessories are promoted higher for this specific shopper.
As the visitor continues browsing and adds more interactions to their sequence (perhaps viewing dress pants or cufflinks), the personalization dynamically updates. Each new search maintains its query context—a search for "casual wear" returns casual clothing, not formal wear—but within those results, products are re-ranked based on the shopper's evolving behavioral pattern and what similar shoppers ultimately purchased.
Requirements for optimal performance
-
Language support: Compatible with catalogs in all languages
-
Required tracking pixels (without any issues):
-
Minimum traffic threshold: 250,000+ combined weekly events across the above three pixel types for optimal performance. Lower traffic volumes may reduce the effectiveness of personalization.
-
Catalog updates: The model performs best when catalog updates remain below 30% over 3 days. If too many products are removed between indexes (out of stock or discontinued), the model trains on products that are no longer available to recommend.
Personalization ranking controls
To maintain consistent and RPV-optimized personalization performance, the 1:1 Personalization feature includes built-in controls that govern how products are ranked and displayed.
These guardrails ensure that personalization enhances the shopping experience without creating extreme variations that might confuse shoppers or drop performance.
Bucketed ranges
Bucketed ranges control how much products can move up or down in search results or category listings through personalization. Rather than allowing unlimited repositioning, products are grouped into performance-based buckets at the catalog level. Products can only be reranked within their assigned bucket, preventing unexpected or low-performing items from jumping to top positions.
The default bucket configuration uses four ranges:
- Positions 1-10: Top-performing products remain in premium positions
- Positions 11-25: Strong performers can move within this mid-tier range
- Positions 26-50: Average performers are reranked within this broader range
- Positions 51-200: Lower-performing products compete within this extended range
The default configuration (10, 25, 50, 200) works for most catalogs, but you can adjust these ranges to match your business strategy. Contact your Customer Success Manager or submit a support ticket to modify bucket boundaries according to your specific needs.
Personalized ranking precedence rules
- Bloomreach Merchandising rules for product locking operations (conditional slot, sequential lock, position lock) will always take precedence over personalized ranking.
- In-session personalization creates a short-term user profile. This profile is created by storing the user’s recent interaction data against their cookie ID.
Understanding session-based personalization
Personalization works over multiple user sessions for both new users (non logged-in) and repeat users (logged-in).
Personalization for non logged-in users
For new site users with no prior interaction data, products are initially ranked using the Bloomreach default algorithm. After the user makes at least three interactions on the site, personalization begins to apply to their subsequent relevant searches.
At this point, the user profile for this visitor would have been generated, and they would get personalized results on later visits for up to a month (unless they log in).
Personalization for logged-in users
For a returning site user with at least 6 past interactions, personalization is applied from the start of a new session (based on their previous interaction data). After the user makes at least 3 new interactions on the site, interaction data starts updating, and real-time personalization starts applying to subsequent relevant searches.
All the interaction data collected over the session is added to the user’s past interaction data, which is stored for up to three months.
Personalization across devices
- 1:1 Personalization will continue to apply to logged-in users with valid
user_id, and personalization data will be collected even if they log in from a different device. - 1:1 Personalization will not apply over multiple devices for non logged-in users (without a
user_id).
Updated 3 months ago