Segmentation setup
This guide covers how to expose segmentations to Discovery using the Engagement dashboard, how to configure the exposed segmentations using the Discovery dashboard, and how to unexpose segmentations.
Prerequisites
Knowledge
We recommend that you review the following guides before proceeding:
Segmented search: This article introduces you to the Segmented search feature.
Permissions
Before you proceed with the setup, make sure the dashboard users have the following permissions:
- The Engagement user must have the role access of Analyses Editor.
- The Discovery user must have Personalization studio editor permission.
Segmentation Setup Overview
In this setup, you will allow the segmentation to be used for Segmented search. Once this is done, Bloomreach will automatically optimize how products are ranked for each segment within the selected segmentation in Search, Category, and Pathways. The process summary is listed below:
👉 Exposing a Segmentation to Discovery
This section illustrates the process of exposing a segmentation to Discovery using the Engagement dashboard.
👉 Setup after exposing the Segmentation
This section illustrates the process of:
- Viewing the progress of the exposed segmentation
- Data Training & algorithm building after exposing segmentation
- Setting a state for the segmentation
Exposing a Segmentation to Discovery
- Navigate to Analyses > Segmentation in the Bloomreach Engagement dashboard.
- Hover over the desired segmentation you want to use for personalized search results.
- Click the v action tab next to the Edit button to view a dropdown list.
- Click the Expose option. Now select the sub-option Segmented Search under Discovery.

Note: If you're not using all 3 Bloomreach products (Content, Discovery, Engagement), then you will not see the additional option to Expose the segmentation to Bloomreach Content for content personalization as above.
- You’ll see the modal shown below that describes the feature process briefly and lists the exposed segmentations. Click the Expose button.
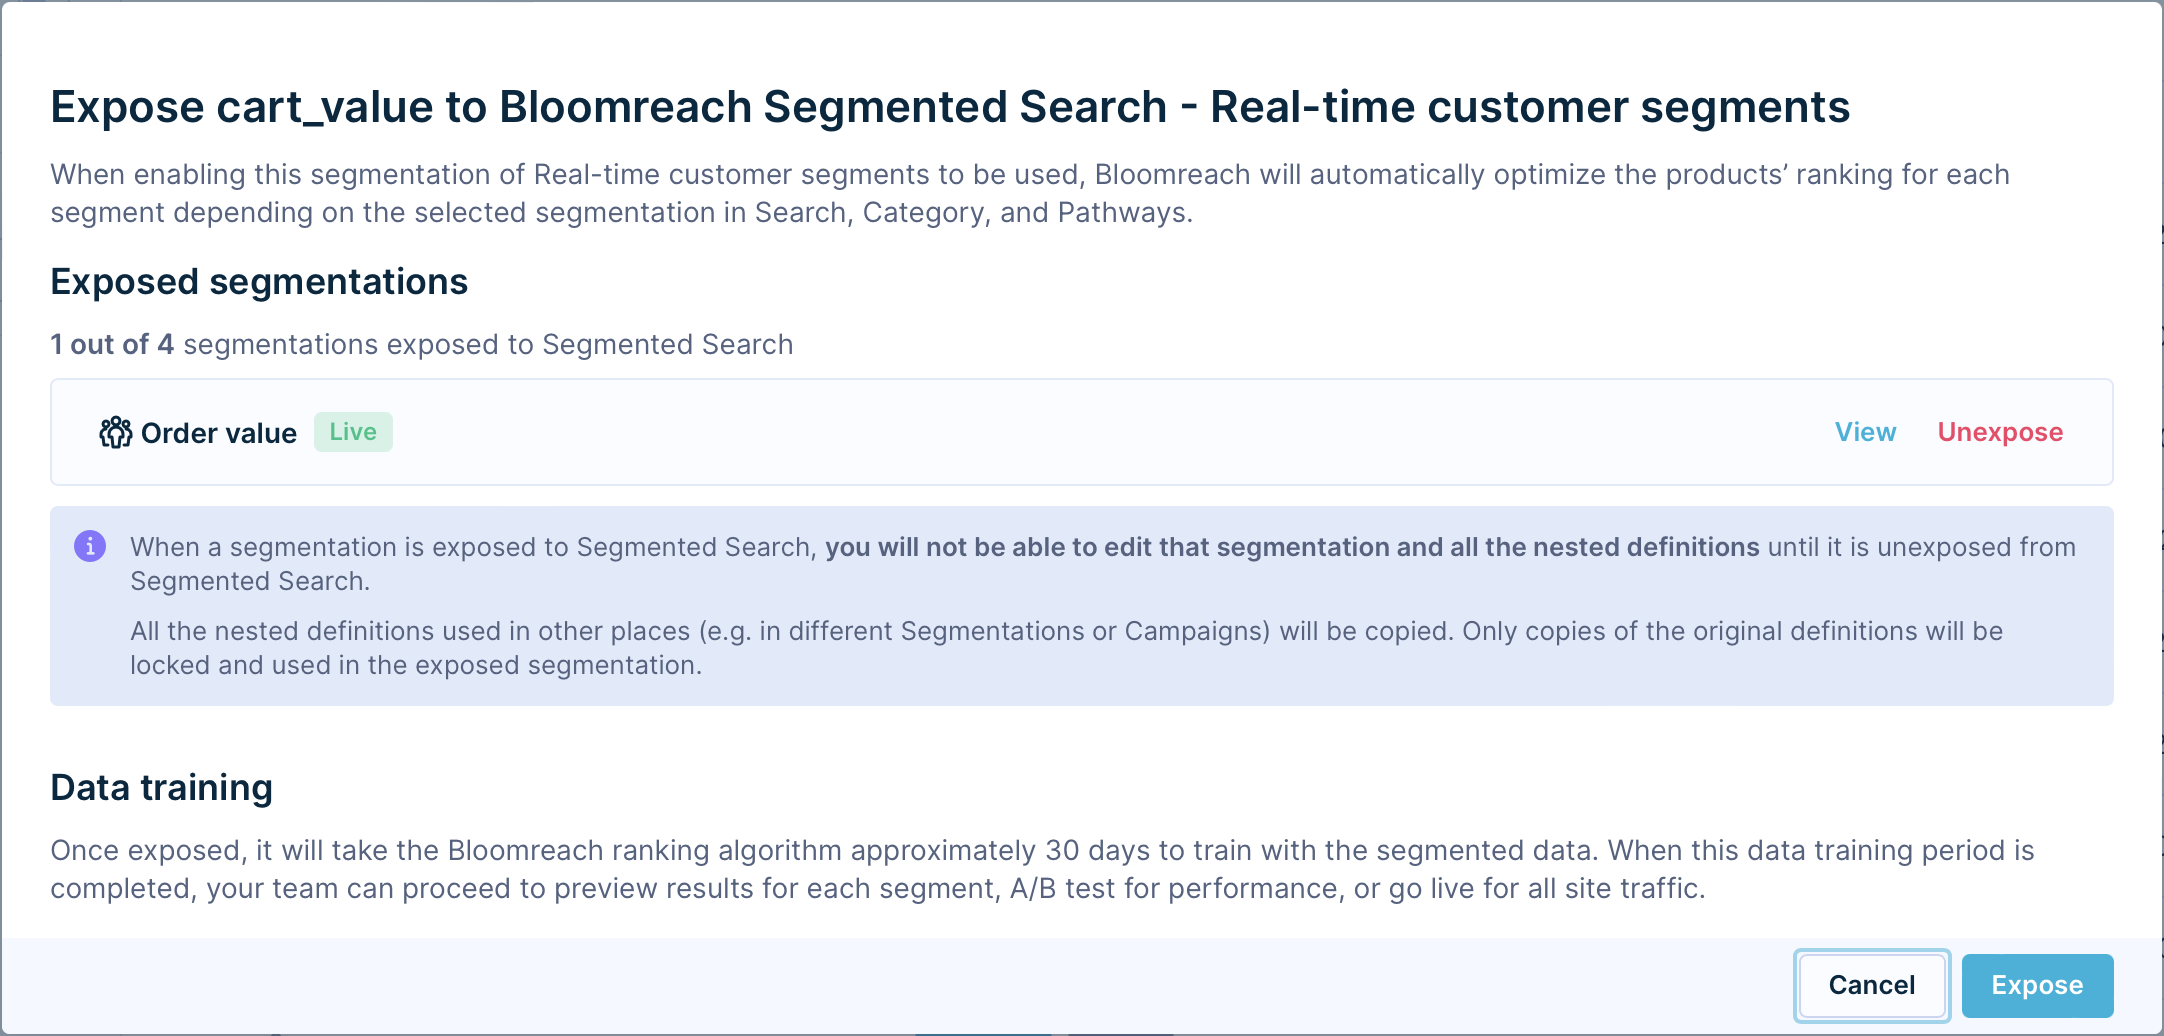
- Once the segmentation is exposed, you’ll receive a success notification.

You can click the exposed Segmentation and view its status. At the top of the Segmentation module, you will see an "Exposed to Segmented Search" notification with the Segmentation status. In the case shown below, the status is Data training.

Note
- If a segmentation is already exposed to any other Discovery or Content feature, you cannot directly expose it to Segmented Search. To do so, you will be prompted to create a clone of the segmentation first and you can expose that to Segmented Search.

- Segmentations exposed to Segmented Search are indicated by a lock (🔒) symbol. You will not be able to edit a segmentation after exposing it to Segmented Search. This prevents interference with the Training phase and the live experience. You will have to unexpose the segmentation to edit it.

Setup after exposing the Segmentation
This setup involves the process of previewing the segmentation results, initiating AB tests, and setting the segmentation LIVE using the Discovery dashboard.
1. Viewing the progress of the exposed segmentation
When the segmentation is exposed, Discovery users with AlgoSegmentation User permissions will receive this mail.
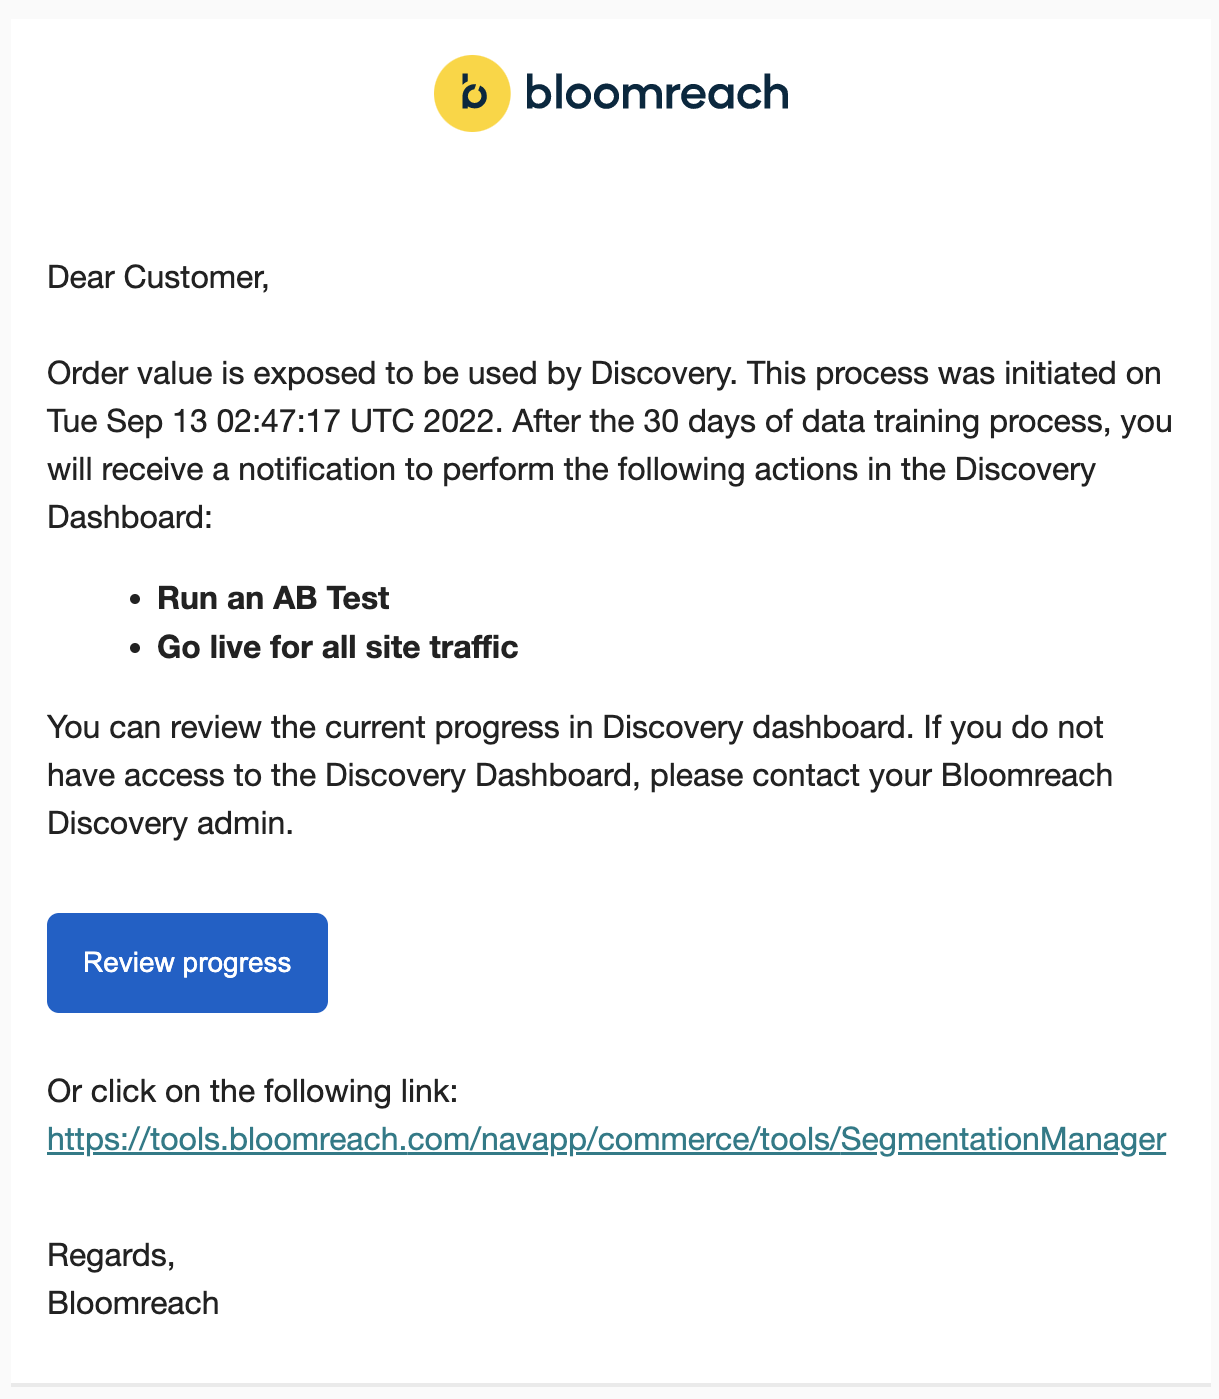
With the required permissions, you can proceed to view the status of the exposed segmentation.
Click on the Review progress button or the Discovery dashboard link provided in the mail. This takes you to the Segmentations page in the Discovery dashboard.
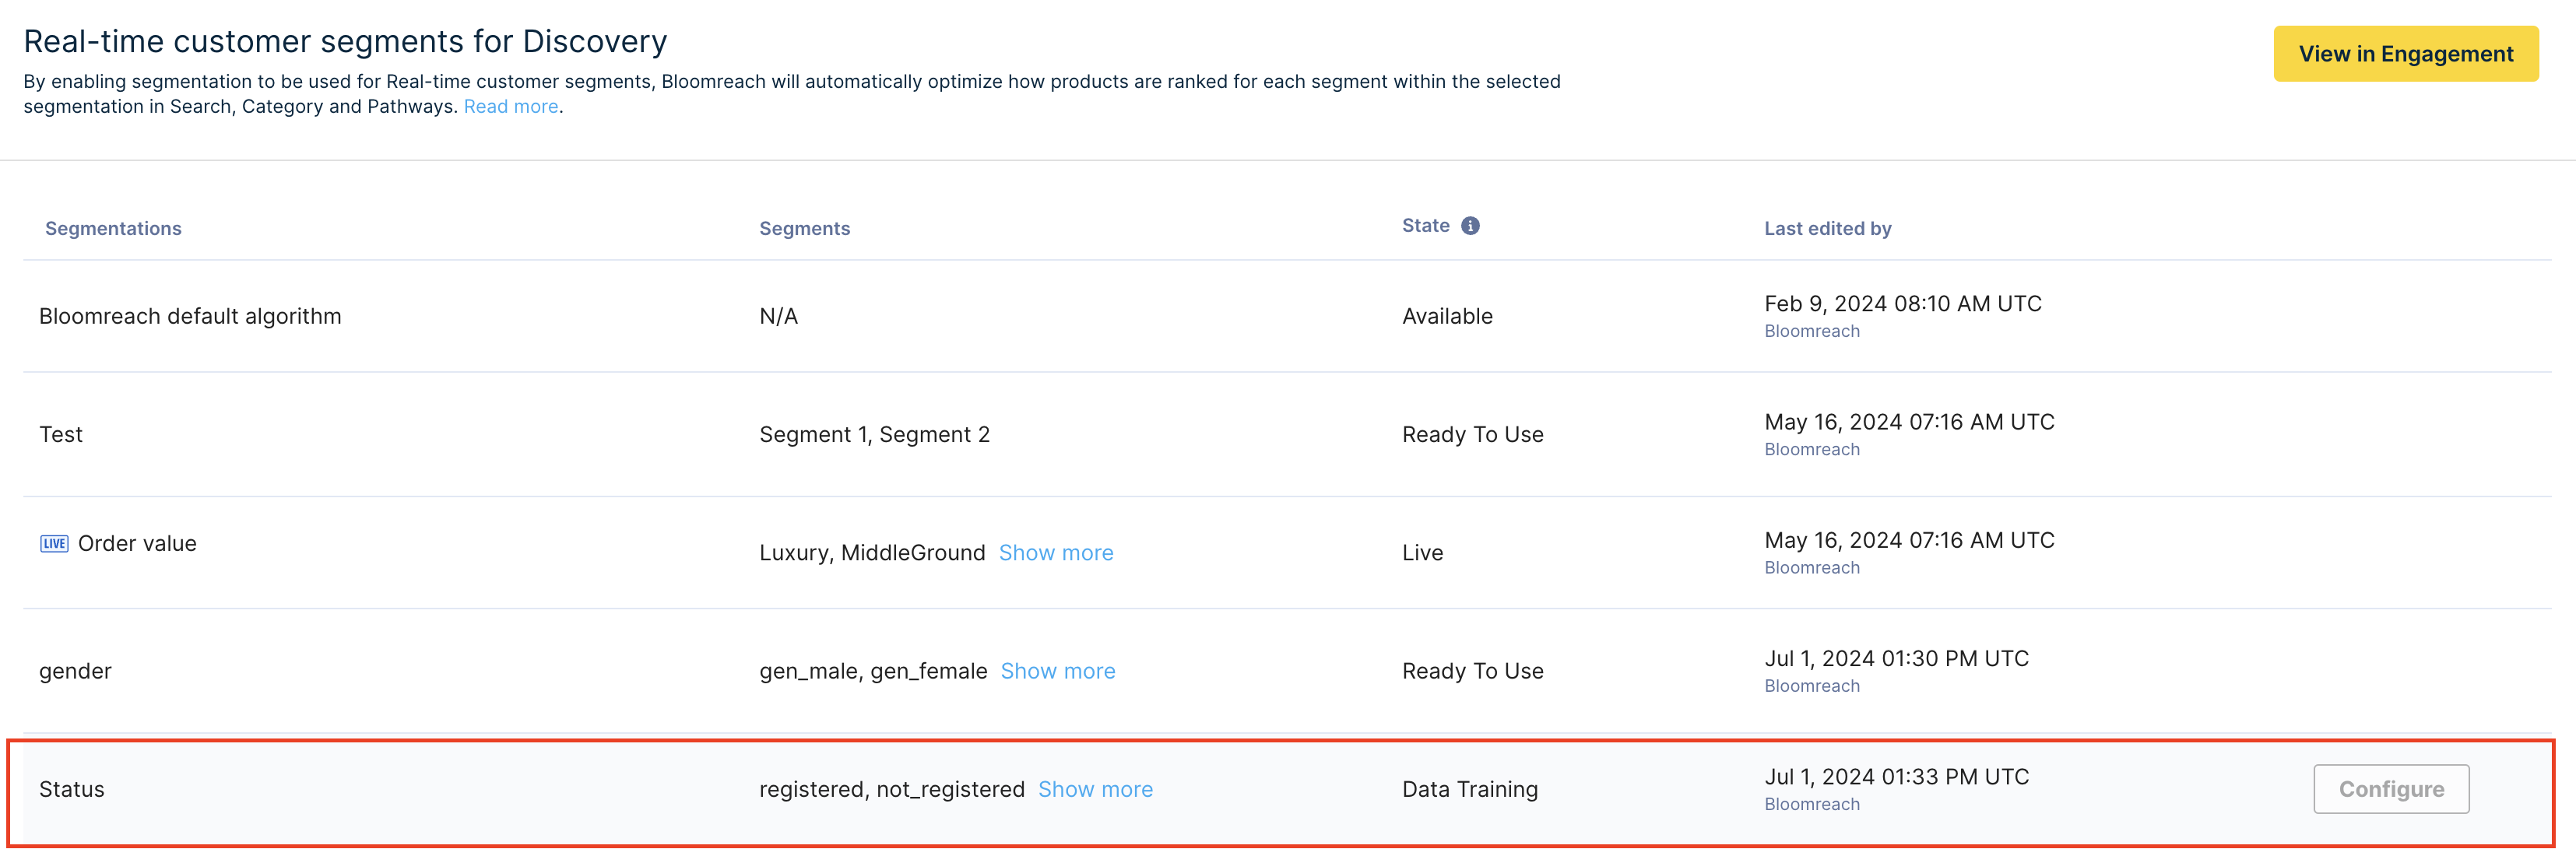
Here are the Discovery dashboard UI components:
- Segmentations: This section lists the exposed segmentations.
- Segments: This section lists the segments that make up a particular segmentation.
- State: This section shows the current state of the exposed segmentation. In our example, the state is Data Training.
- Last edited by: This section indicates the date and time the segmentation was last edited along with the editor’s mail.
- Action options: On hover, this section shows configuration options. These are not available in the Data Training state.

- View in Engagement: Click this option to view the Engagement dashboard and manage your exposed segmentations.

Instant segmentation sync
As soon as you expose a segmentation using the Engagement dashboard, you will see it immediately on the Discovery dashboard.
2. Data Training & algorithm building after exposing segmentation
The Bloomreach ranking algorithm takes about 30 days to train on the segmented data. When Data Training is complete, Discovery users with AlgoSegmentation User permissions will be notified via this email:
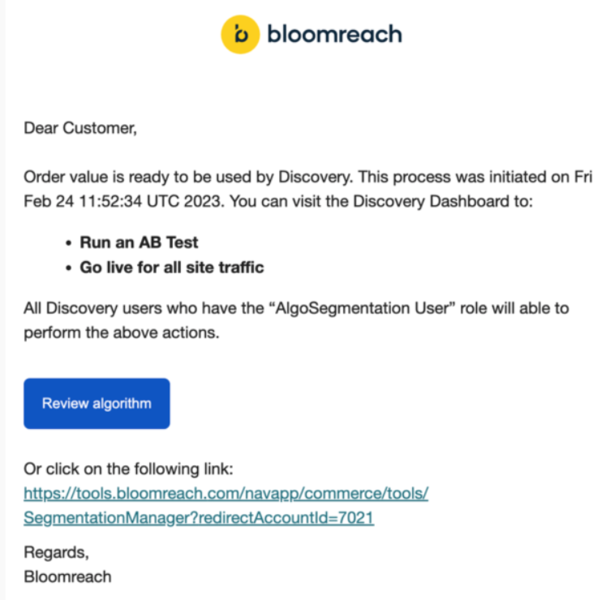
With the required permissions, you can now proceed to AB test the algorithm for performance, or go live for all site traffic.
3. Setting a State for the Segmentation
To set a state for the Segmentation, click on the Review algorithm button or the Discovery dashboard link provided in the mail. This takes you to the Segmentation page in the Discovery dashboard.

You will see that the Segmentation State is Ready to use. On clicking Configure, you’ll see the available Configurations.
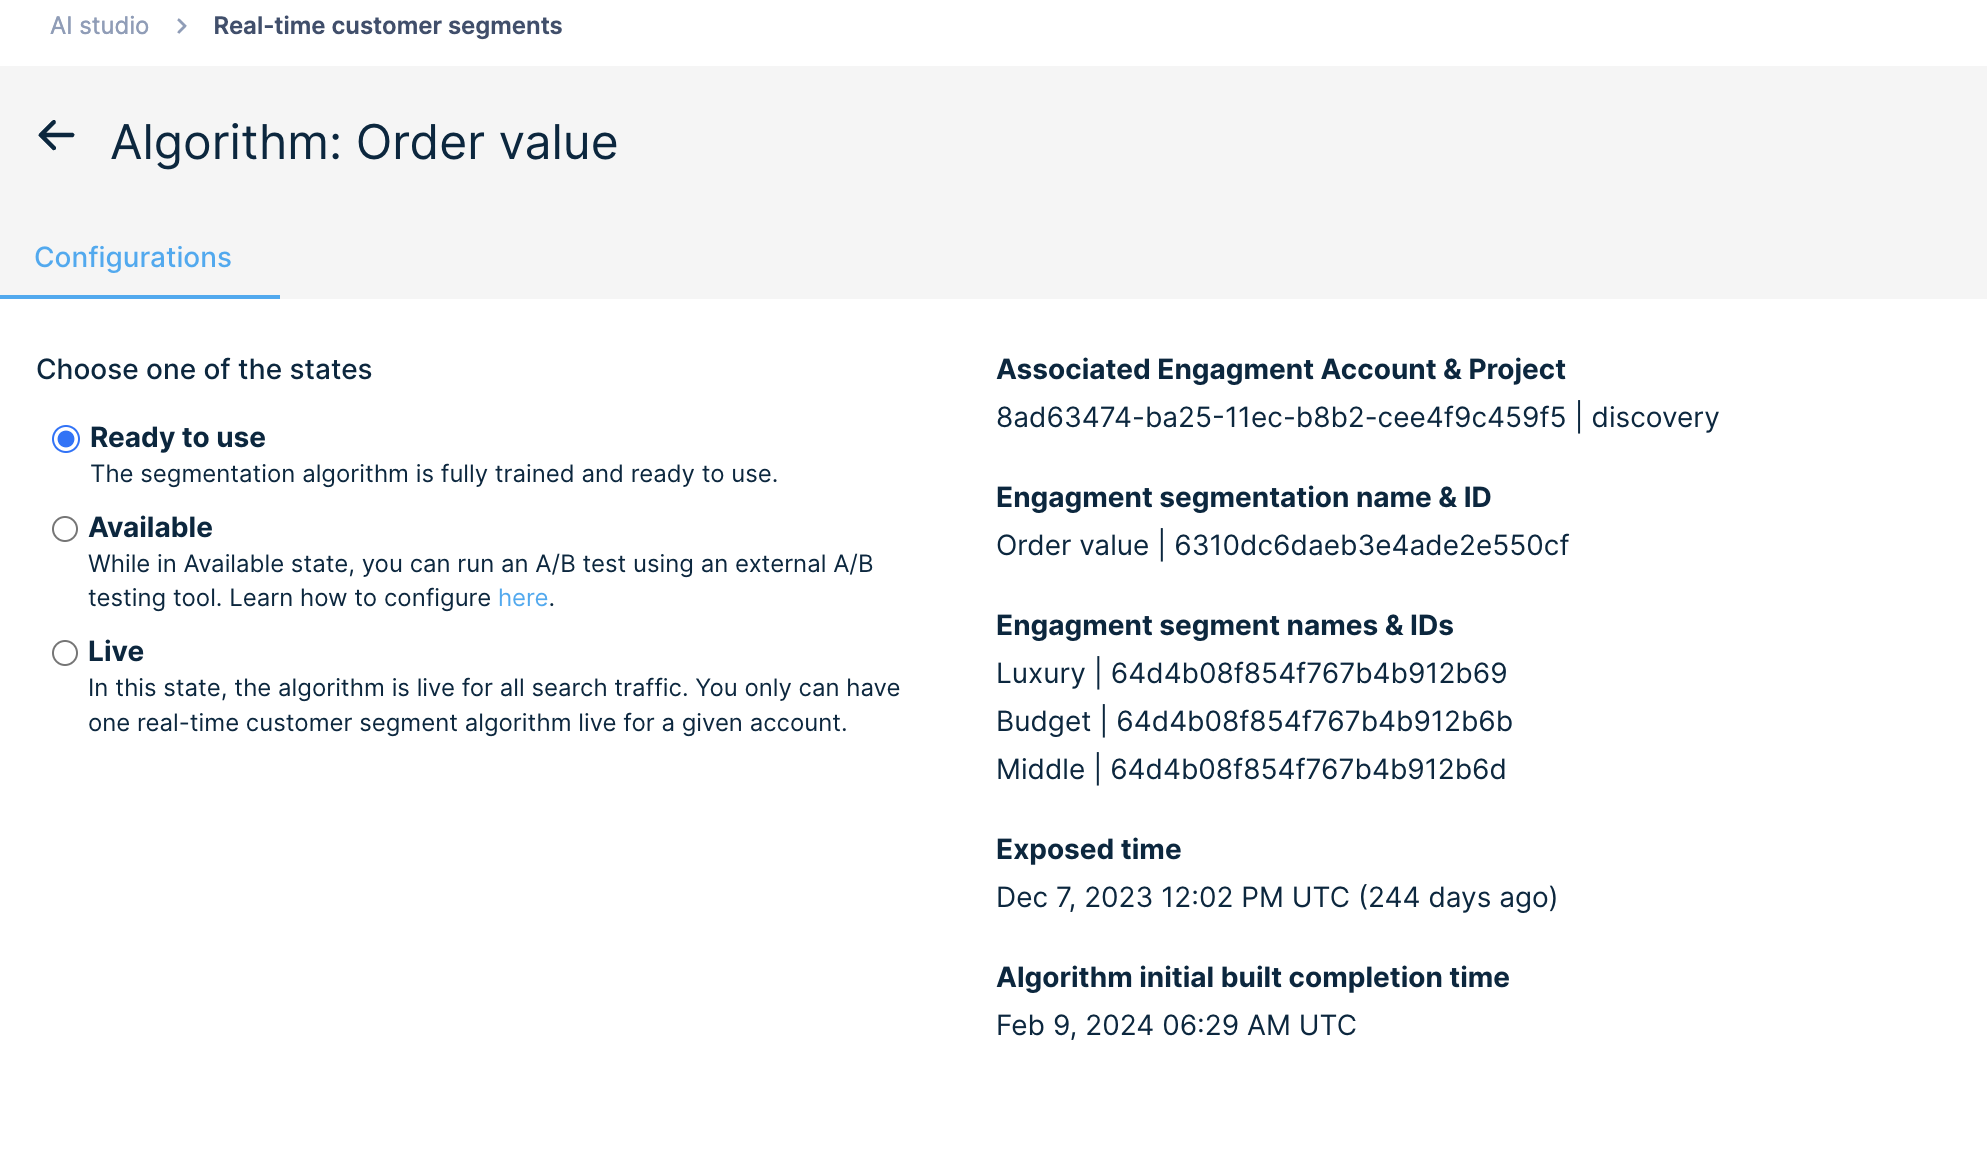
The three available configurations are explained below:
Ready to use
Description
This state makes the segmentation available to view segmented results in the Discovery dashboard product grids.
Steps to configure this state
- Choose “Ready to use” option.
- Click “Save changes” button. The configuration will be successfully implemented.

Available
Description
This state makes the segmentation available for AB testing.
Steps to configure this state
- Choose “Available” option.
- Click “Save changes” button. The configuration will be successfully implemented.

Live
Description
This state makes the segmentation algorithm live for all search traffic.
Steps to configure this state
- Choose “Live” option.
- Click “Save changes” button.
- You’ll see this modal shown below. Select “Go live” to set the segmentation algorithm state to Live.
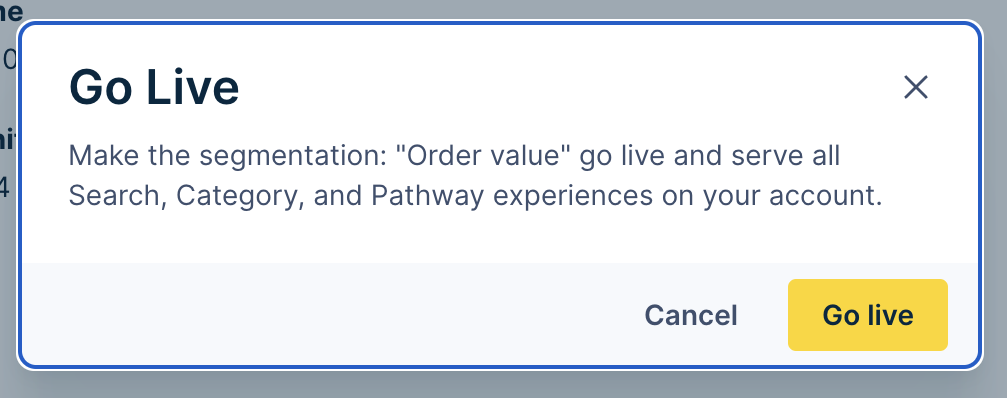
The default Bloomreach algorithm will be taken down, and segment-optimized search results will be implemented on your site.
Note
- Only one segmentation algorithm can be Live at a time. If another algorithm is already Live, you’ll be required to set an alternative state (Ready to use/Available) for the already Live algorithm.
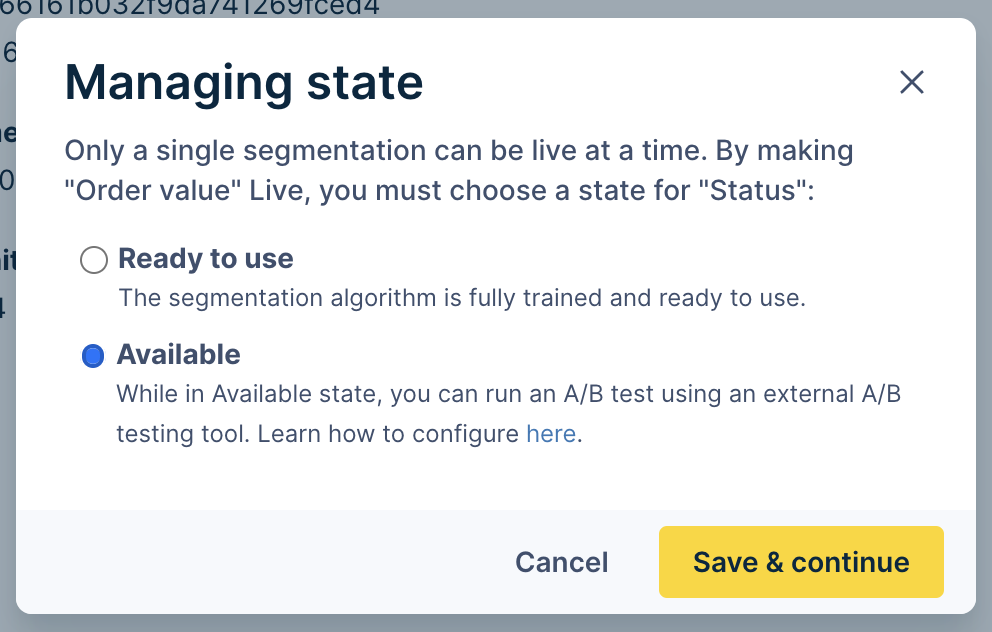
Exposing Multiple Segmentations
In the previous workflow, you exposed just one segmentation to Discovery. You can expose 4 segmentations to Discovery at a time, but only one segmentation can be used against live traffic. The ability to expose more than one segmentation allows you to run AB tests or go Live quickly with no downtime.
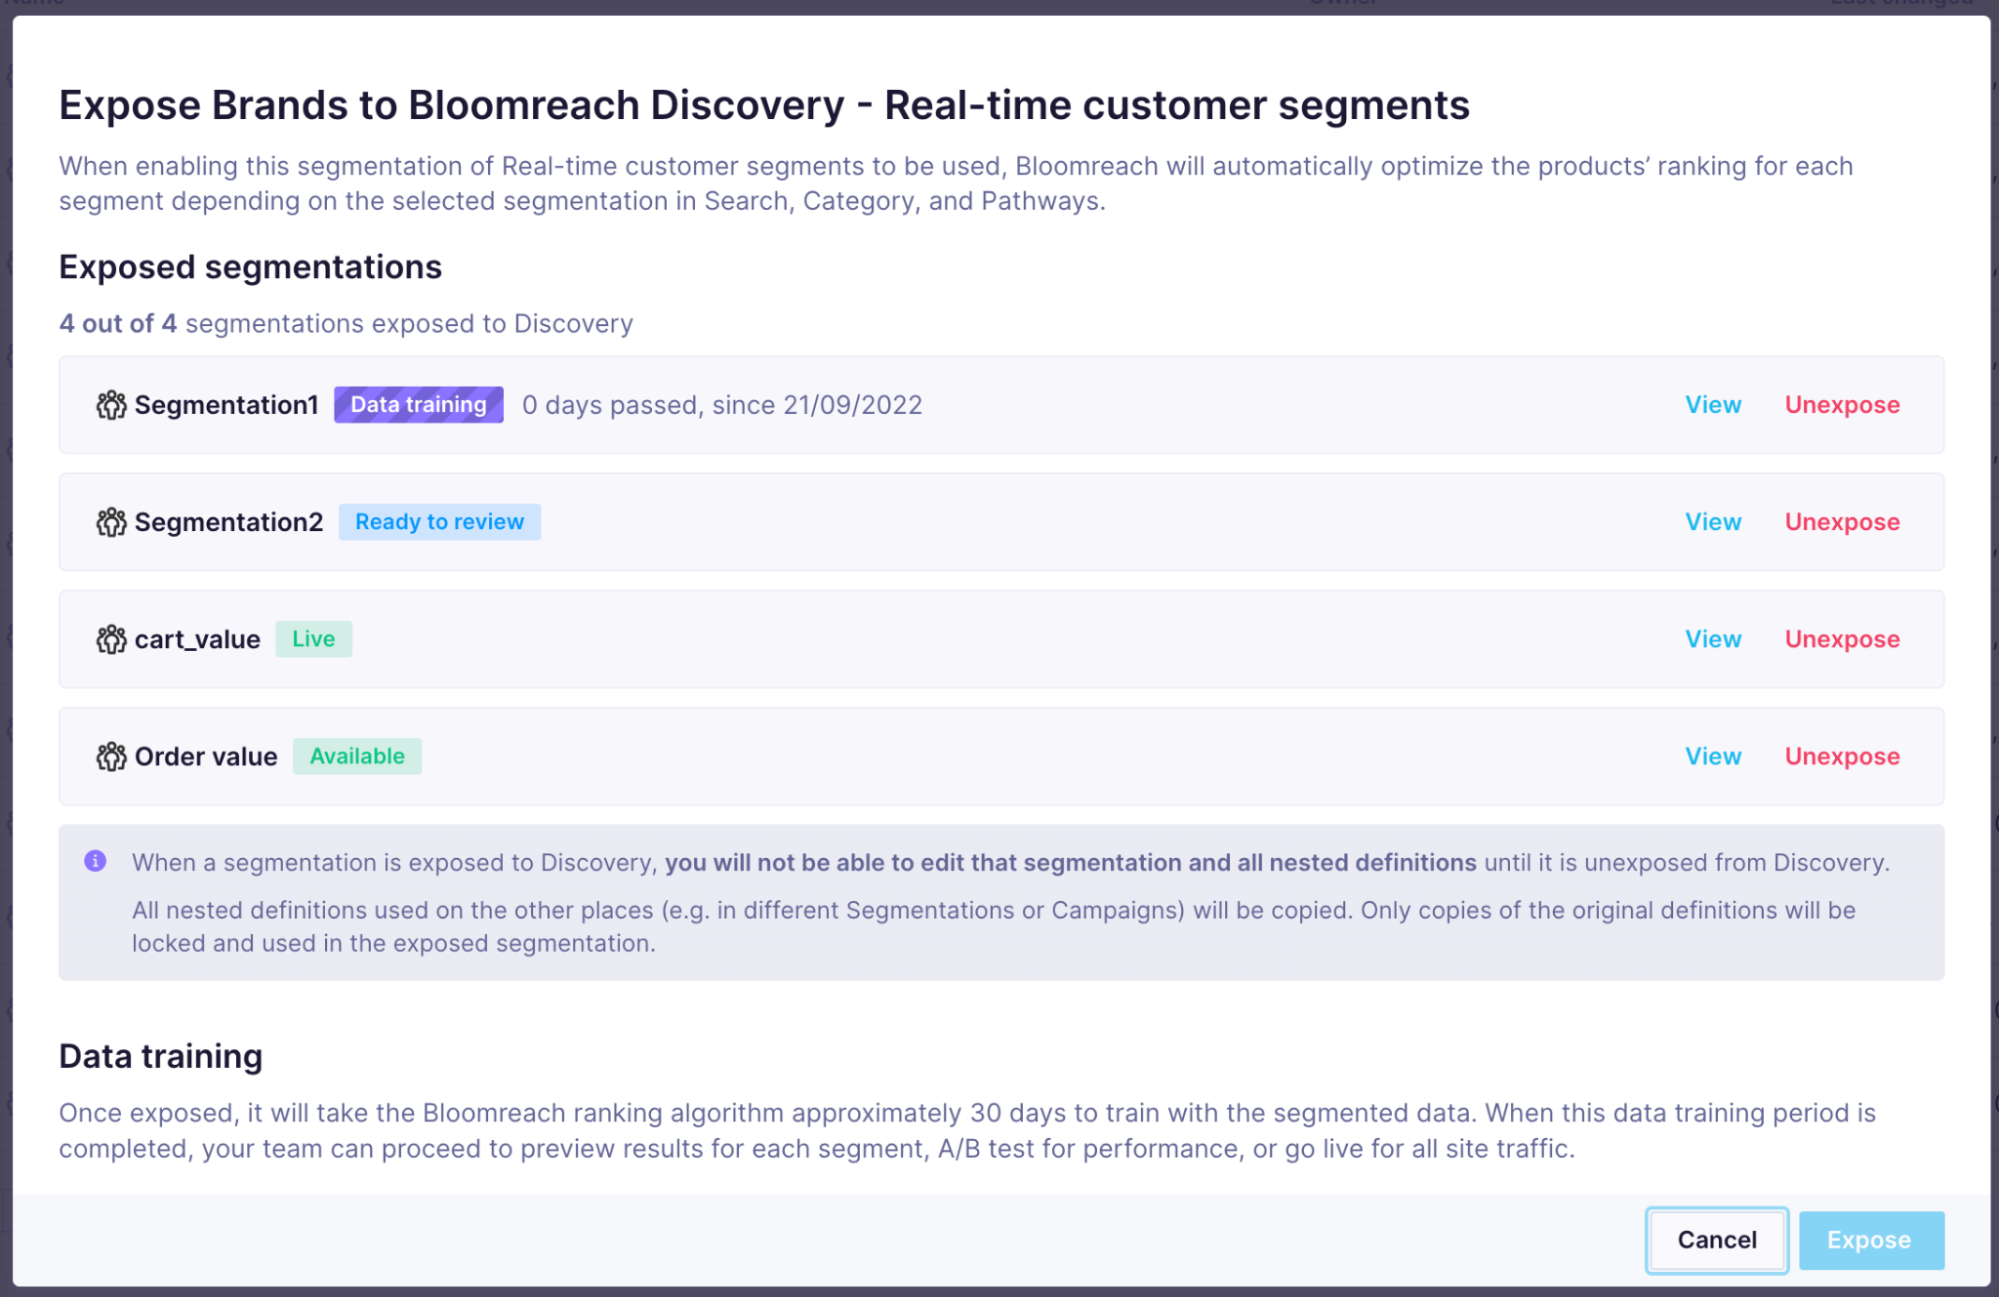
In this example, 4 segmentations are exposed to Discovery. Each segmentation has a state tag next to its name.
If all four slots are occupied, you need to unexpose a segmentation algorithm to expose a new segmentation. When a segmentation algorithm is in Data training/ Ready to use state, the process of unexposing it differs from that when it is in AB Testing or LIVE. Each process is discussed below.
Unexposing Segmentation in Data Training / Ready to use state
If the segmentation algorithm is in the Data Training/Ready to use state, you can unexpose the segmentation using the Engagement dashboard. There will be no impact on the end-user, however, any training that has occurred will be lost.
Unexposing segmentation using the Engagement dashboard
- Navigate to Analyses > Segmentation.
- Go to the desired segmentation.
- Click the v action tab to view a dropdown list.
- Choose the option Unexpose from Segmented Search.

- You’ll see this Unexpose warning box. Tick on the checkbox and click the Unexpose button.

- The segmentation will be successfully unexposed.

Unexposing Segmentation in LIVE / Available state
Segmentation algorithm is currently LIVE
For a Live segmentation, you need to:
- First, disable the Live segmentation on the Discovery dashboard
- Unexpose the segmentation using the Engagement dashboard
1. Taking down Live segmentation using the Discovery Dashboard
- Navigate to the AI studio > Segmentations.
- Go to the desired segmentation. Click the “Configure” action button.

- Choose an alternate state for the Live segmentation. You can select Available/Ready to use state.

- Click on “Save changes”. The segmentation algorithm will no longer serve search results on your site. Bloomreach default algorithm will now be Live by default. Now, proceed with unexposing the segmentation using the Engagement dashboard.
2. Unexposing segmentation using the Engagement dashboard
- Navigate to Analyses > Segmentation.
- Go to the desired segmentation.
- Click the v action tab to view a dropdown list.
- Choose the option Unexpose from Segmented Search.

- You’ll see this Unexpose warning box. Tick on the checkbox and click the Unexpose button.

- The segmentation will be successfully unexposed.

Segmentation algorithm is in AB Testing (Available state)
Firstly, remove the algorithm from the AB test. Next, proceed with unexposing the segmentation using the Engagement dashboard as illustrated below.
Unexposing segmentation using the Engagement dashboard
- Navigate to Analyses > Segmentation.
- Go to the desired segmentation.
- Click the v action tab to view a dropdown list.
- Choose the option Unexpose from Segmented Search.

- You’ll see this unexpose warning box. Tick on the checkbox and click the Unexpose button.

- The segmentation will be successfully unexposed.
Updated 6 months ago
