

Configuration cloner workflow
This guide illustrates the complete Configuration cloner workflow.
💡Prerequisites
Knowledge
We recommend that you review the following guide:
- Configuration cloner: This feature guide introduces you to the Configuration cloner feature. It gives you the necessary background before getting started with the cloning mechanism.
Permissions
Accesses needed on the Target Site/Account
- If you're copying from a Source Site to a Target Site, you need to have access to write on the Target Site(Account).
- You necessarily need to have write access for the selected rule type.
Accesses needed on the Source Site/Account
- You should at least have Read-Only access to the Source Site.
Customers using both Content and Discovery products can only access Configuration cloner feature via the Discovery dashboard.
Configuration cloner workflow overview
To clone configurations, follow the cloning workflow provided below:
- Select Target Site/Account
- Select Environment
- Select Source Site/Account
- Select source configurations
- Review discrepancies
- Clone review
1. Select Target Site/Account
The starting point of your cloning process is always the Target Site/Account or where you want to copy the rules to.
For cloning configurations from one Account to another Account, select the target Account from the site-selector in the top-right corner. For cloning configurations from one Site to another Site, select the Target Site from the dropdown.
Then, navigate to the cloning wizard under Setup > Merchandising > Configuration cloner
For Account to Account cloning, the Configuration cloner page will look like this:

For Site to Site cloning, the Configuration cloner page will look like this:

Once you land on the Configuration cloner page, click on the yellow Start clone setup button and proceed with the cloning workflow described below.

Before proceeding
- Ensure that the Source Site catalog and the Target Site catalog are in sync.
2. Select Environment
In this step, you can select the environment (Staging or Production) that you wish to clone configurations from.

3. Select Source Site/Account
In this step, you can select any Source Site/Account within your organization to clone configurations from. As you’ll be on the Target Site/Account, you must choose a Source Site/Account for copying configurations. Click Next to proceed to the next step.

This step displays the eligible Source Sites that you have access to. You can choose one Source Site at a time, then proceed to the next step.
This step can have different cases based on your access. Suppose you have Site A, Site B, and Site C as potential candidates for Source Site selection. Refer to the following table to understand which site will be available to you for the selection:
| Site | Access scenario | Actions available |
| A | You don’t have the permission to read any rule type on site A but do have permission to use Catalogs app. | This site will be disabled with the tooltip - “You don’t have read or write permission of any configuration type of this site.” |
| B | You do not have access to this site at all. | This site will be disabled with the tooltip - “You don’t have read or write permission of any configuration type of this site.” |
| C | You have access to read-only category rules on the Source Site. | You are allowed to select this site as the Source Site |
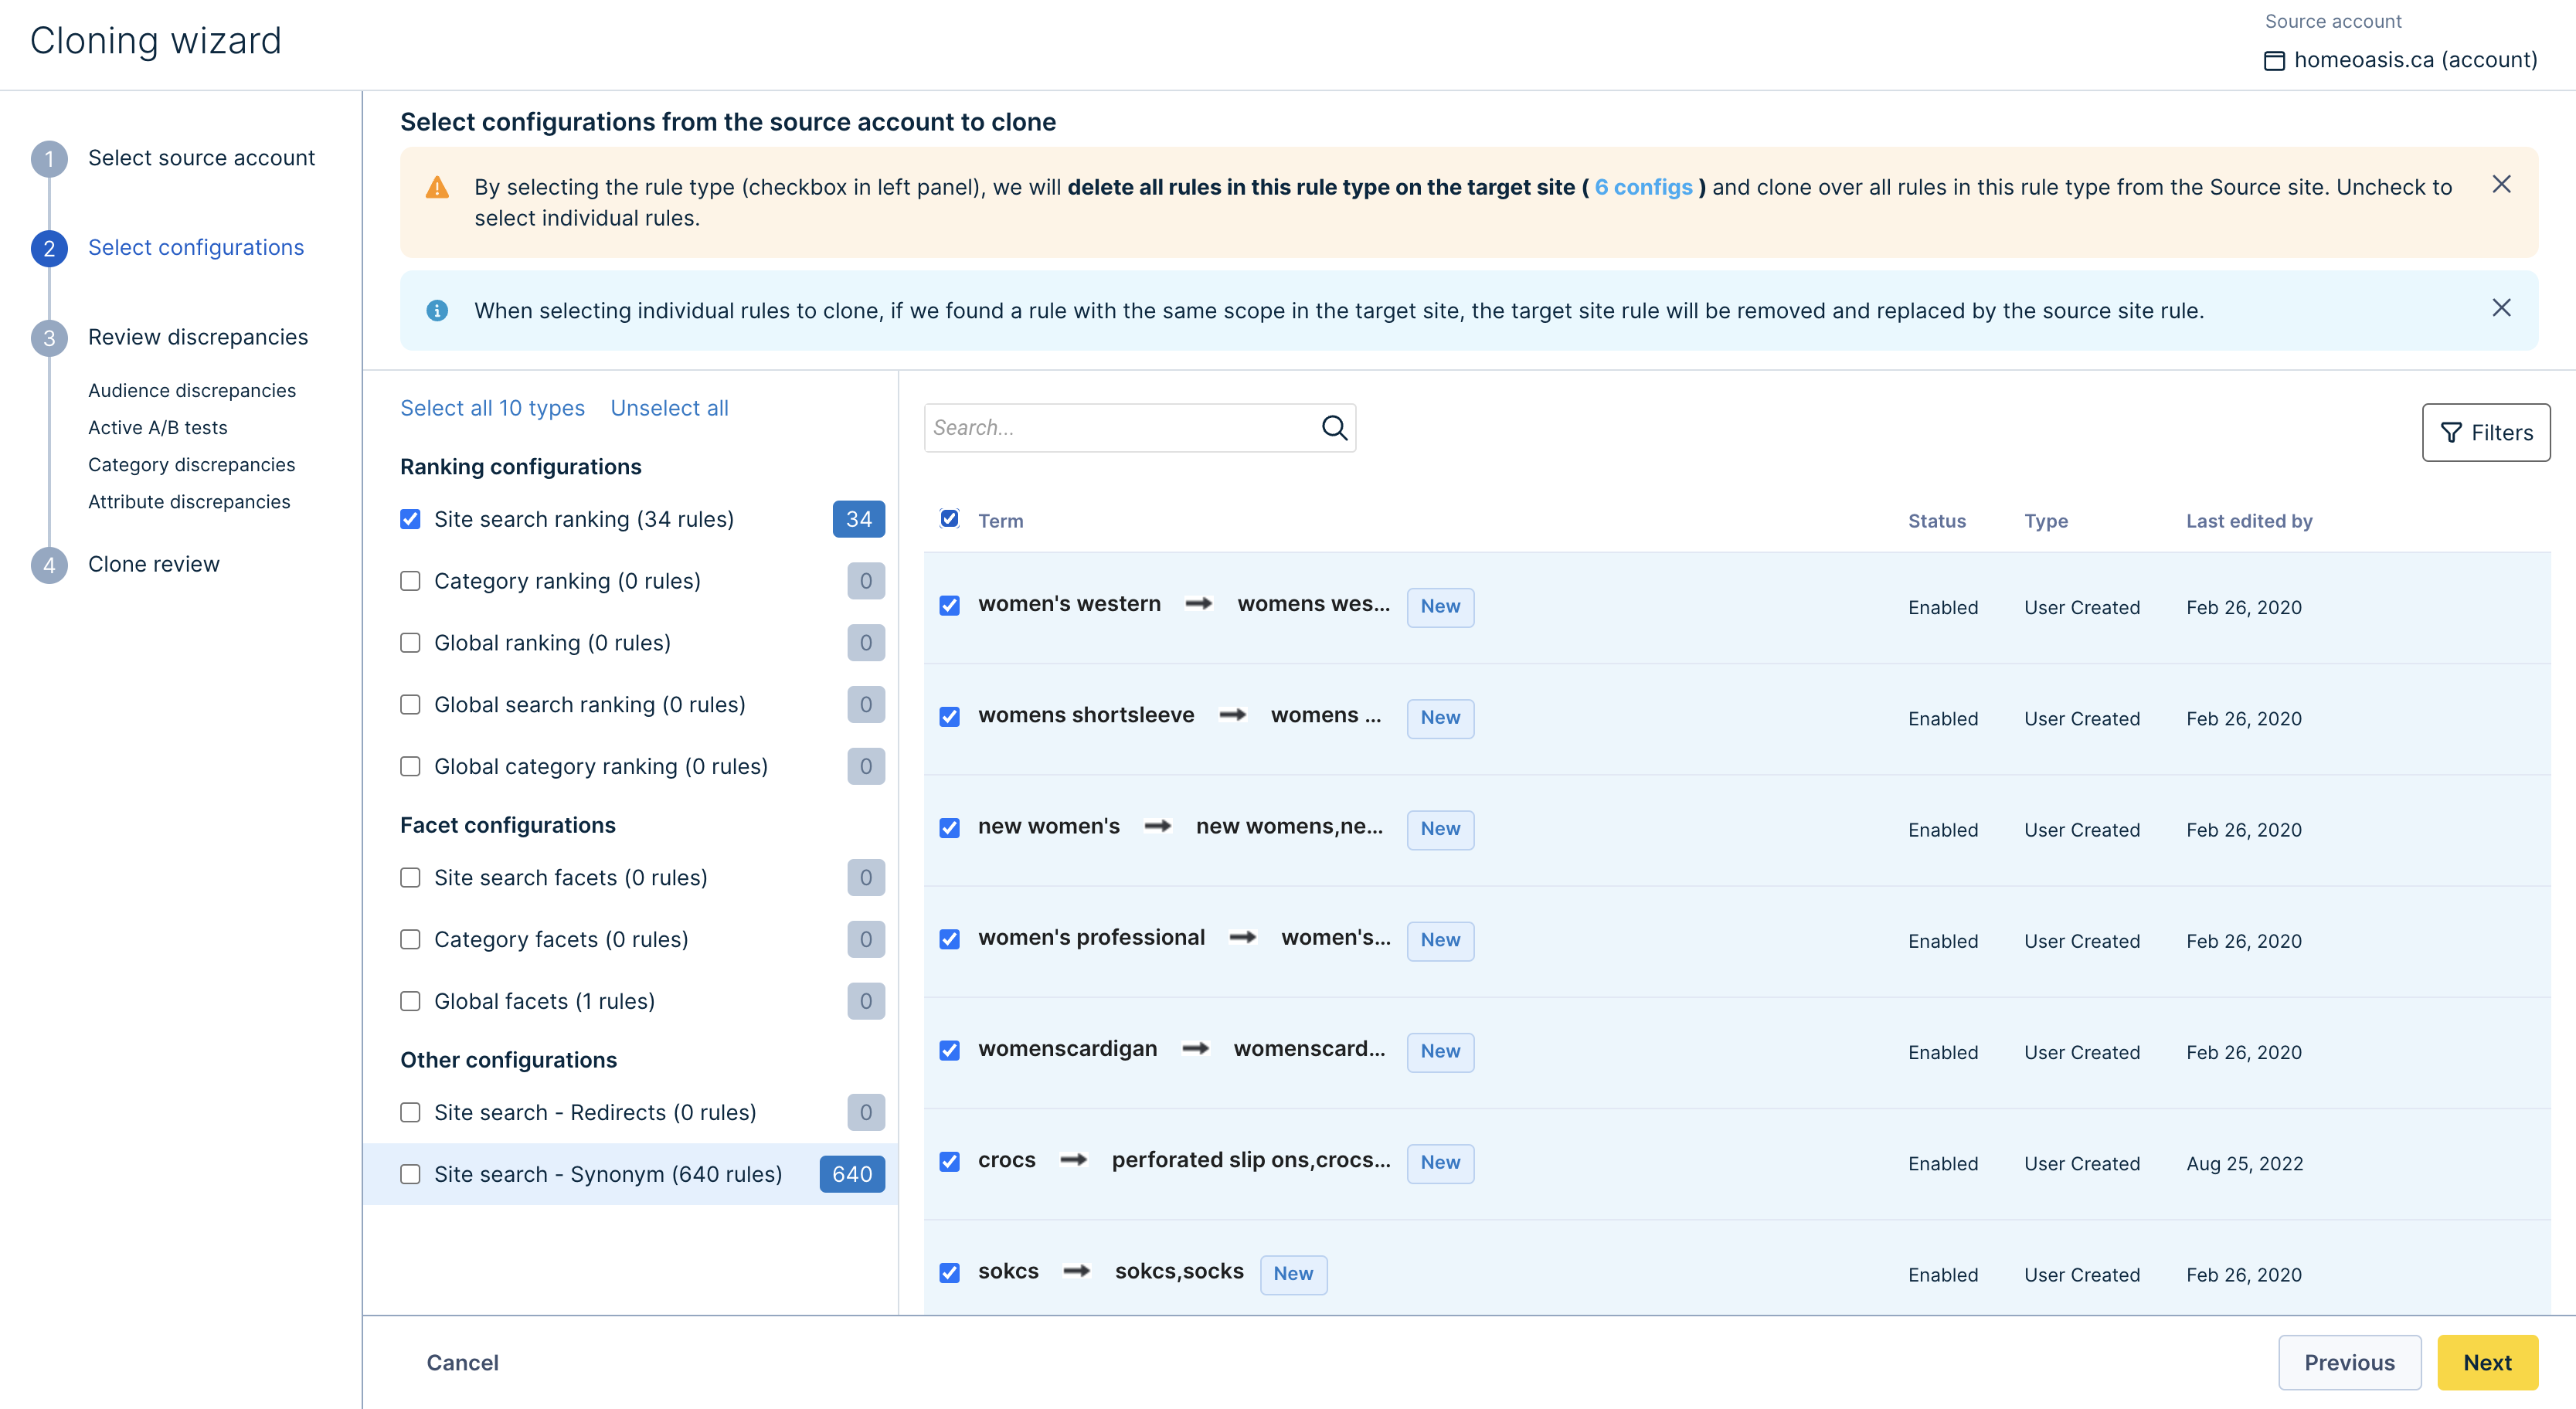
4. Select source configurations
This step involves selecting the configurations to clone. You’ll find different types of rules grouped under Ranking Configurations, Facet configurations, and Other configurations.
You can either
- Select the whole rule type by clicking the checkbox provided on the left side. This will delete all rules belonging to the selected rule type on the target site.
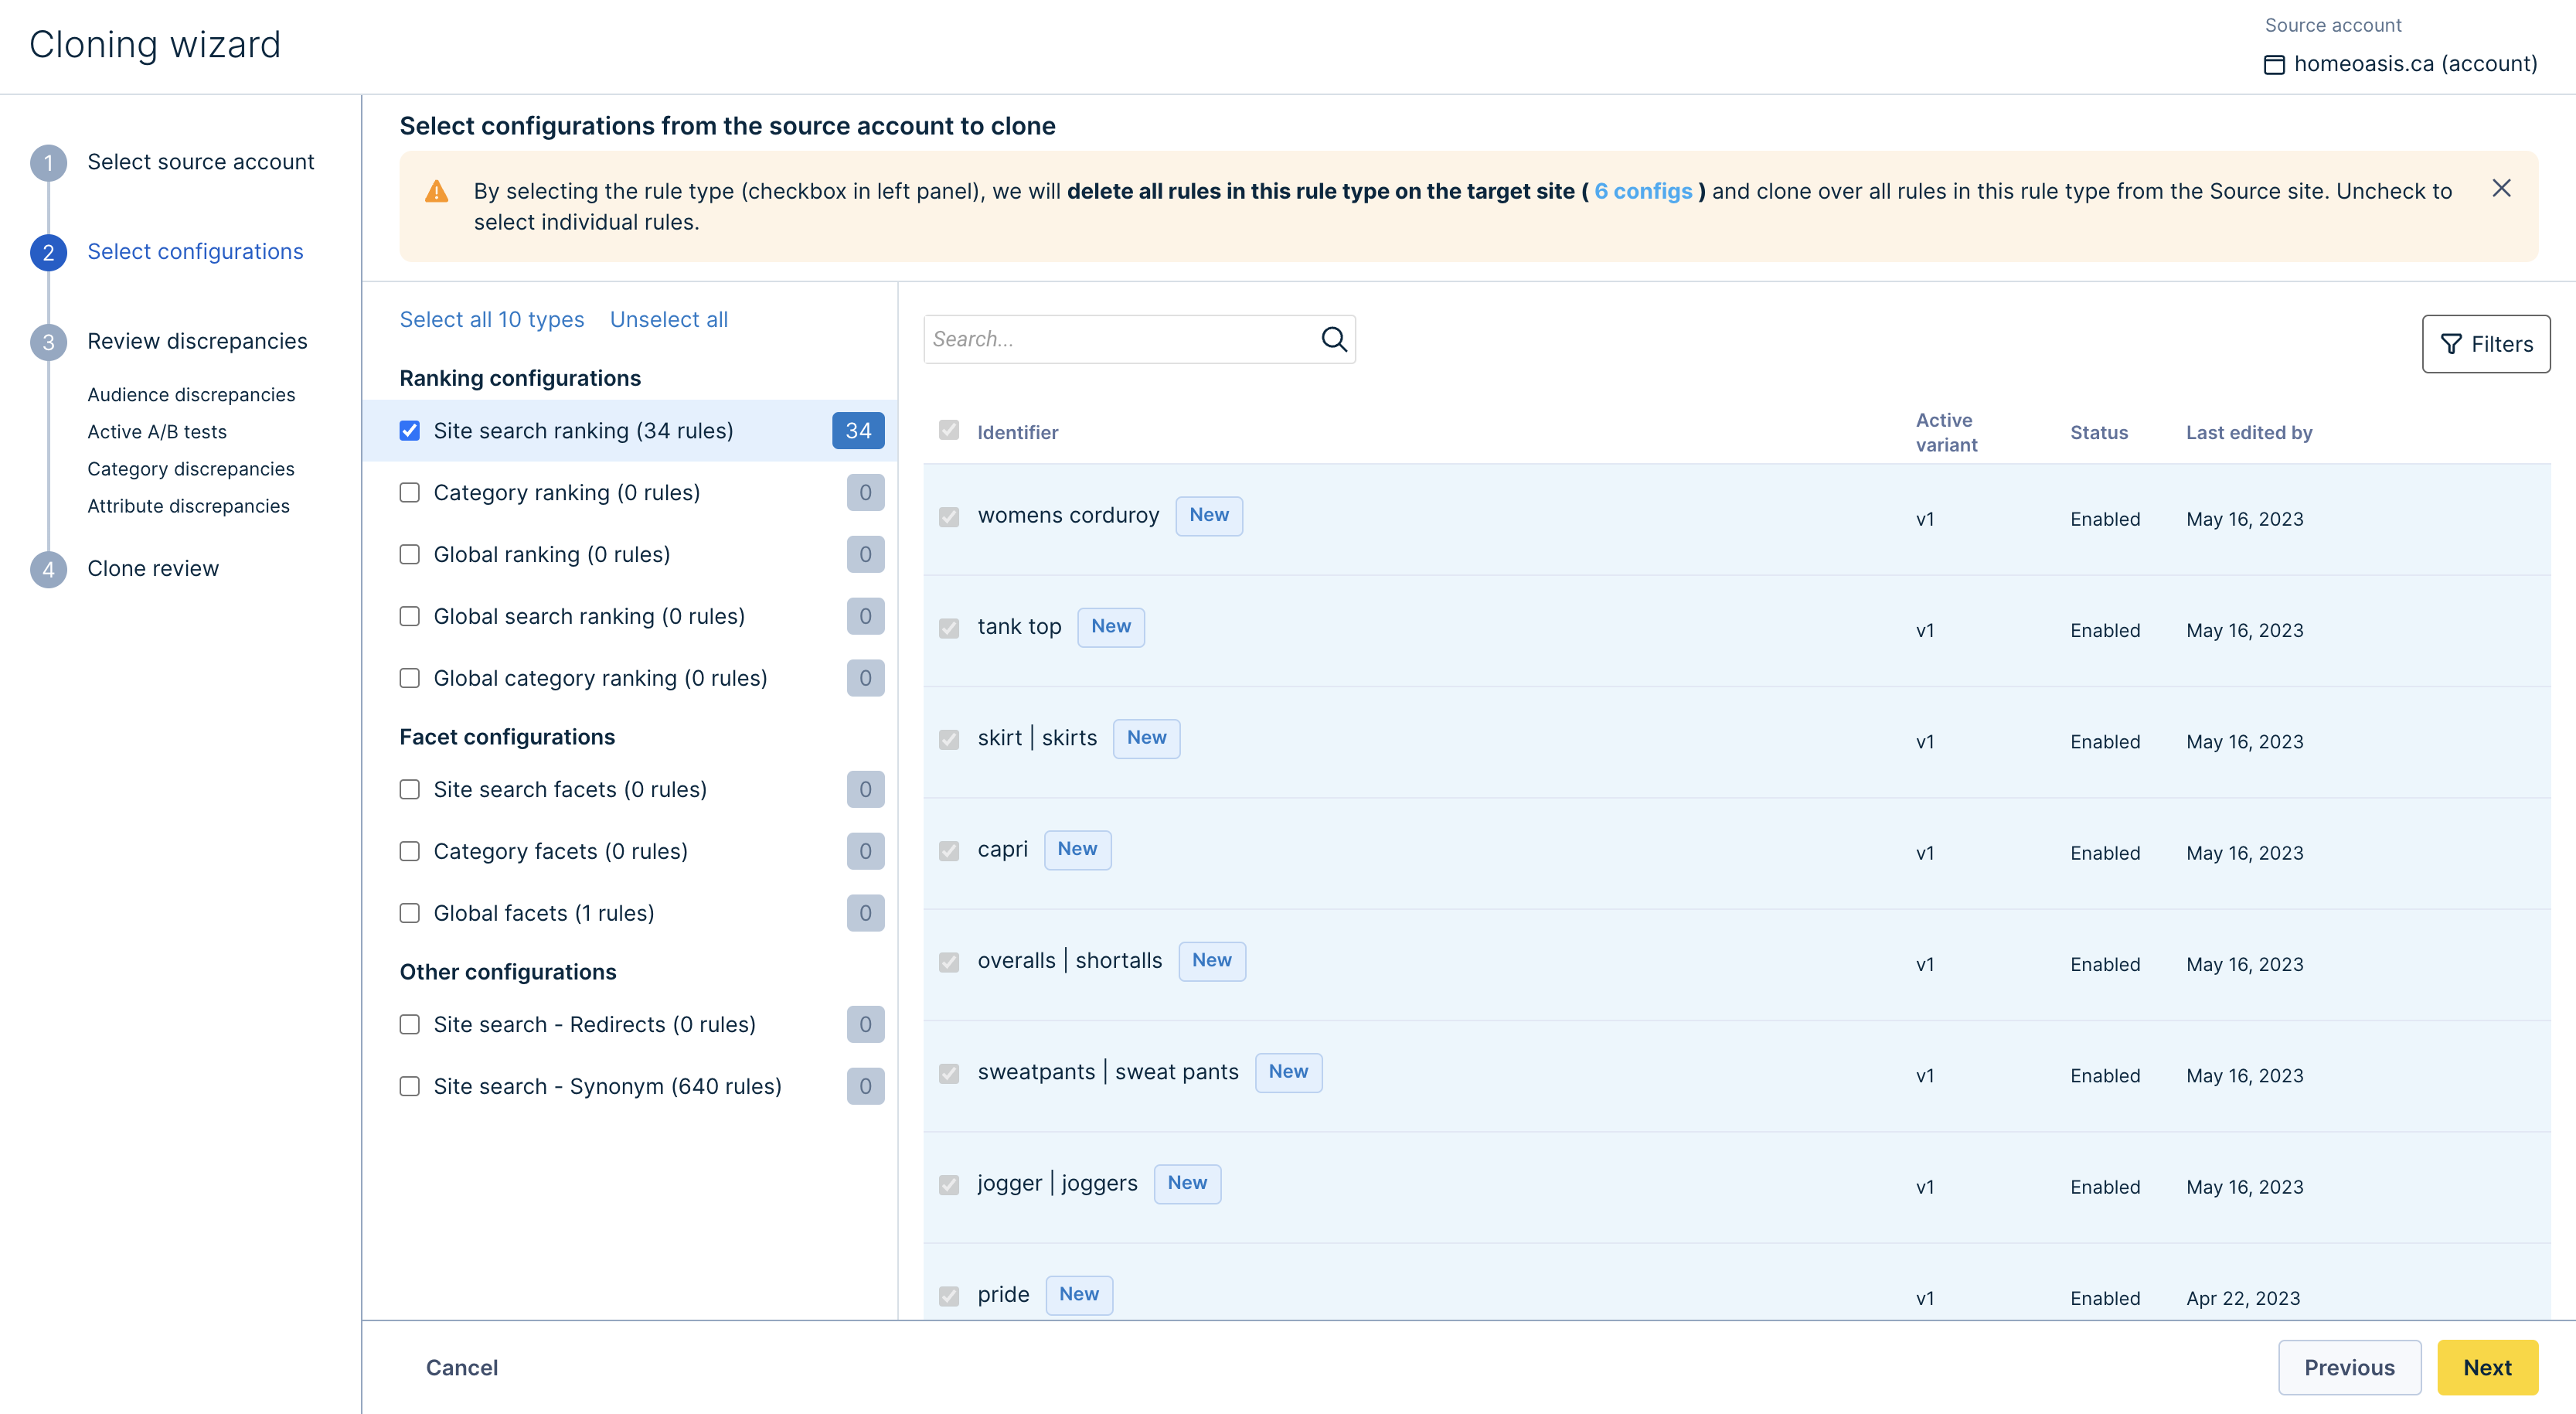
- Choose individual rules within a rule type by clicking the rule type row. The right panel will display a list of individual rules to choose from. Check the boxes next to the individual rules to select them.
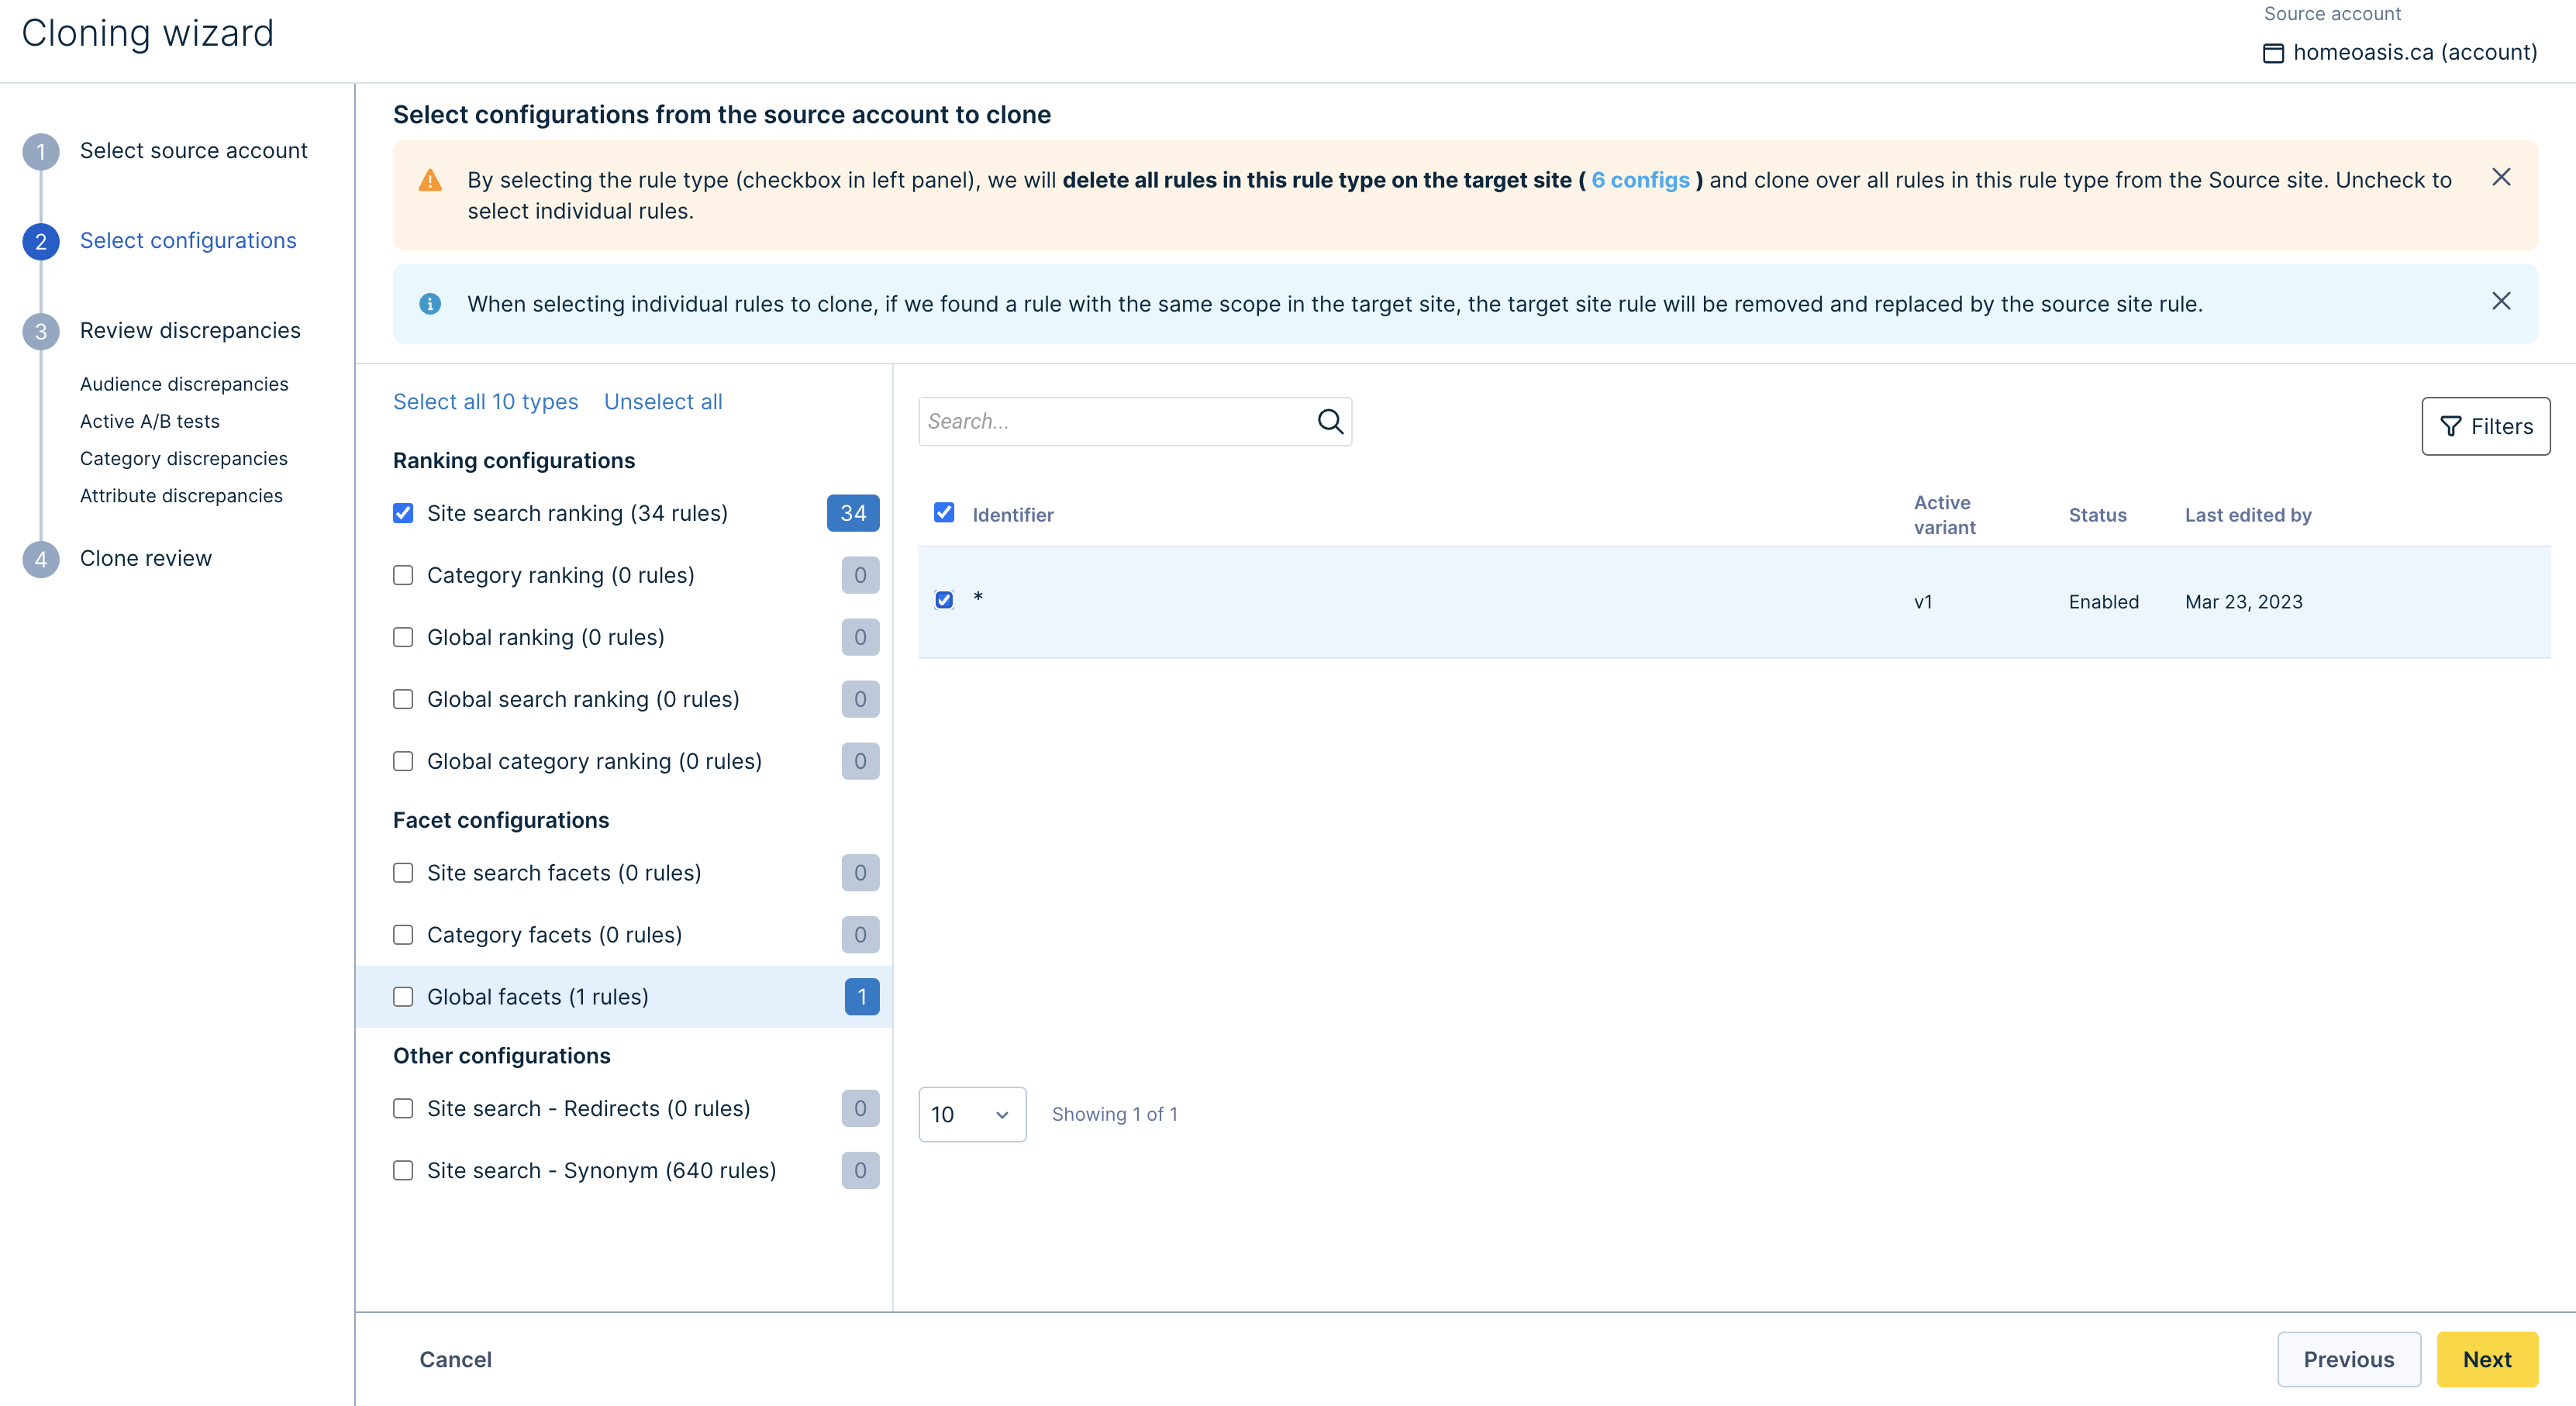
Note: If you select all rules using the checkbox in the right panel, then on the target:
- We'll only delete rules that conflict with the rules on Source in terms of scope.
- We’ll retain the rules with new scopes that are not present on the Source.
Refer to the table below to learn about all the possible selection scenarios and their treatment.
Table usage instructions: Please note that the items chosen on the Source are denoted in bold font, and rules that share the same scope are indicated with an asterisk (*) on both the Source and Target.
| Selection Scenarios | Source | Target | Cloning Treatment | |
|---|---|---|---|---|
| 1. | Only Rule Type selected on the Source | Rule type A - Rule 1 | Rule type A - Rule 3 |
|
| 2. | Only individual rule selected on the Source[same rule scope] | Rule type A - Rule 1* | Rule type A - Rule 3* |
|
| 3. | Only individual rule selected on the Source[different rule scope] | Rule type A - Rule 1 | Rule type A - Rule 3 |
|
| 4. | Both Rule Type and individual rule selected on the Source[same rule scope] | Rule type A - Rule 1 - Rule 2Rule type B - Rule 5* - Rule 6 | Rule type A - Rule 3 - Rule 4Rule type B - Rule 7* - Rule 8 |
|
| 5. | Both Rule Type and individual rule selected on the Source[different rule scope] | Rule type A - Rule 1 - Rule 2Rule type B - Rule 5 - Rule 6 | Rule type A - Rule 3 - Rule 4Rule type B - Rule 7 - Rule 8 |
|
This step can have different cases based on your access. Suppose you’d like to clone rule type A from Site X to Site Y. You can see the following selection scenarios:
| Permission case | Actions available | |
| 1 | You don't have the permission to read rule type A on the Source Site but have permission to write A on Target. | This rule type A will be disabled with the tooltip - “You don’t have read or write permission of configuration type A from Source Site A to clone it.” |
| 2 | You can’t read rule type A on the Source and can’t write A on Target as well. | This rule type A will be disabled with the tooltip - “You don’t have read or write permission of configuration type A from Source Site A to clone it” |
| 3 | You can read rule type A on the Source but can’t write A on Target. | This rule type A will be disabled with the tooltip - “You don’t have write permission of configuration type A on Target Site B to clone it.” |
Selecting configurations with 0 rule countIf you select the configurations with 0 rule count, everything in the target will be deleted, and nothing will be copied.
Notes
- In case you have renamed Facets, the Target site should have Facets with the new names.
- Avoid cloning Site search ranking, Category Ranking, Site search facets, Category facets, Redirects, and Synonym rules if your Target and Source Site have different domain keys/languages. We recommend only cloning configurations between sites that have the same language.
- Cloning Recommendations widgets is not supported.
Viewing and Filtering Configurations
Viewing rules
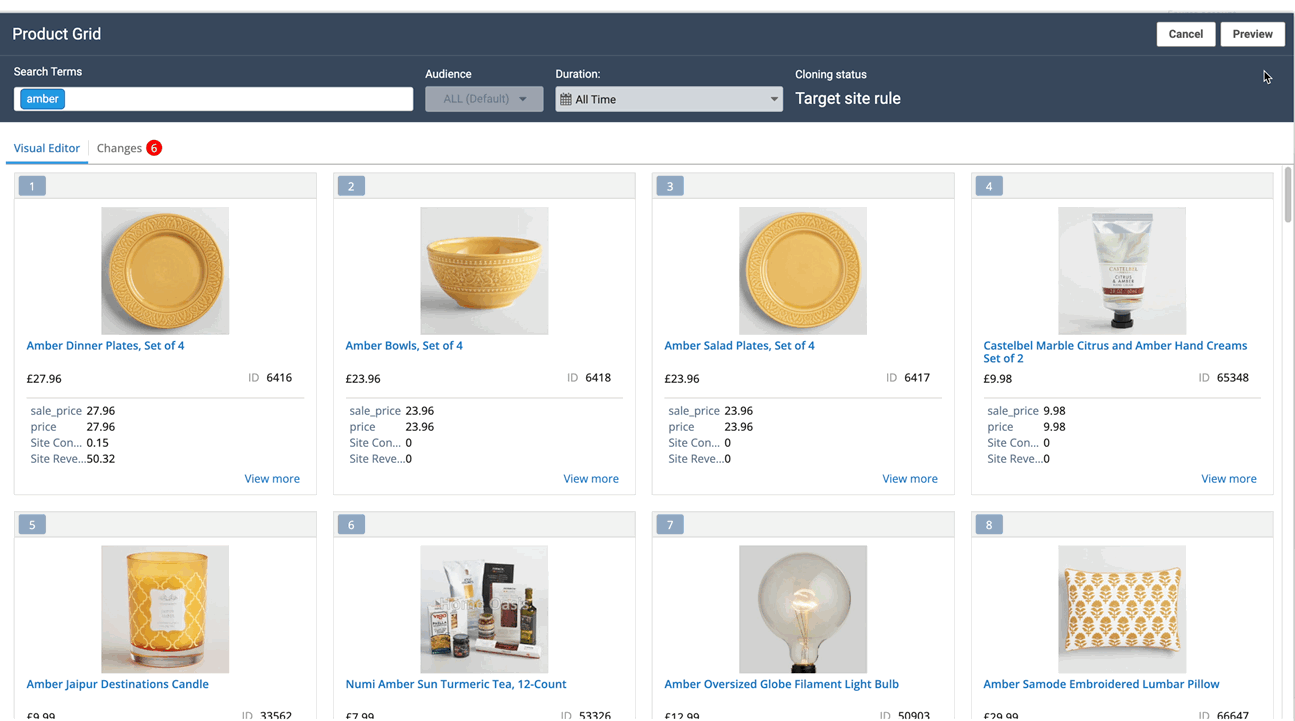
To view the Source site/account rule, click on the “View” action button. This opens up the Product Grid. Here you can view the merchandising operations applied to the rule. You can also preview the product results.
To view the Target site/account rules, click on the “View” dropdown and choose “View target site rule.”

While viewing a Target site/account rule, you can also view a side-by-side comparison of the Target and Source rules. This is visible under the Side-by-Side Preview tab of the Preview module, as illustrated below.
Filtering rules
You may notice that some rules are marked with a blue “New” tag. These are the net new rules on the Source. The Pre-existing rules are rules with the same scope that exist both on the Source and the Target.
Using the Filter options, you can view the associated rules as needed.

Once you’re satisfied with the selected configurations, click Next to proceed to the next step.
5. Review discrepancies
This step will check for discrepancies between the source and Target Site. The checks in place are
Missing ProductsOur system cannot identify missing products in the feed. Please ensure that the product data is up-to-date on your end. Else, any PID level customization on the missing product will be lost.
Known Issues - Missing Products Scenarios
1. Product is missing from the feed on the Target siteIn this case, the missing product will be shown as
OOSin the product grid on the Target site. It will show under the Changes tab, but it will not show up in the Preview section or Frontend API.
2. Product is present in the Target site feed but missing from a specific query for which it is present on the Source siteIn this case, the missing product will appear in the Visual Editor for the specific query on the Target site. It will show under the Changes tab, but it will not show up in the Preview section or Frontend API. This applies to facets as well.
Audience discrepancies
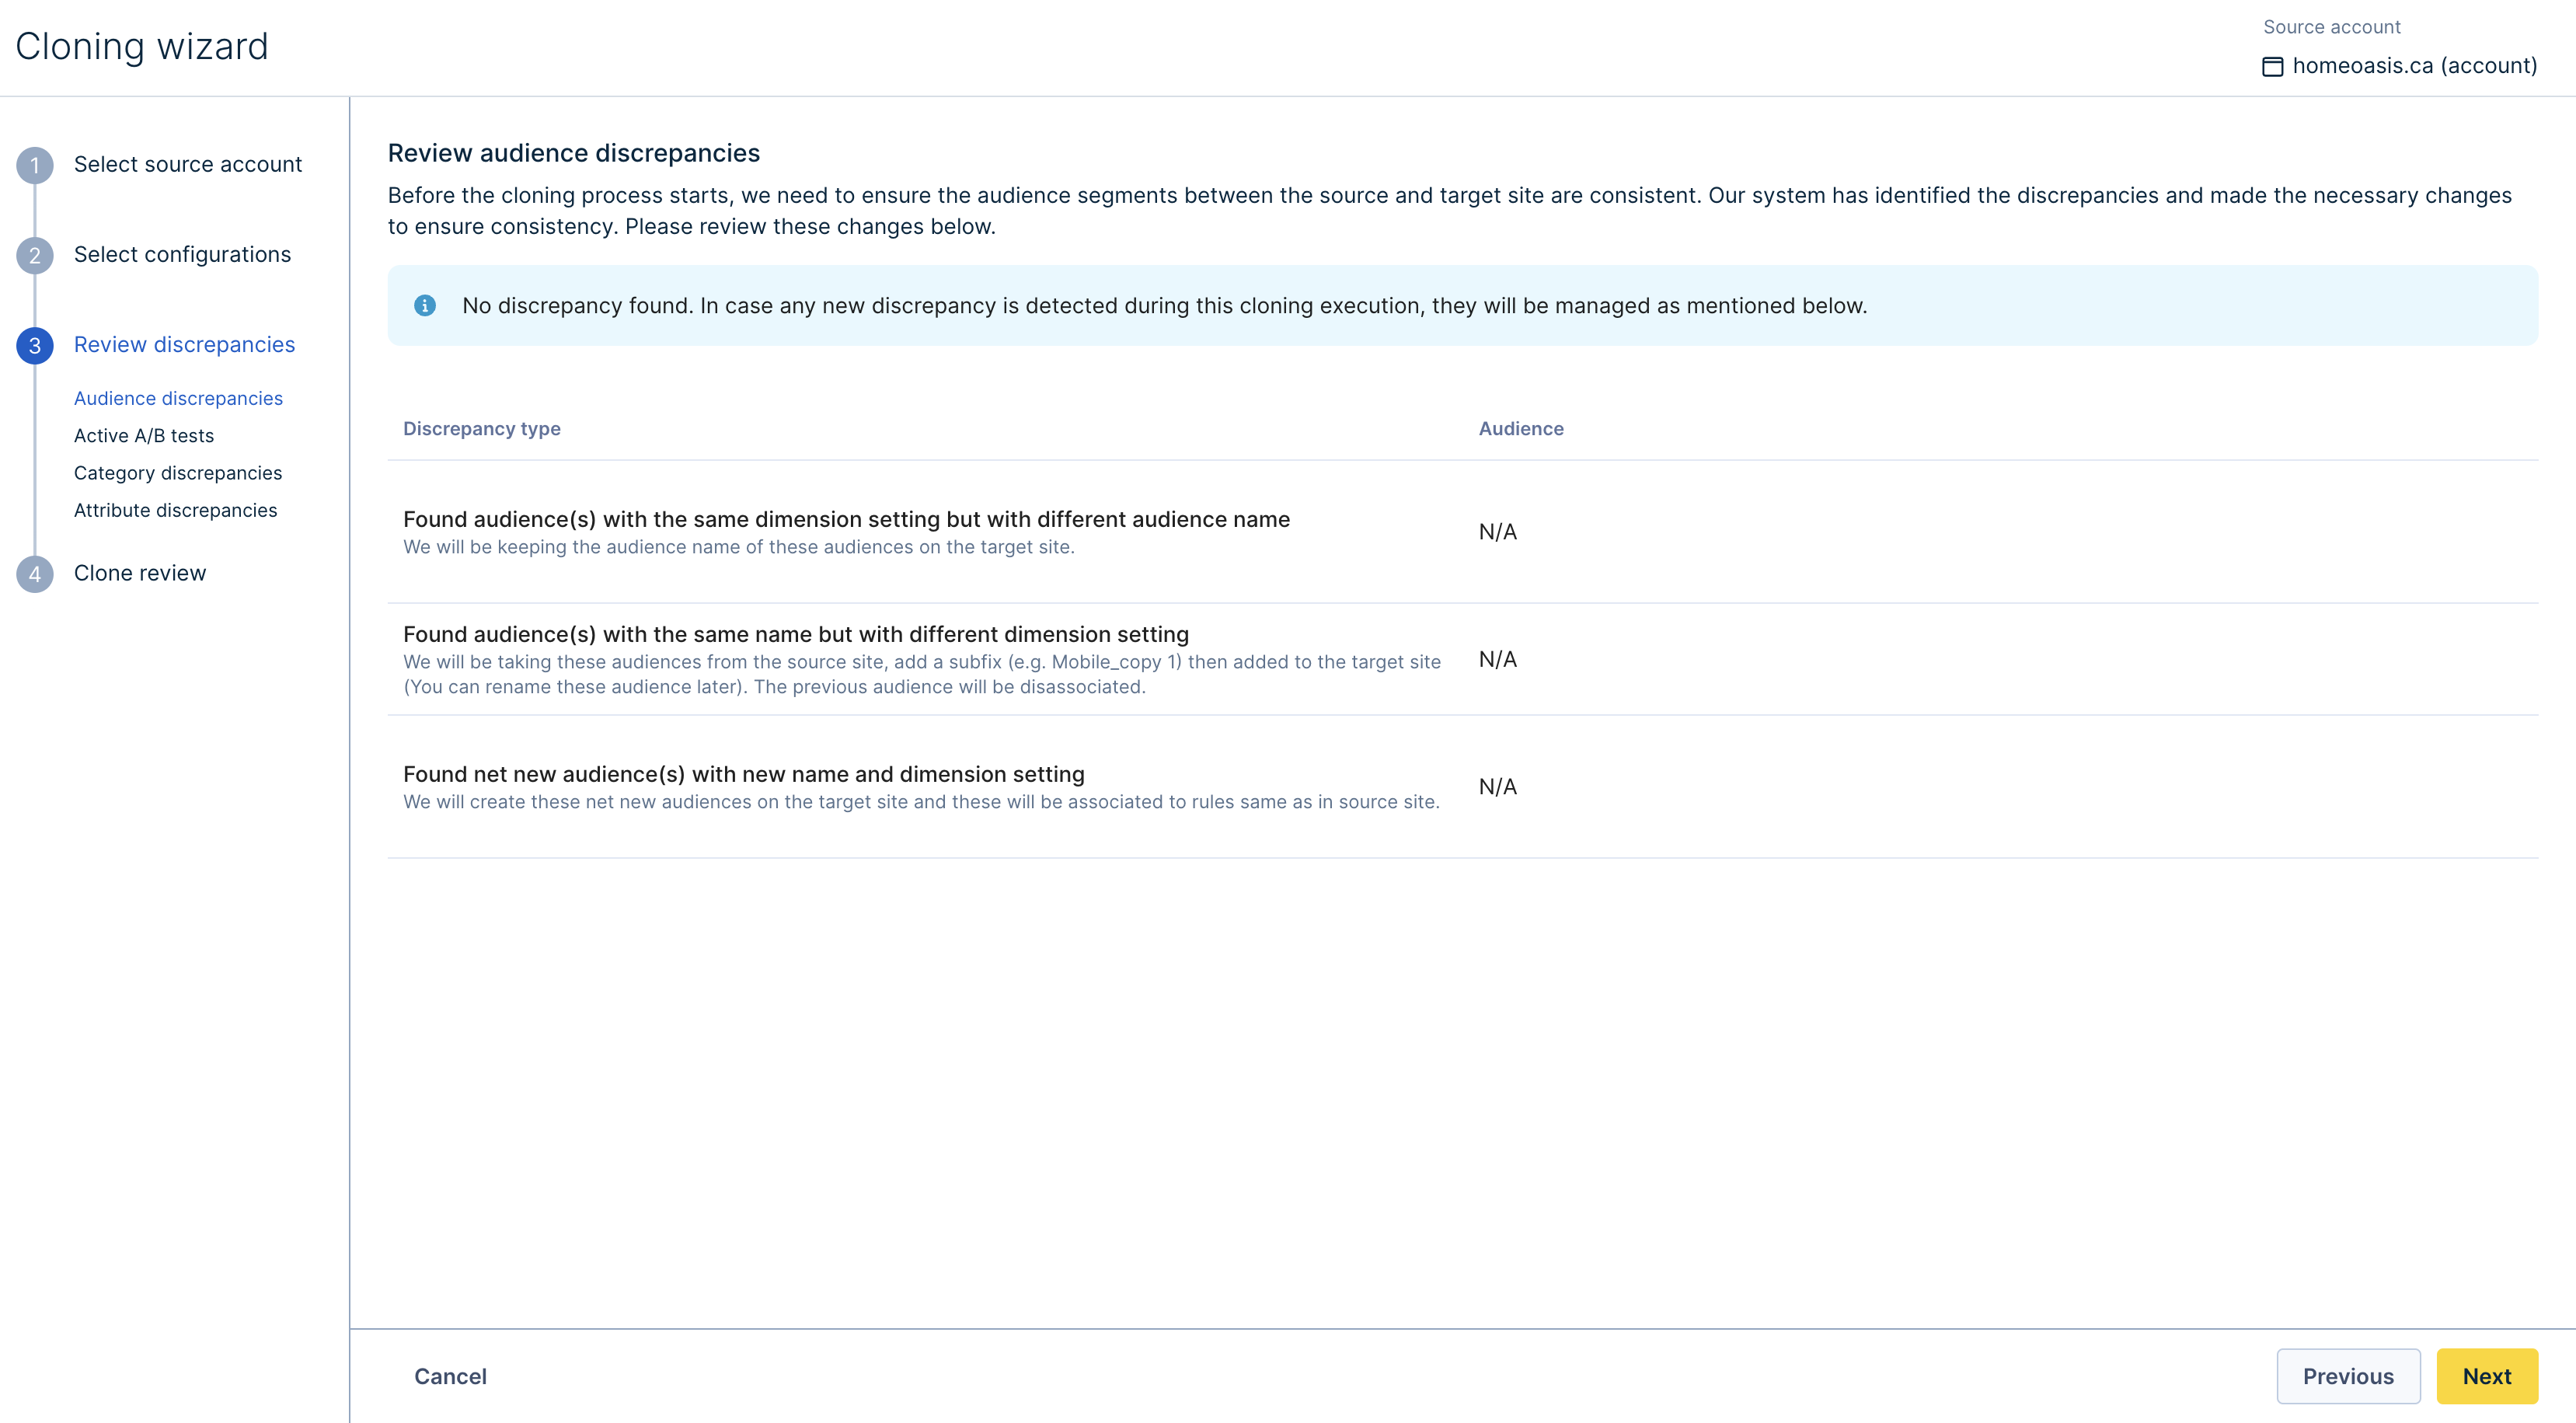
Before the cloning process starts, we need to ensure the audience segments between the source and Target Site are consistent. Our system detects any possible discrepancies and makes necessary changes to address these. The treatment of these discrepancies is listed below:
-
Found audience(s) with the same dimension setting but with different audience name: The system informs you that there is an Audience segment in the Target Site that has the same dimension and dimension values in the Source Site, but they have different names.
Treatment: The Source Audience segment will be replaced with the Target Audience segment, and you can continue to use the Target Audience segment.
-
Found audience(s) with the same name but with different dimension setting:
The system informs you that there is an Audience segment in the Target Site which has different dimension and dimension values in the Source Site, but they have the same name. For example: the Source Site has segment name “North-Eastern Users” with dimension value Location is “New York” while Target Site has segment name “North-Eastern Users” with dimension value Location is “New Jersey, Pennsylvania”.
Treatment: The treatment looks as follows:
- We will create a new ‘copy’ of the Source Site Segment in the Target Site.
- Both the Source Site and Target definition is kept. Source Site definition with “name_copy1” as Audience name and all the copied Source Site rules which were using this Audience segment will use this new “name_copy1” segment as per their targeting setting in the Source Site.
The existing segment definition is kept unchanged. You can rename these audiences later.
-
Found net new audience(s) with a new name and dimension settings
The system informs you that there is an Audience segment in the Target Site that has different dimension and dimension values in the Source Site and they have different names.
Treatment: The system will copy the Source Audience segment and continue to use this Audience segment.
The table summarizes the treatment of various Audience discrepancies:
| Discrepancy | Source Site Audience | Target Site Audience | Treatment of audience(s) |
| Found audience(s) with the same dimension setting but with different audience name | Audience segment name: Southeast Dimension and dimension value: Location is “tampa, florida” | Audience segment name: Florida Users Audience Segment Dimension and dimension value: Location is “tampa, florida” | The Target Audience segment (Florida Users with dimension Location is “tampa, florida”) will replace the Source Audience segment. |
| Found audience(s) with the same name but with different dimension setting | Audience segment name: North-Eastern Users Dimension and dimension value: Location is “New York” | Audience segment name: North-Eastern Users Dimension and dimension value: Location is “New Jersey, Pennsylvania” |
|
| Found net new audience(s) with a new name and dimension settings | Audience segment name: All Desktop Dimension and dimension value: Device is “Desktop” | Audience segment name: Mobile users Dimension and dimension value: Device is “Mobile” | Source Audience segment (All Desktop with Device is “Desktop”) will be copied to the Target Site. This will be created as a new audience. The Target audience segment will stay intact. |
Note: When the audience dimensions are missing on the target, the source audience will not be cloned to the target. We do not create audience on the target while the segments exist on the source audience. Moreover, the rules associated with this uncopied audience will not be cloned to the target account/site.
Click Next to proceed to the next step.
Active A/B tests

This step reviews if there are any rules that are currently being AB tested on the Target Site. You may come across a case where a rule is part of an Active test, and the rule needs to be overwritten/deleted as part of the cloning process. If you choose to continue, the active test on the Target Site will be archived. Click Next to proceed to the next step.
Category discrepancies
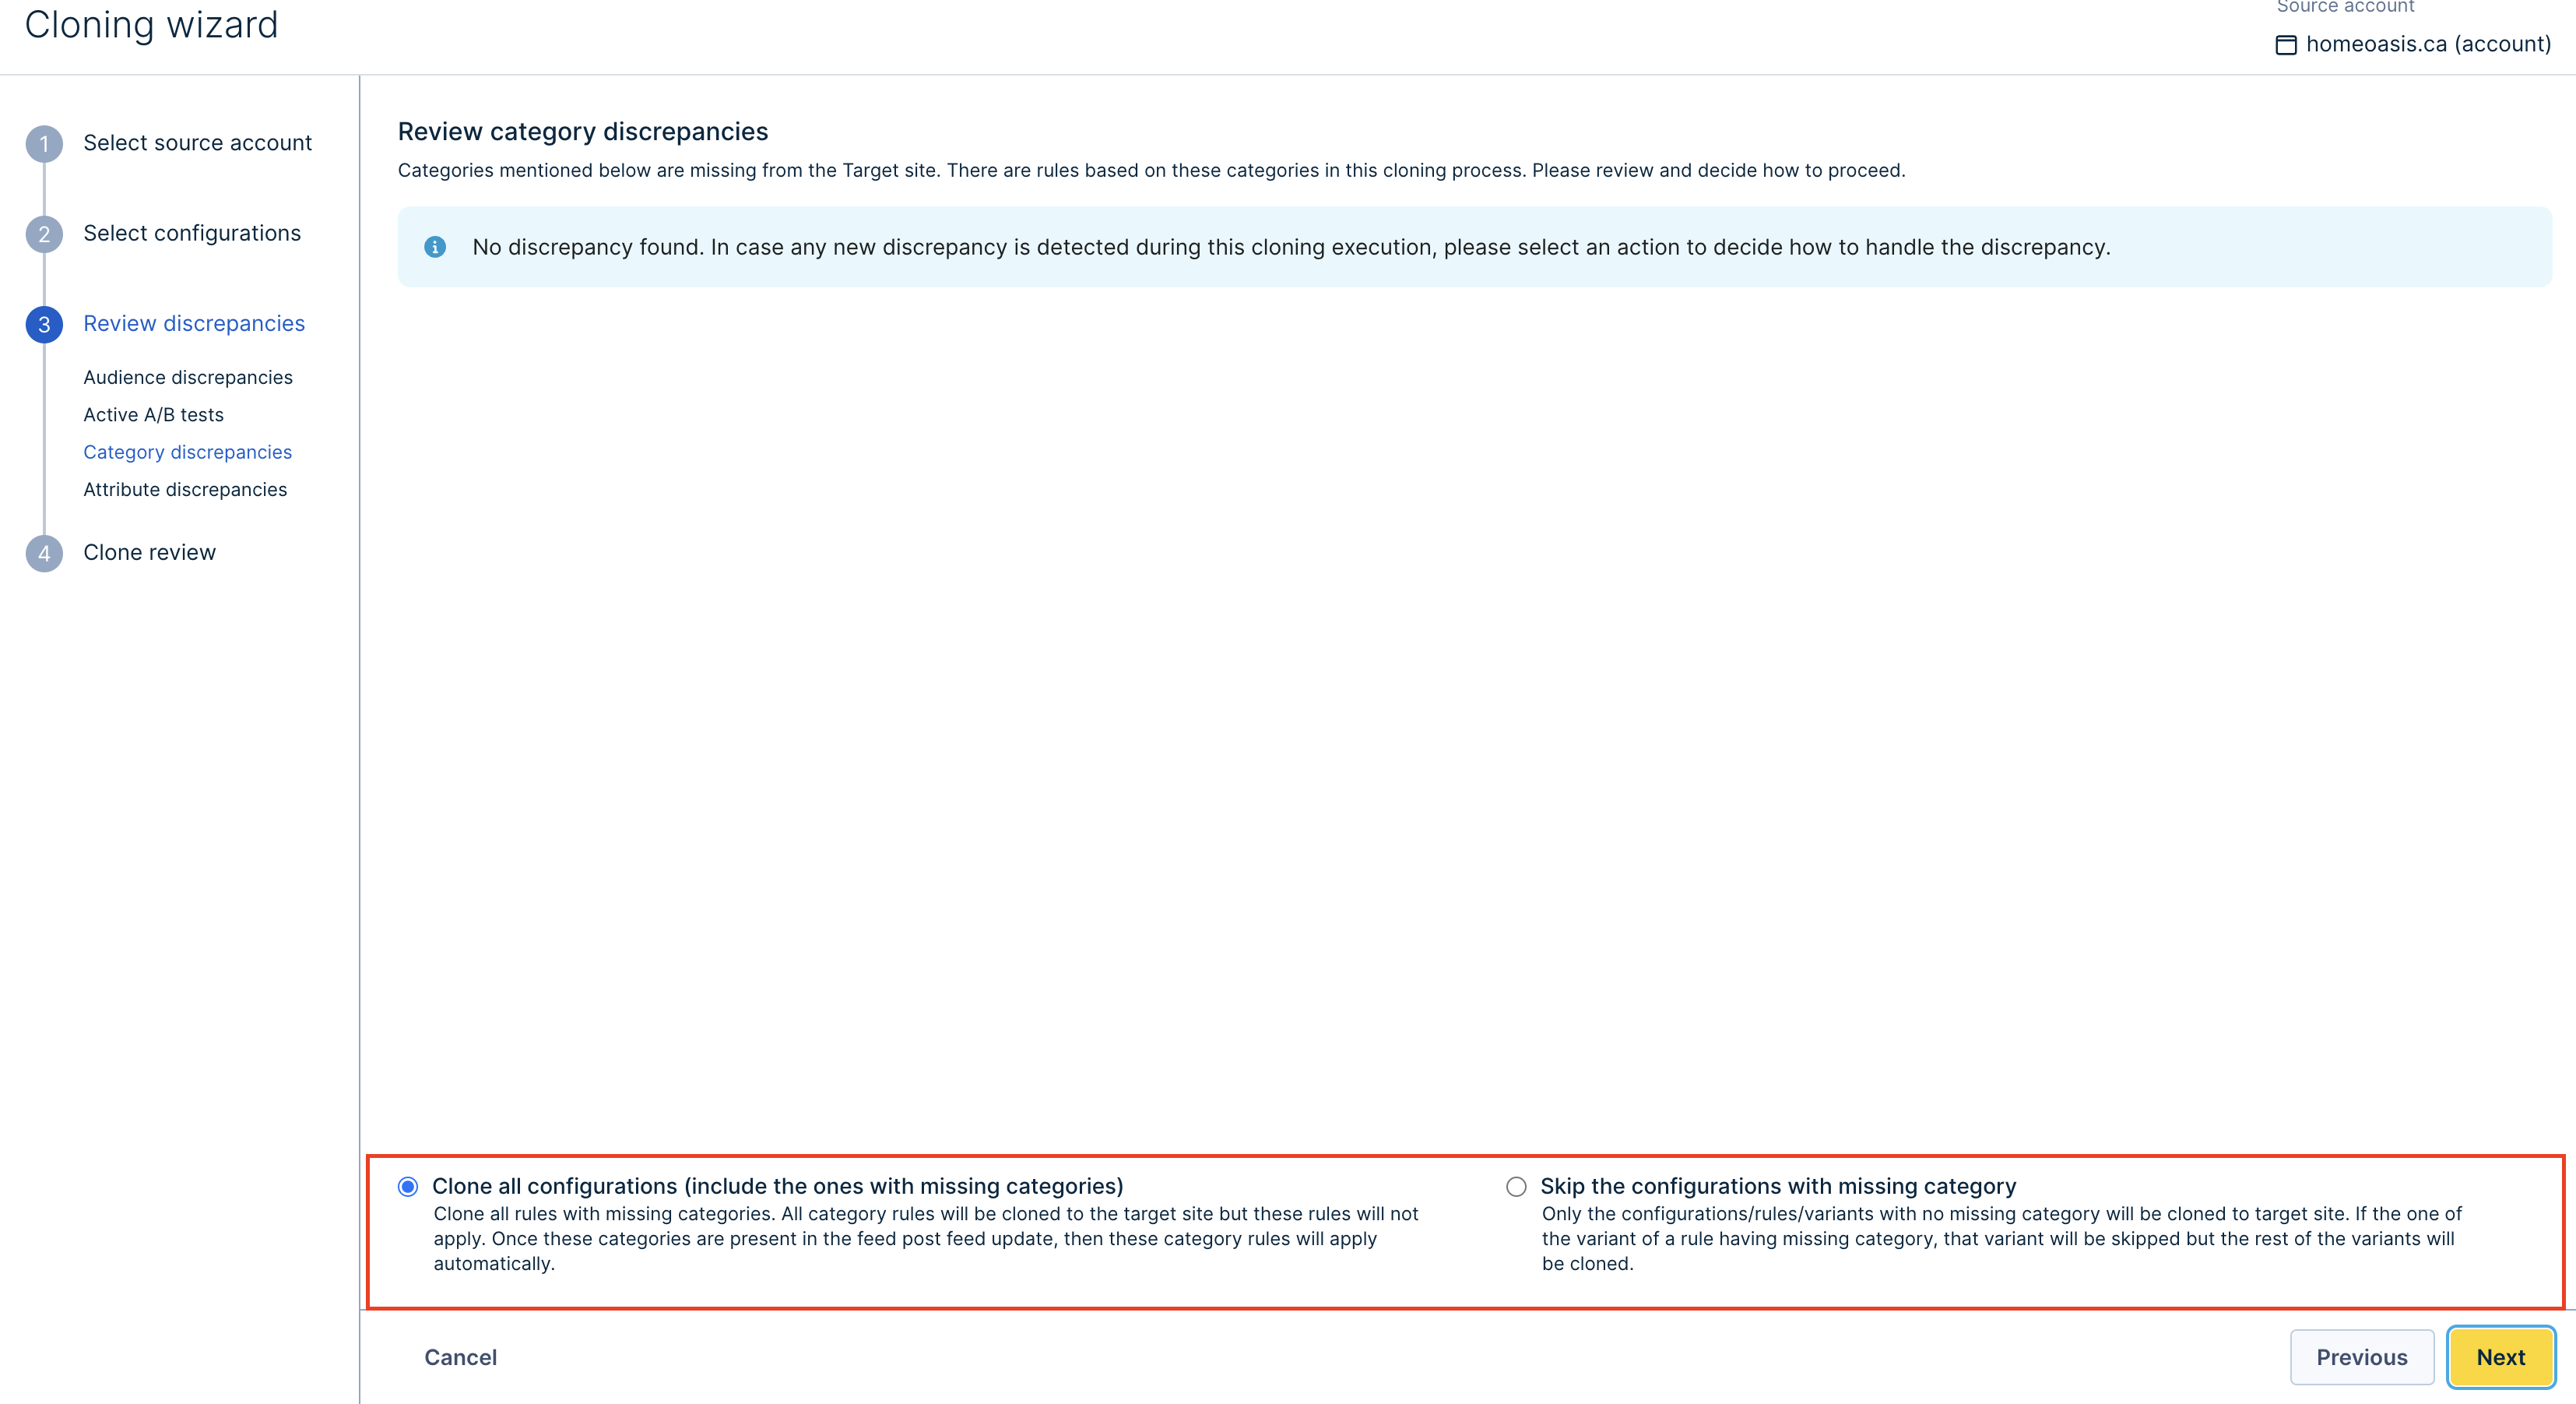
This step is to review the missing Categories on the Target Site. The dashboard shows a list of missing Categories and associated rules. You can choose how to proceed by selecting either of these options:
-
Clone all configurations (include the ones with missing categories)
Use this option to clone all rules with missing categories. Our system will clone all category rules cloned to the Target Site. Please note the rules with missing categories will not apply. Once you add these categories after the feed update, then these category rules will apply automatically. -
Skip the configurations with missing attributes
Use this option to clone only the configurations/rules/variants with no missing attribute to the Target Site.
Please note that skipping rules is done at the variant level. If one of the variants of a rule has a missing attribute, that variant will be skipped, but the rest of the variants will be cloned.
When there are no discrepancies: You can choose any of the given 2 actions in case a new discrepancy is detected during the cloning execution.
Click Next to proceed to the next step.
- Canceling the operation
You can use the cancel option to cancel the whole copy operation. You can go back to update the feed and initiate the copy operation later.
Attribute discrepancies
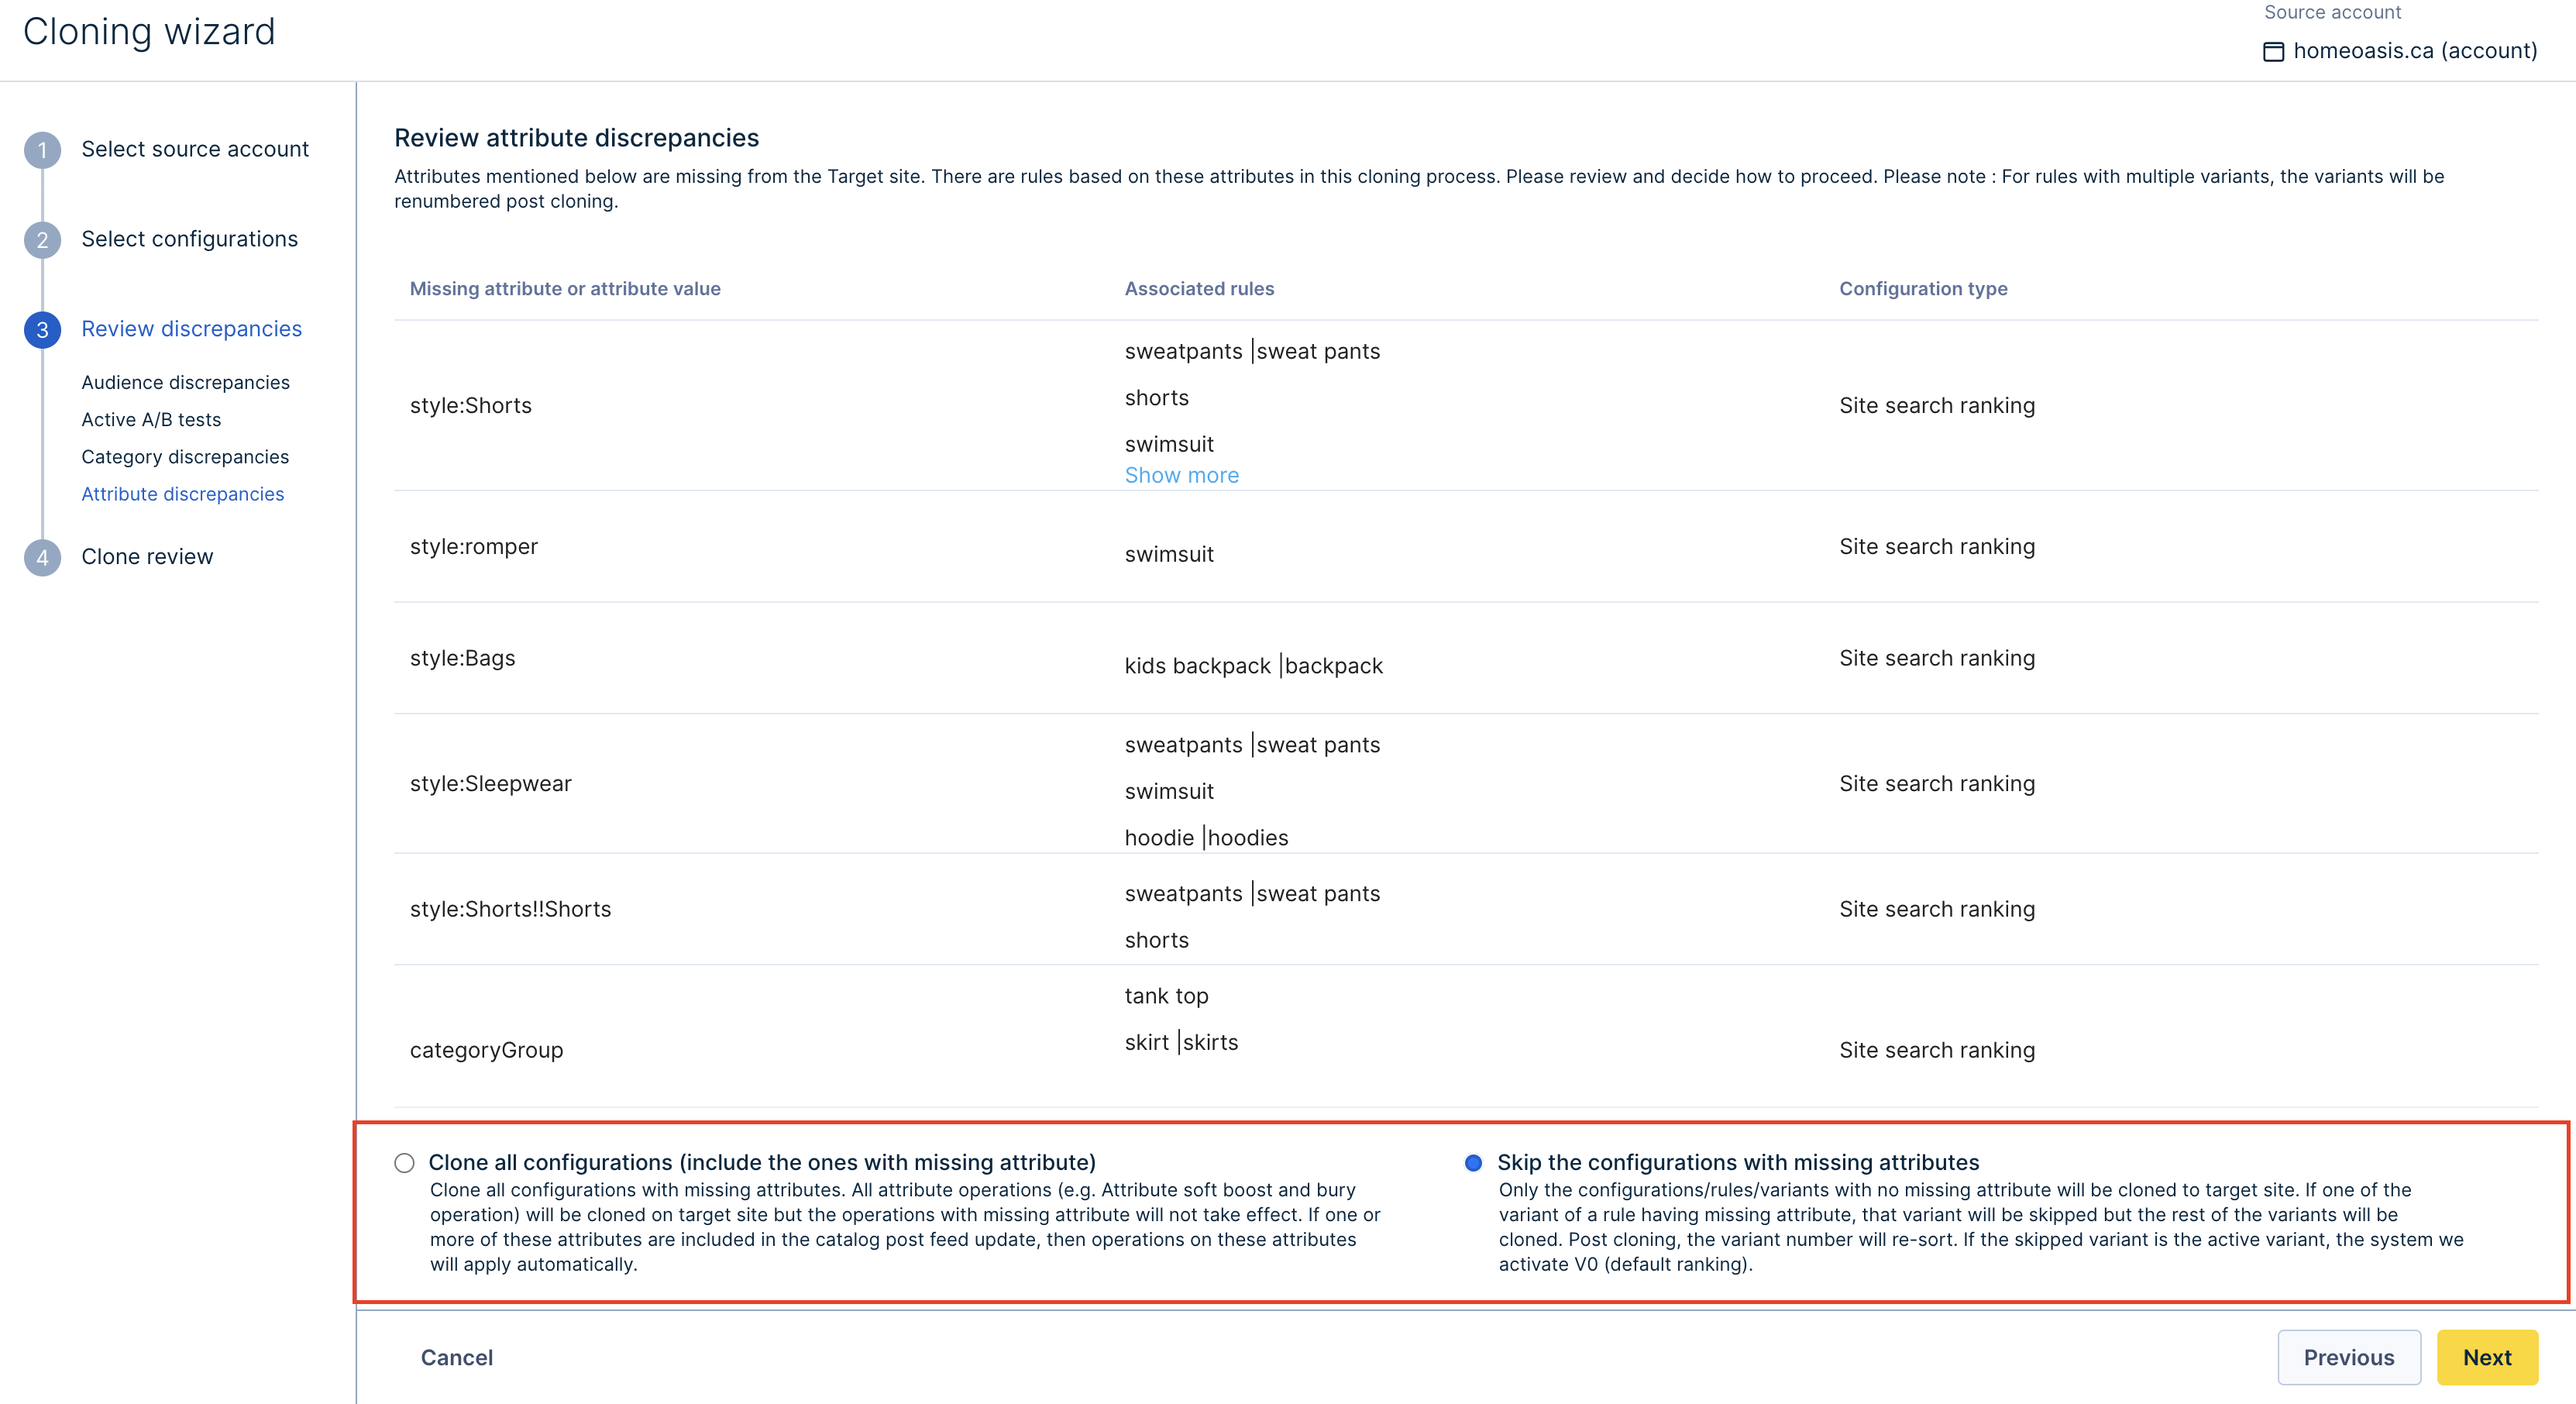
This step is to review any attribute discrepancies between Source Site and the Target Site. The dashboard shows a list of missing attributes and associated rules. You can choose how to proceed by selecting either of these options:
- Clone all configurations (include the ones with missing attributes)
Use this option to clone all configurations with missing attributes. Our system will clone all the attribute operations (e.g. Attribute soft boost and bury operation) on the Target Site. Please note that the operations with missing attributes will not work. If you include these missing attributes in the catalog after the feed update, then operations on these attributes will apply automatically.
- Skip the configurations with missing attributes
Use this option to clone only the configurations/rules/variants with no missing attributes to the Target Site.
If one of the variants of a rule has a missing attribute, that variant will be skipped, but the rest of the variants will be cloned. After cloning, the variant number will re-sort. If the skipped variant is the active variant, the system will activate V0 (default ranking).

- Variant Numbers After Cloning
Please note that variants will be renumbered post cloning. Even if you choose to copy all the variants, the variant sort can differ from the variants sort of the source. Example: There is a rule named dress at the Source Site. Peter has created 3 variants (V1, V2, V3). He tested and deleted 2 variants (V2, V3). Then, he created 3 more variants (V4, V5, V6). He tested and deleted 1 variant(V5). So currently, rule dress has 3 variants (V1, V4, V6).
When the rule dress is copied to the Target Site (even without skipping any operations due to missing attributes), variant no. will change from (V1, V4, V6) > (V1, V2, V3). This is irrespective of whether we skip a variant or not.
- AB test for multiple variants in the Source Site
Multiple variants can be active on the Source Site as a part of AB testing. But when you copy these variants to the Target Site, only one variant can be active.
The following scenarios can help determine the active variant on the Target Site:
- When the control variant in the Source Site is not skipped: The control variant will be the active variant in the Target Site.
- When the control variant in the Source Site is skipped: The default variant for this rule will be the active variant in the Target Site. The default variant for a rule can not be skipped as it has no customizations.
When there are no discrepancies: You can choose any of the given 2 actions in case a new discrepancy is detected during the cloning execution.
Click Next to proceed to the next step.
- Canceling the operation
You can use the cancel option to cancel the whole copy operation. You can go back to update the feed and initiate the copy operation later.
6. Clone review
This step outlines the Cloning path and list of selected configurations to be cloned and replaced.
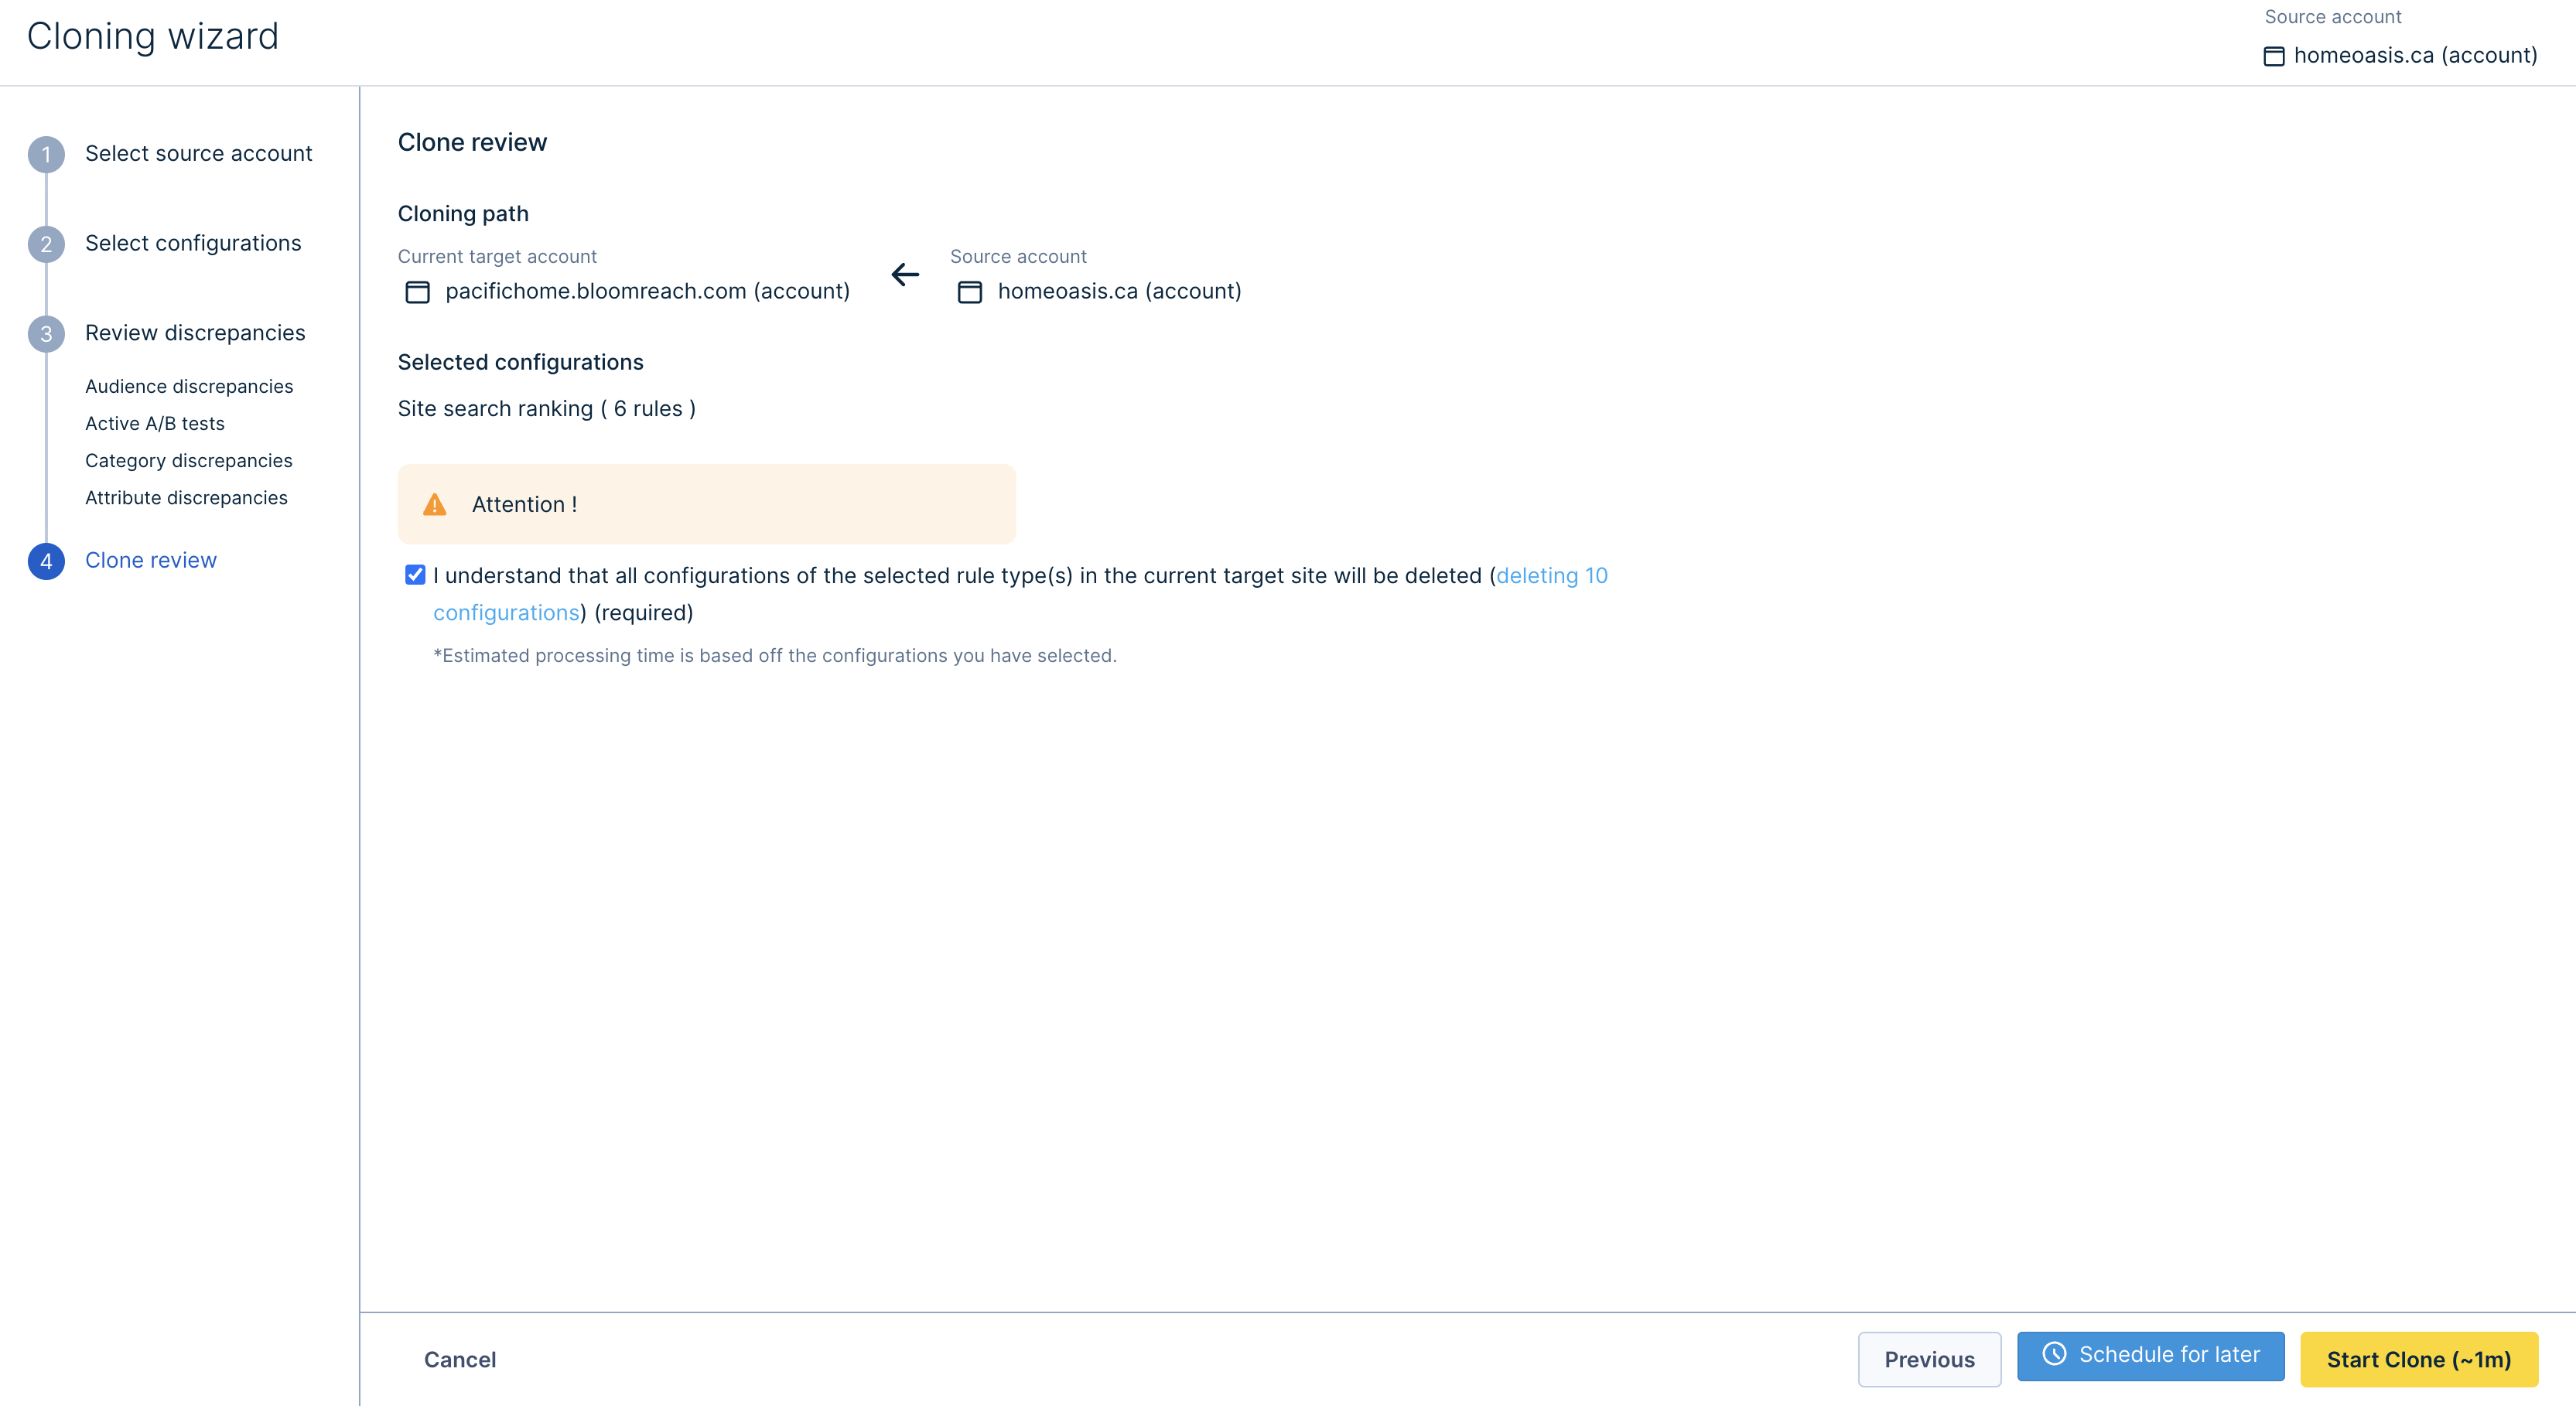
You are required to tick the warning checkbox and choose one of the following to conclude the cloning process:
- Start Clone(~approximate time): Use this to kickstart the cloning process and complete it within the estimated processing time shown on the screen.
- Schedule for later: Use this to schedule the cloning process at a date and time of your choice. We only support one-time schedules for a specified date and time. Recurring schedules for any given slot or any given type are not supported.
Note: Scheduled jobs may have different dependencies during setup versus when the rule is actually copied based on the schedule.
The Clone Configurations page will reflect Scheduling information. If a Rule Type copy is scheduled already and you try to schedule another copy for the same Rule type or start another copy process for the same Rule type within 24 hours, you’ll see a warning message about the copy schedule. You’ll need to review the previous set schedule.
When the cloning process begins, you’ll see a progress bar that shows the current status of the cloning process. After the cloning process is complete, you cannot reverse it.
When the cloning process is complete, click the View Report action button to view the Cloning process report.

The Report might differ based on the job executed:
When the job gets executed without any failures: If the clone job is successful without any failures or discrepancies, the report page shows the count of the following:
- Total planned configurations to clone: This count consists of rules that you planned to clone. It excludes the rules with discrepancies and the associated skipped rules (if you skipped any).
- Actual configurations cloned successfully: This count consists of rules that were actually cloned to the target. This count excludes the skipped rules.
- Configurations failed to clone: This count consists of rules that weren’t cloned to the target. The failed count is 0 in the case shown above.
- Deleted configurations on the target site
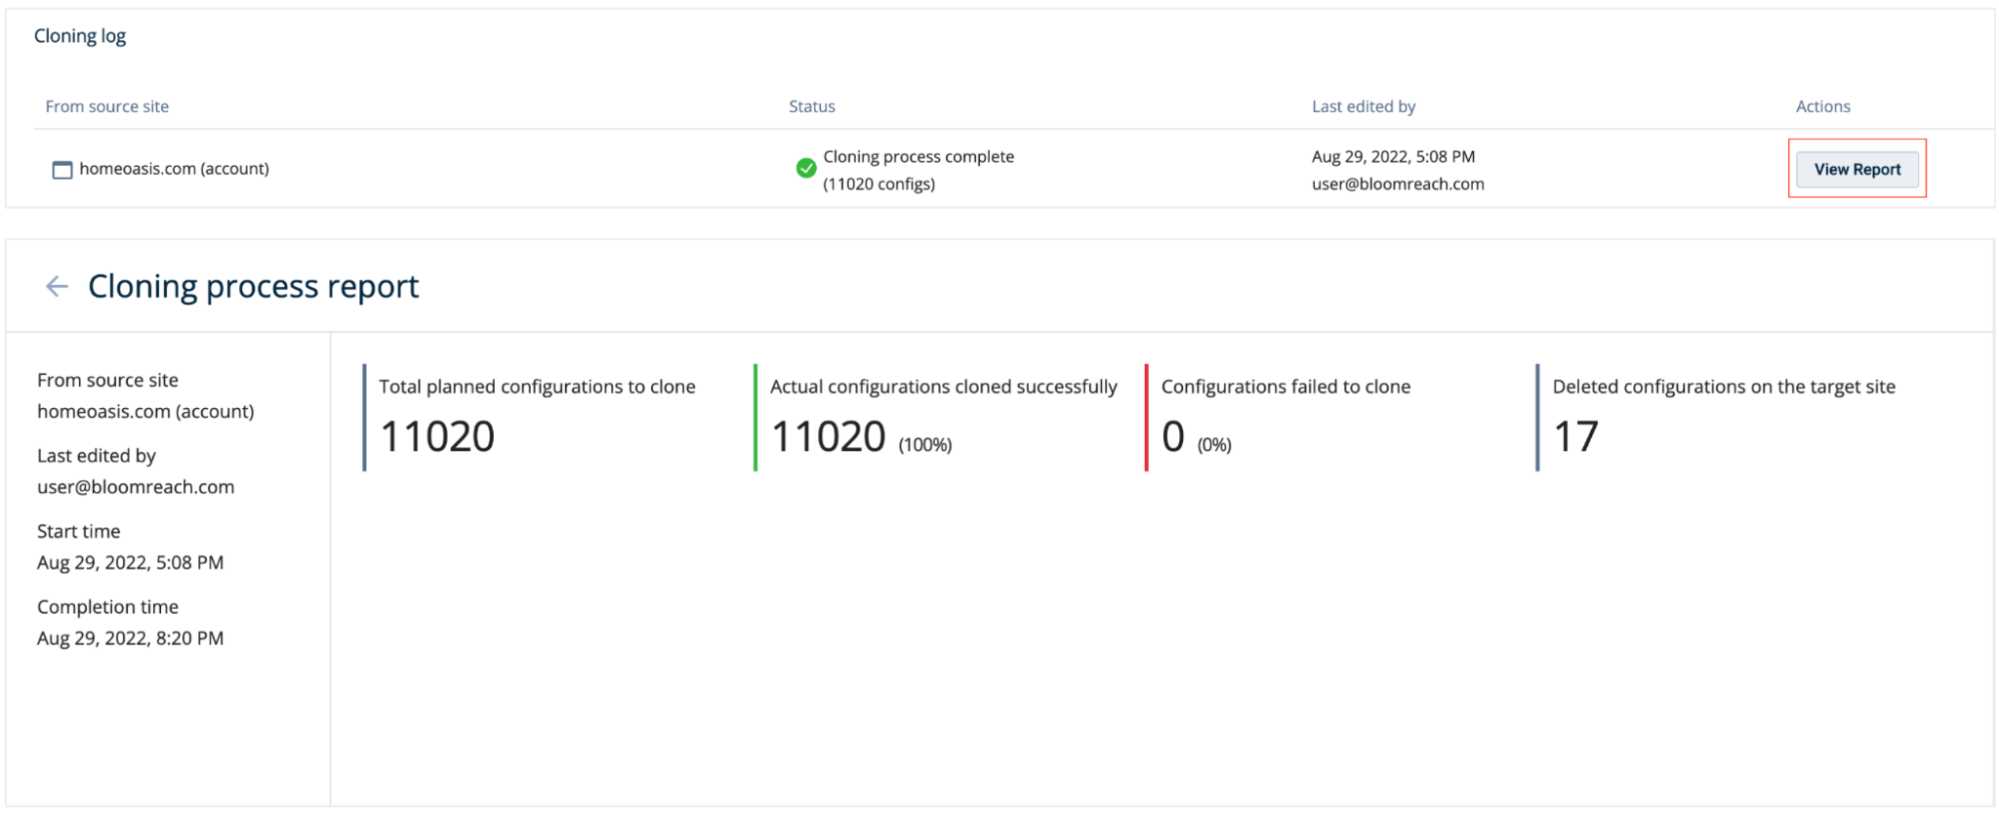
Job executed without any failures

Job executed with discrepancies
When the job gets executed with discrepancies: If the clone job is completed with any failures or discrepancies, the report page shows the total, successful, failed, and deleted configurations count along with information about any kind of discrepancies and the associated skipped rules (if any).
Note: Whether the cloning job is completed with or without discrepancies, the Cloning report will always show the total, successful, failed, and deleted configurations count.
✍️ Points to remember
- You can leave the setup to fix feed gaps and not lose your setup progress. For this, choose Cancel and then Save Draft. This way, you can always come back to the setup draft under the Cloning log and proceed further with the cloning process.

- If you refresh the page, you will still stay on the page. If you cancel/close the tab, then you’ll see a caution window asking you to save the progress as a draft or abandon it completely.
- You must ensure that the Feed Attributes between the Source Site and the Target Site are in sync for efficient cloning.
FAQs
-
You renamed a Facet at the Global level, but only copied Category/Sitesearch Facet rules (not Global rules). On the Target site, what will be the Facet name?
As you only copied Category/Sitesearch Facet rules, the Global renaming rule won’t be considered. So the renaming won’t apply.
Updated 4 months ago