

Catalog Settings
What are Catalog Settings
Catalog Settings empower you to independently manage various catalog-level settings that impact your Bloomreach experience. You no longer need to rely on Bloomreach Service or Support teams to implement changes, thus saving both time and cost.
In this feature iteration, you can configure the following settings:
- General settings for feed, indexing, and default attribute configurations.
- Variants Settings.
- Autosuggest Settings —Keyword, Product, and Attribute.
How to configure Catalog Settings
1. Navigation
- Go to Setup > Catalogs.
- Choose the desired catalog. Selecting the Production catalog will apply the configurations to the production environment.
- Click the Settings tab. This opens up the Catalog Settings interface with the 3 settings menu - General, Variants, and Autosuggest.
2. Configuring General Settings
You can modify the following settings in the General settings section:

2.1 Feed

- Feed job processing: Use this toggle to control whether every feed job submitted should be processed.
2.2 Index
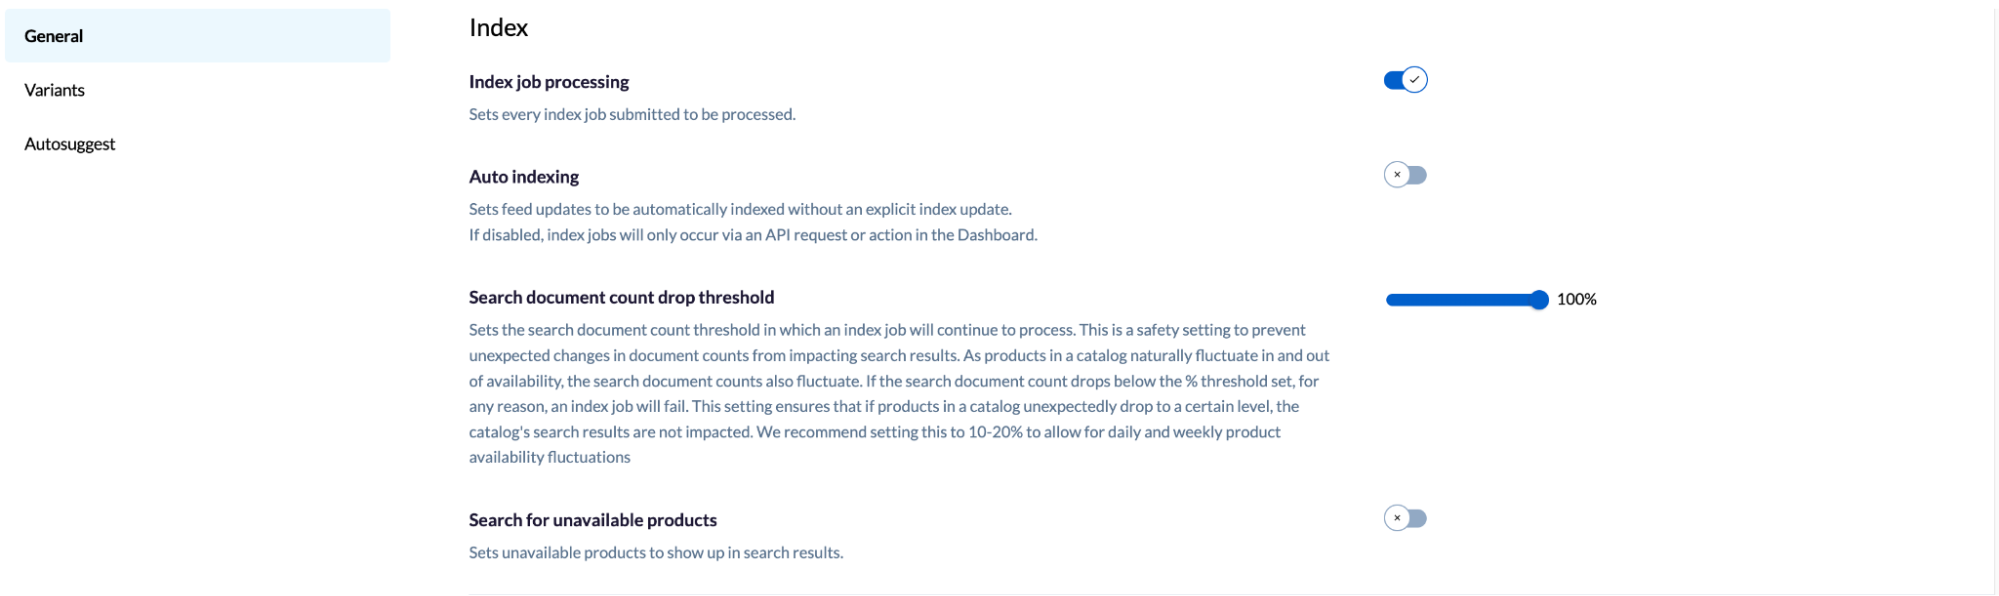
- Index job processing
Use this to set every index job submitted to be processed.
- Auto indexing
Use this to index feed updates automatically without an explicit index update. If disabled, index jobs will only occur via an API request or action in the Catalogs application UI.
- Search document count drop threshold
This sets the search document count threshold in which an index job will continue to process. This is a safety setting to prevent unexpected changes in document counts from impacting search results.
As products in a catalog naturally fluctuate in and out of availability, the search document counts also fluctuate. If the search document count drops below the % threshold set, for any reason, an index job will fail. This setting ensures that if products in a catalog unexpectedly drop to a certain level, the catalog's search results are not impacted.
We recommend setting this to 10-20% to allow for daily and weekly product availability fluctuations.
- Search for unavailable products
This sets unavailable products to show up in search results.
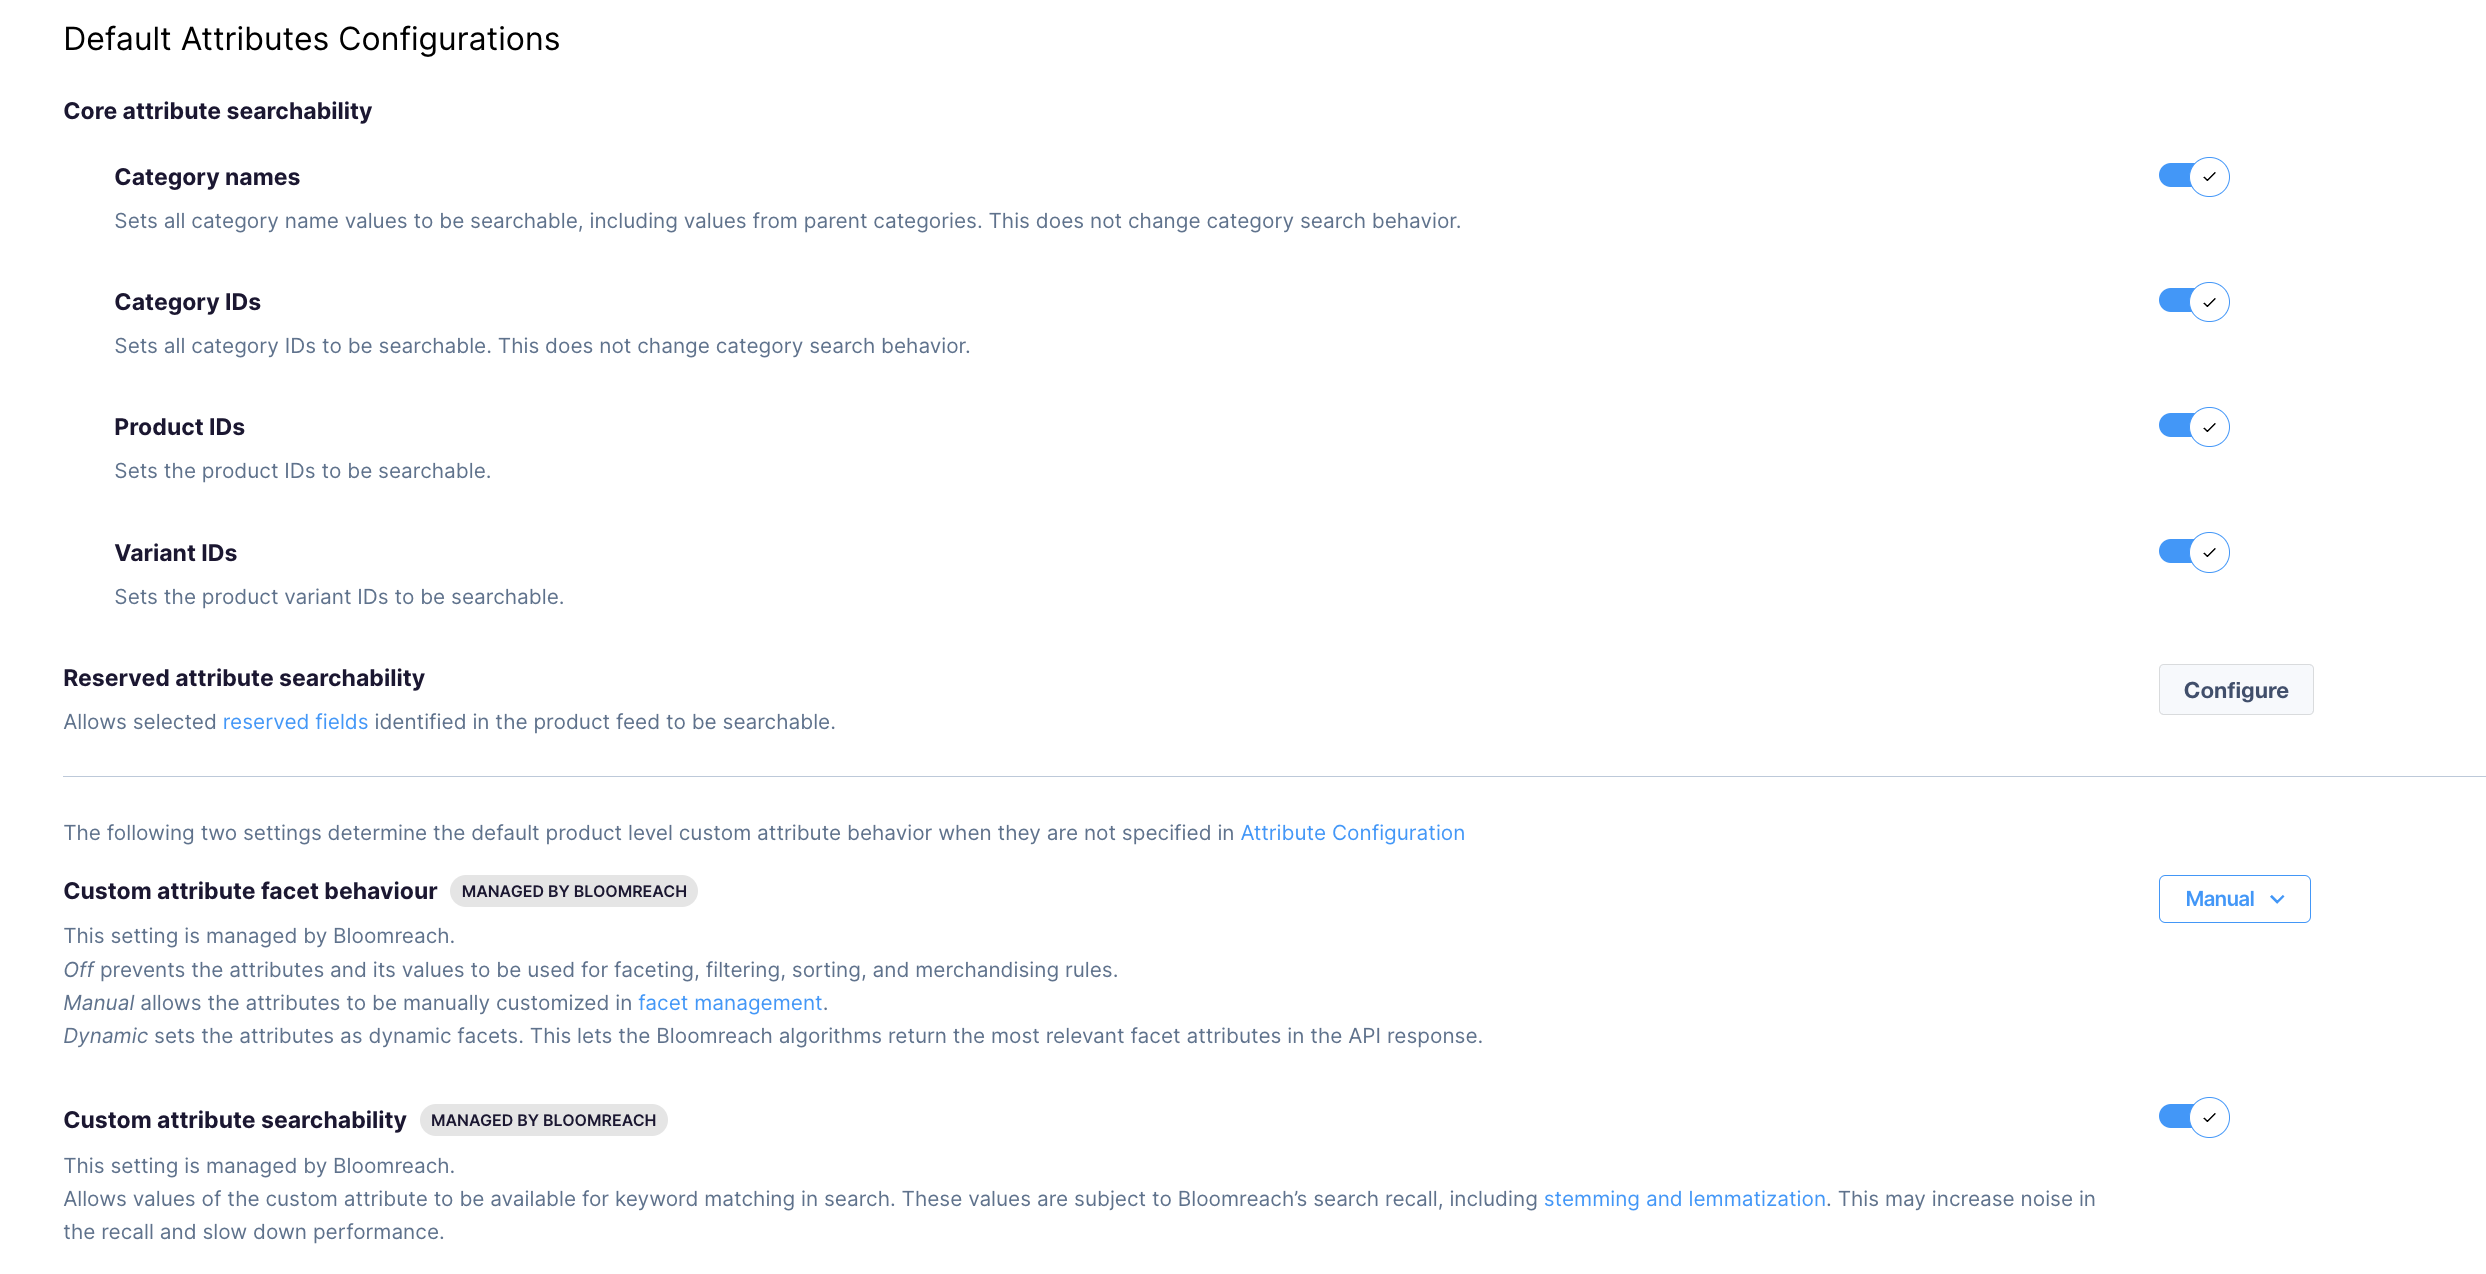
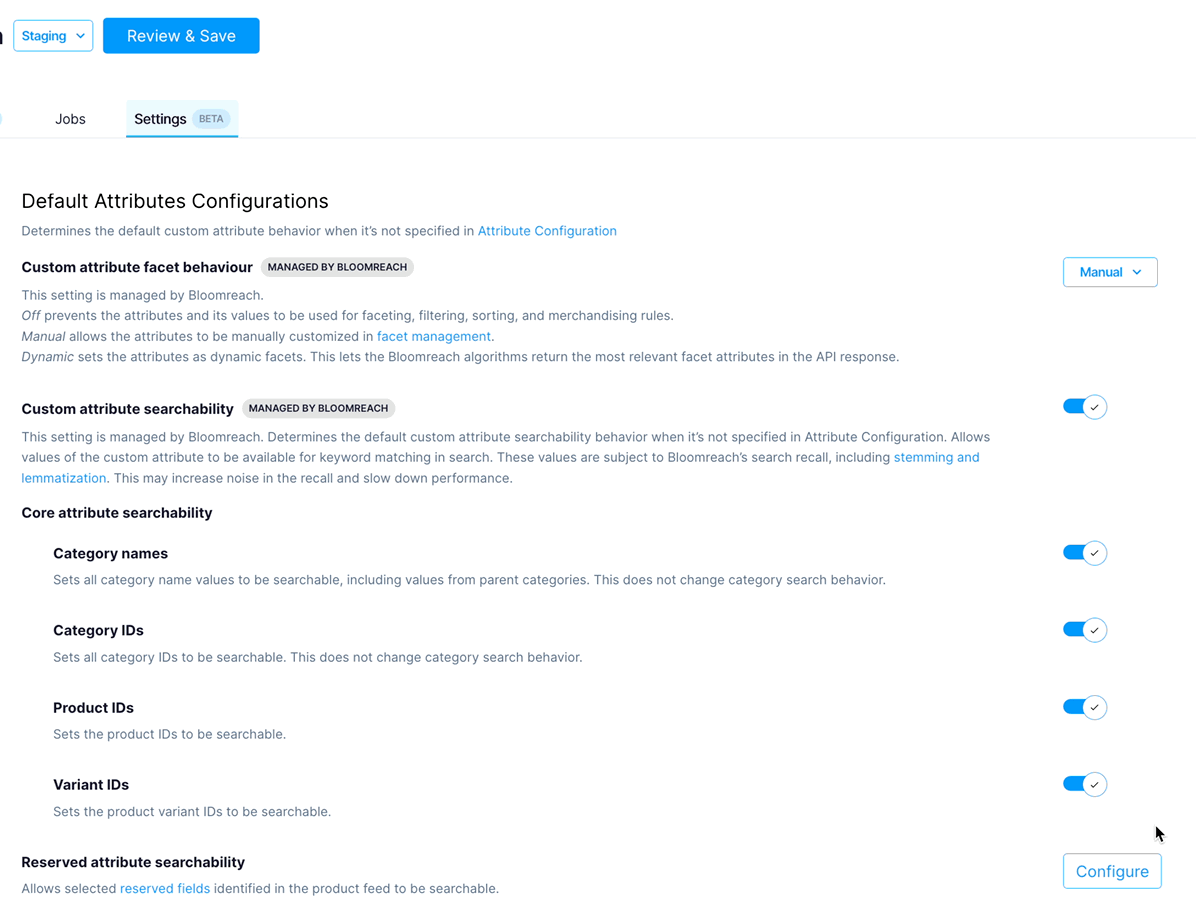
2.3 Default Attributes Configurations
Use this section to set the default configurations for attributes. These will be used as a fallback if no settings exist in the Attributes Configuration section.
-
Core attribute searchability
- Category names
This sets all category name values to be searchable, including values from parent categories. This means that we will use Category names to retrieve relevant products for search queries. This does not change category search behavior. - Category IDs
This sets all category IDs to be searchable. This means that we will use category IDs to retrieve relevant products for search queries. This does not change category search behavior. - Product IDs
This sets product IDs as searchable i.e. this allows us to use product IDs for searching. - Variant IDs
This sets variant IDs as searchable i.e. this allows us to use variant IDs for searching.
- Category names
-
Reserved attribute searchability
This allows selected reserved fields identified in the product feed to be searchable. Unless a reserved attribute is listed here, you cannot modify its searchability. You can instead create an additional custom attribute and configure it as searchable in Attribute Configurations. To configure the attributes, follow the steps below:-
Click the Configure button.
-
This opens the Reserved Attribute Searchability modal.
-
Now use the toggles provided to turn on/off the reserved attribute searchability. You can also use the filters at the top to view all attributes, only searchable attributes, or non-searchable attributes.
-
Once you’re satisfied with the selection, click Save.
- Custom attribute facet behaviour *[Managed by Bloomreach]
This allows you to specify the custom attribute facet behavior. Choose one of the following configurations for your custom attributes:- Off - This prevents the attributes and their values from being used for faceting, filtering, sorting, and merchandising rules.
- Manual - This allows the attributes to be manually customized in facet management.
- Dynamic - This sets the attributes as dynamic facets. This lets the Bloomreach algorithms return the most relevant facet attributes in the API response.
- Custom attribute searchability *[Managed by Bloomreach]
This setting allows you to control whether the custom attribute values should be used when matching products for keyword searches. These values are subject to Bloomreach’s search recall, including stemming and lemmatization. Please note that this may increase noise in the recall and slow down performance.*Kindly contact Bloomreach Support to configure the settings managed by Bloomreach.
-
3. Configuring Variant Settings
You can modify the following settings in the Variants section if you have the SKU Select feature enabled. Please note that Bloomreach Support manages the SKU select setting. You can configure the below settings in the Variants section:
3.1 Hero variant
This allows you to customize the ranking weight of custom variant attributes used to return variants for products in a search recall. If disabled, the behavior will fall back on Bloomreach’s algorithms, which consider factors such as query relevancy, synonyms, and best-selling variants.
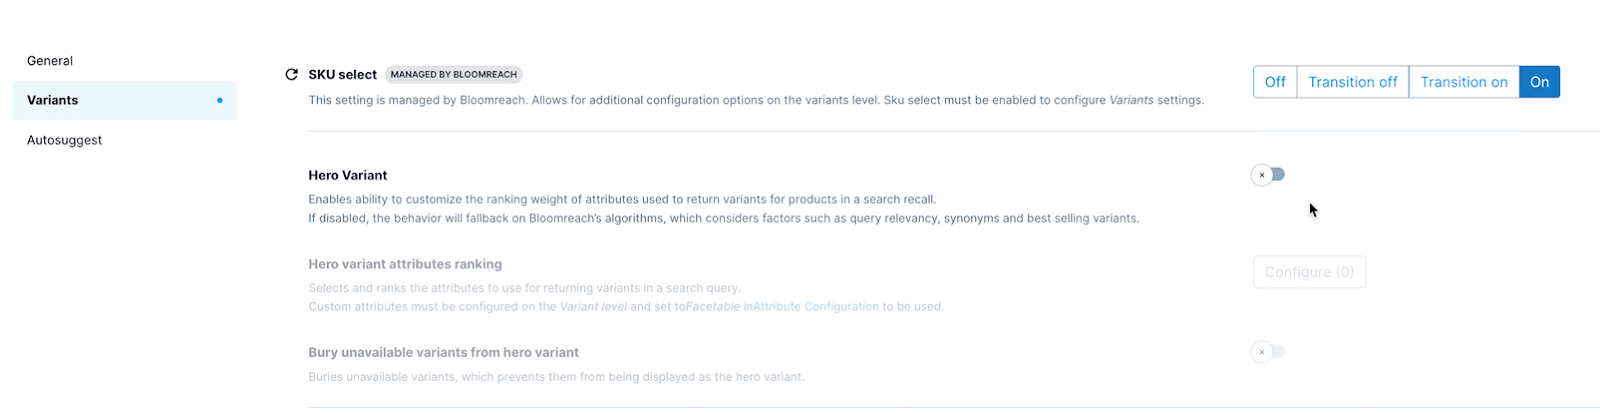
The below 2 settings will activate once you enable Hero Variant.
1. Hero variant attributes ranking
This allows you to select and rank the attributes to use for returning variants in a search query. Please note that only facetable variant-level custom attributes and the following reserved variant-level attributes can be used for the Hero variant attributes ranking:
- color
- color_group
- large_image
- price
- sale_price
- size
- swatch_image
- thumb_image
To configure the Hero variant attributes ranking, follow the steps below:
- Click the Configure button.
- This opens the Hero Variant Attributes Ranking modal.
- Click on the +Add Attribute button. Now, choose the attribute from the dropdown or enter the attribute in the input field. Please note that the attribute entered here must be set Facetable.

- Use the grabber UI element to reorder the attributes.
- Once you’re satisfied with the changes, click Save.
2. Bury unavailable variants from hero variant
If turned on, this buries unavailable variants and prevents them from being displayed as the hero variant.
3.2 Variant filtering, grouping, and response limit Settings
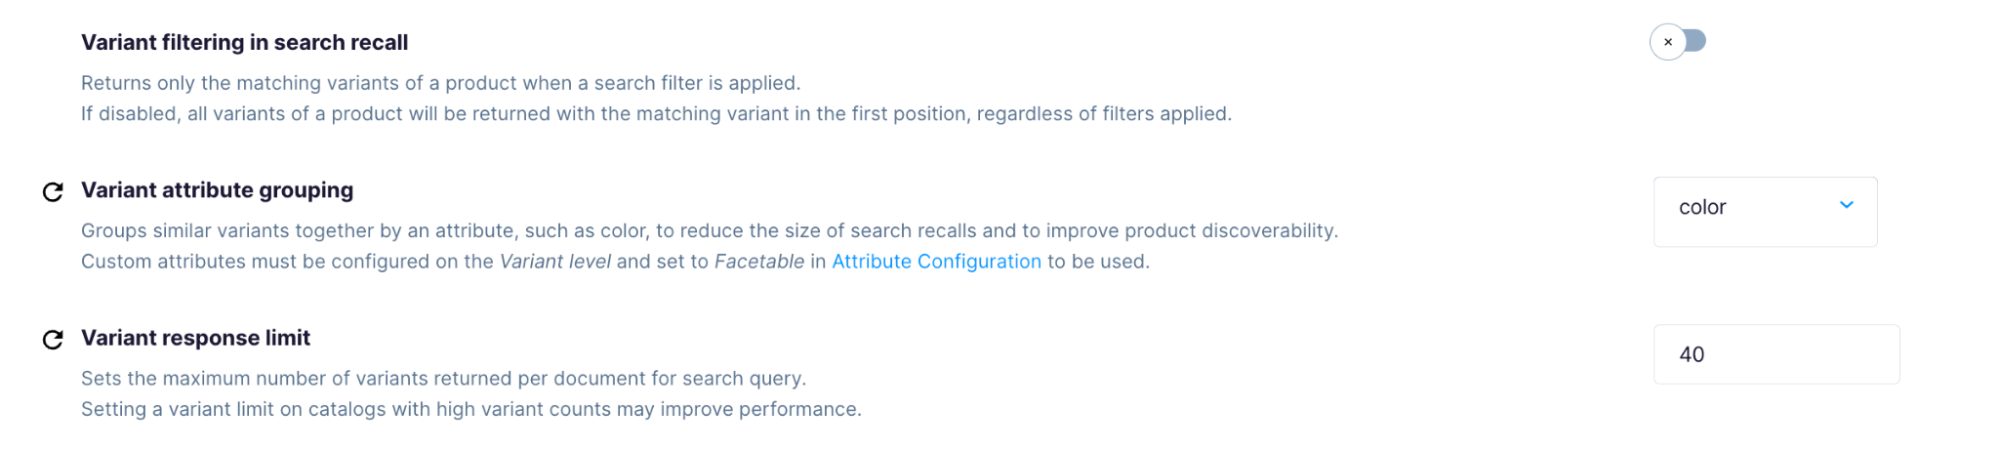
- Variant filtering in search recall
On- This returns only those variants that match the exact SKU variant filters. You can use this for a more precise recall set.
Off- This returns other similar SKU variants in addition to the matching variants. You can use this to provide more options to your shoppers.
- Variant attribute grouping
This groups similar variants together by an attribute (such as color) to reduce the size of search recalls and to improve product discoverability. Please note that only facetable variant-level custom attributes and the following reserved variant-level attributes can be used for the Variant attribute grouping:- color
- color_group
- large_image
- price
- sale_price
- size
- swatch_image
- thumb_image
- Variant response limit
This sets the maximum number of variants returned per document for a search query. Setting a variant limit on catalogs with high variant counts may improve performance. Please note that you can set this limit up to 100.
4. Configuring Autosuggest Settings
You can configure the below settings in the Autosuggest section:
4.1 Keyword Autosuggest
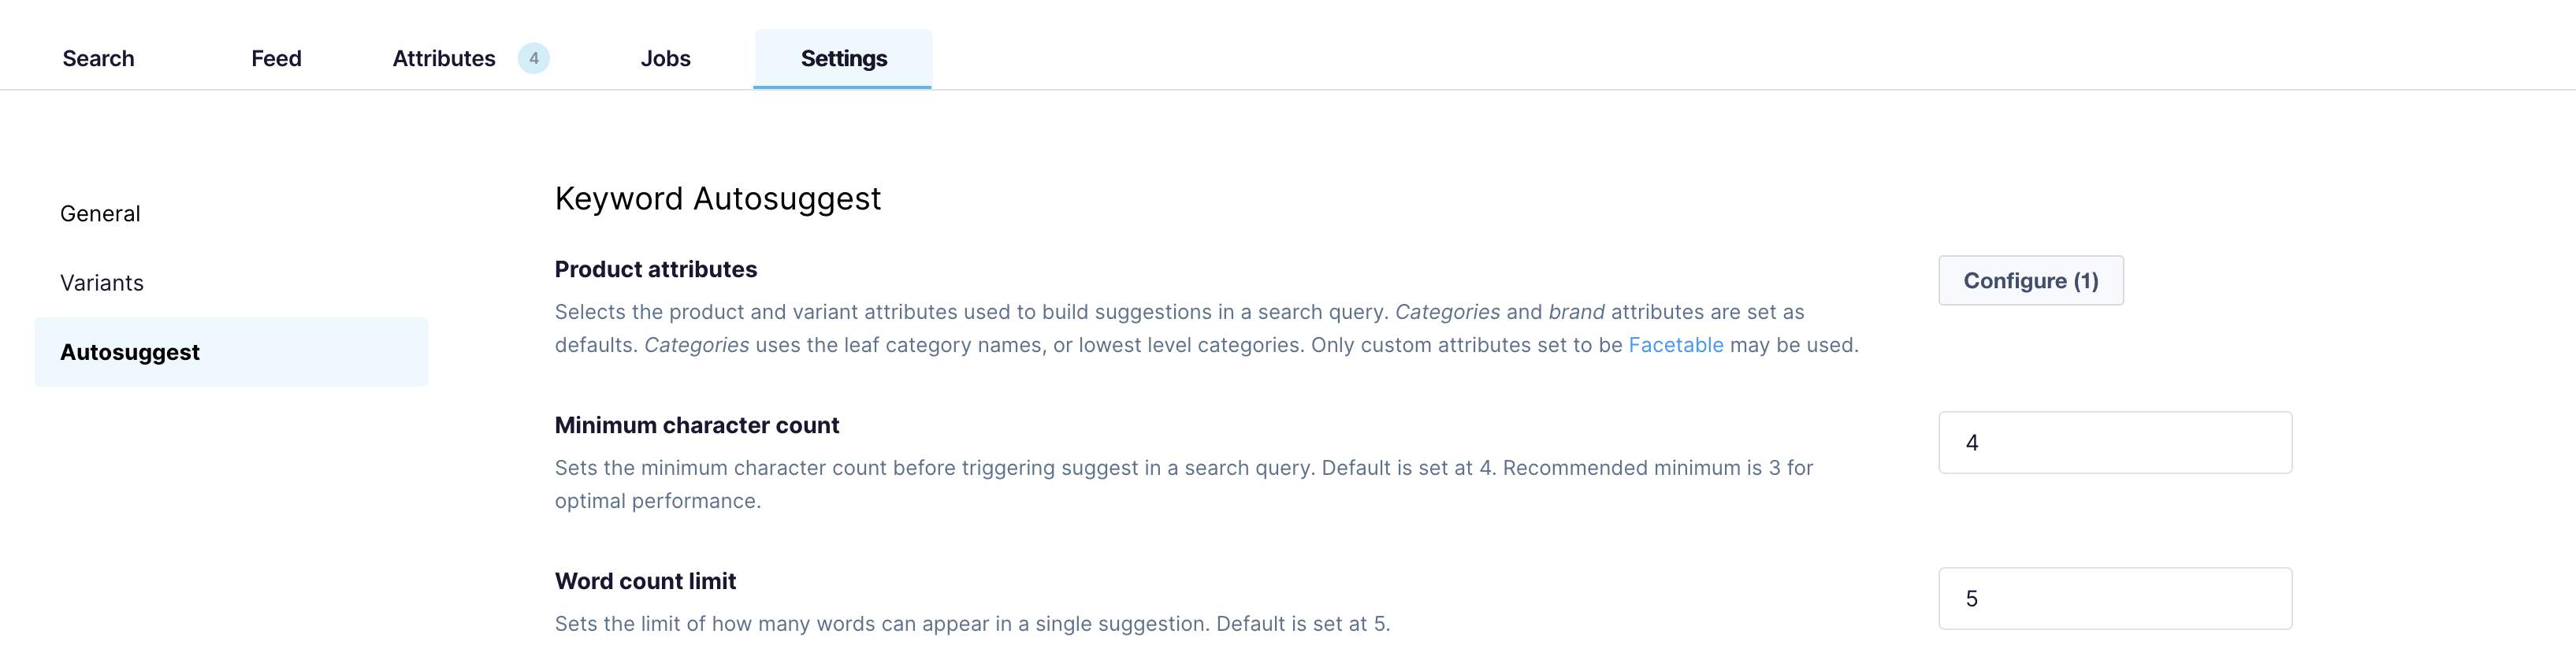
- Product attributes
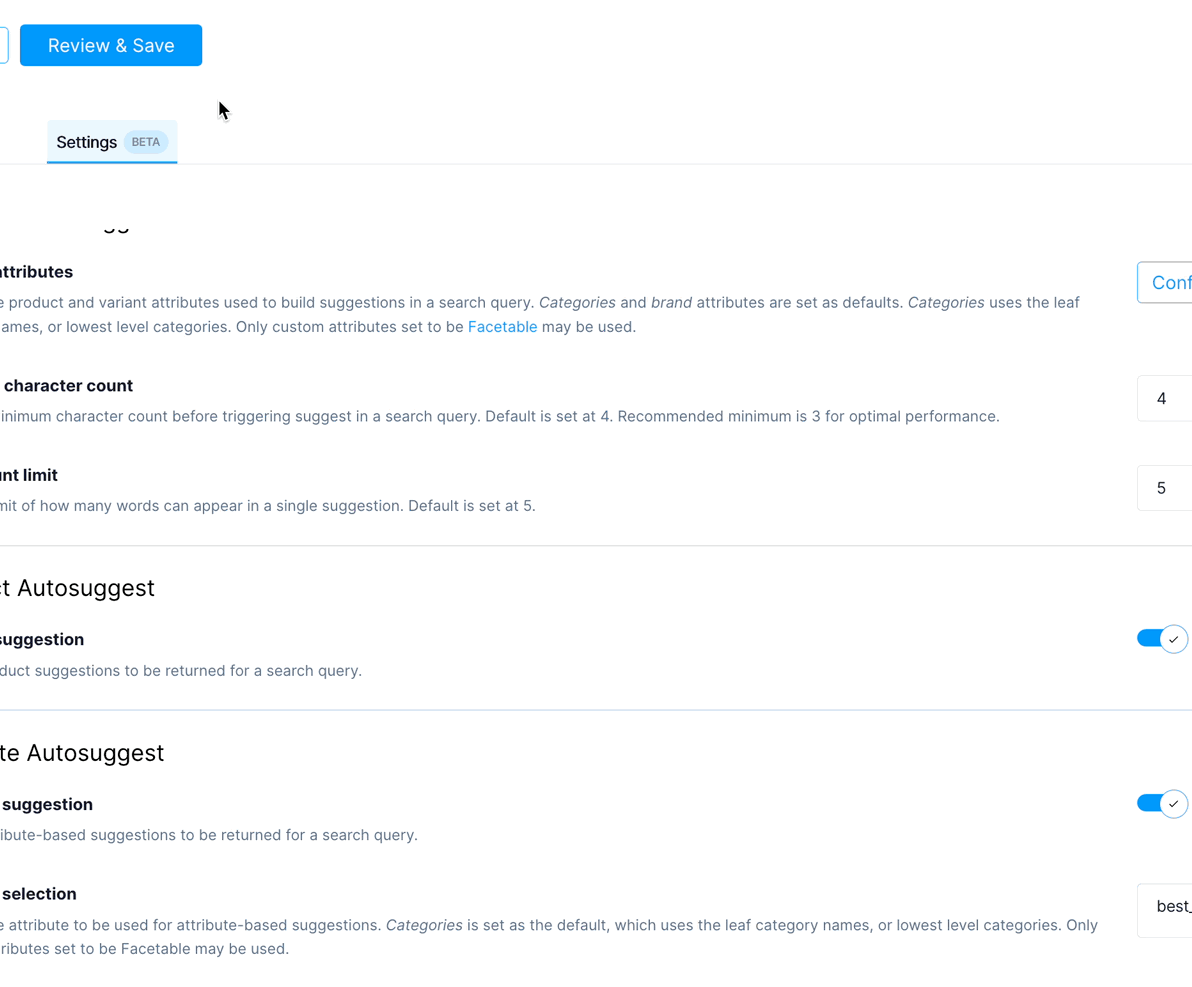
This setting allows you to specify the product and variant attributes to build suggestions in a search query. Categories and brand attributes are set as defaults. Categories use the leaf category names or the lowest-level categories. Only custom attributes set to be Facetable can be used. To configure the attributes, follow the steps below:- Click the Configure button.
- This opens the Configure Keyword Autosuggest Product Attributes modal.
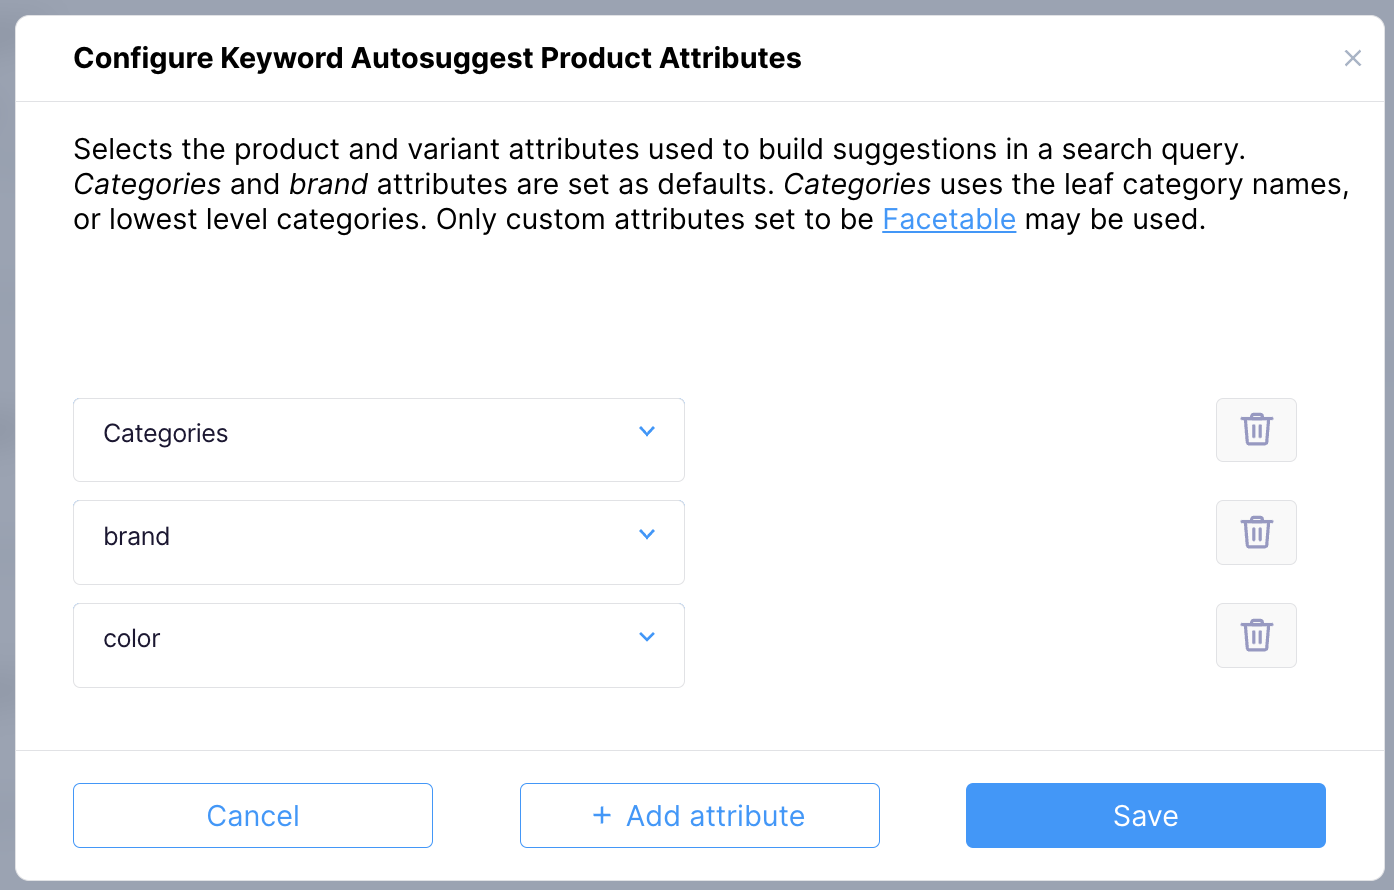
- Click on the +Add Attribute button. Now, enter the attribute in the input field. You can also use the dropdown for a quick search.
- After adding the desired attributes, click Save.
- Minimum character count
This sets the minimum character count before triggering autosuggest in a search query. The default is set at 4. To ensure good performance, we recommend setting this to a minimum of 3.
- Word count limit
This sets the limit of how many words can appear in a single suggestion. The default is set to 5.
4.2 Product Autosuggest

Product suggestion
This turns on/off product suggestions for a search query.
4.3 Attribute Autosuggest
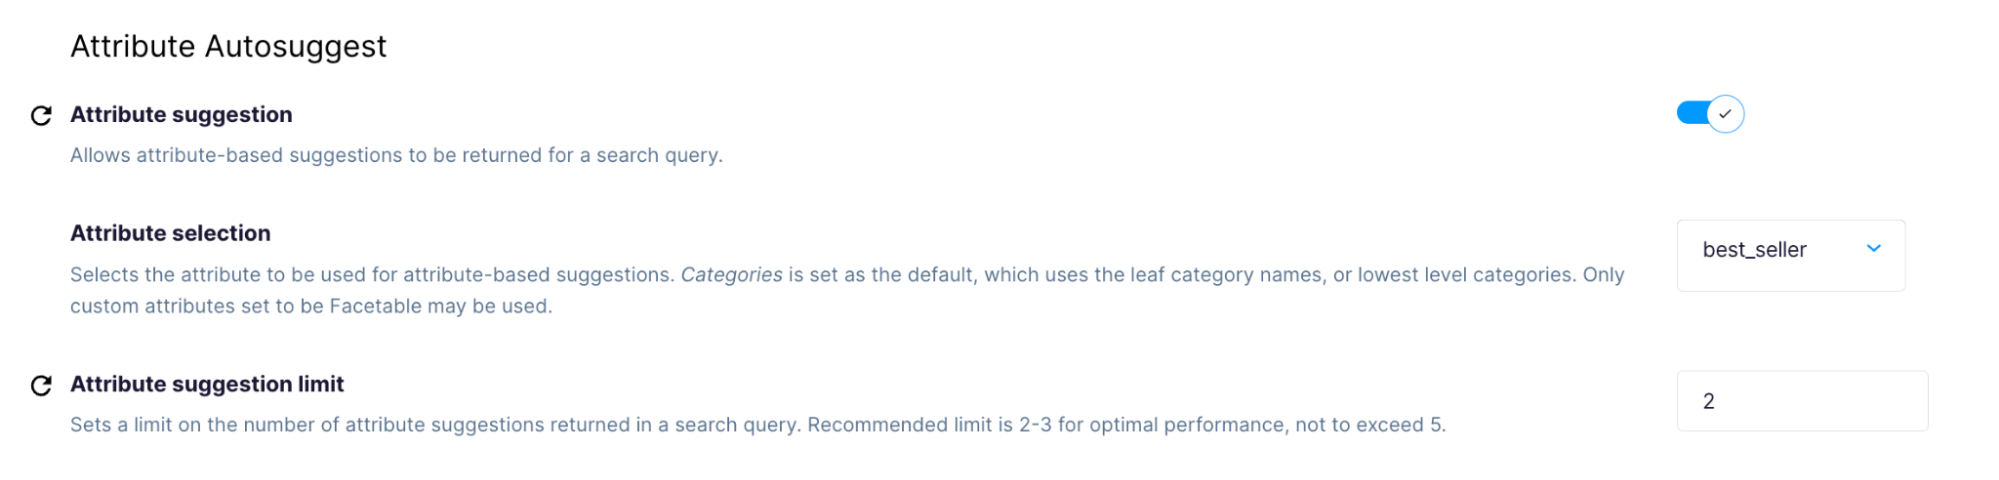
- Attribute suggestion
This allows attribute-based suggestions to be returned in a search query.
- Attribute selection
This selects the attribute to be used for attribute-based suggestions. Categories is set as the default, which uses the leaf category names, or lowest-level categories. Only custom attributes set to be Facetable can be used. Select the desired attribute from the dropdown provided.
- Attribute suggestion limit
This specifies the limit on the number of attribute suggestions returned in a search query. The recommended limit is 2-3 for optimal performance, not to exceed 5.
5. Reviewing and Saving Changes
After making the desired changes, click the Review and Save button. This opens up a modal that summarizes the list of changes. After reviewing the changes, click Save Changes. This is followed by a Confirm Changes modal. Click Confirm after reviewing the confirmation message.
Modifying Production configurationsYou can modify Catalog Settings directly on Production without going through the process of promoting configurations from Staging.
Nonetheless, it's still recommended to test any changes in the Staging environment. This helps prevent unwanted changes in the Production environment.
Bloomreach’s recommendation after saving configurations
Immediately after saving every configuration, update your index either via our index update API or through the UI. This helps minimize the time when the configuration available on your APIs is out of sync with the data in your catalog's index.
For Autosuggest settings, you can directly run an Autosuggest Index Update through the pop-up that appears after saving any changes.

Reverting changes
If an incorrect configuration is applied and you need help, our Support team can revert to a previous version of either your catalog's configuration, its indexed data, or both.
Updated 3 months ago