Customize Ranking Algorithm with Ranking Studio
This guide covers how to customize ranking algorithm via the Ranking Studio dashboard.
This is a Premium tier feature powered by Loomi AI.
Prerequisites
Knowledge
We recommend that you review the Ranking Studio guide to get a feature introduction.
Permissions
Ensure your Users Admin assigns you the Recall and ranking studio editor permission to access the Ranking Studio feature.
Dashboard overview
Ranking Studio provides a dashboard interface to customize and test the newly created ranking algorithm(s). You may use a mix of ranking strategies:
- Machine learning (ML-powered) algorithm
- In this strategy, you choose an ML algorithm as the source algorithm to clone ranking signals, namely, Performance and Text relevance signals.
- We add the custom signals you provide in the feed on top of the cloned signals.
- When you start ML training, the algorithm learns the signal weights with the training framework.
- Bloomreach-optimized algorithm trains on the global data from multiple catalogs with Bloomreach.
- Upon training completion, the algorithm results can be viewed, tested, and applied to all or select queries (or categories).
- Custom algorithm
- This strategy allows fine-grained control of the ranking signal weights. Here, you clone the signals from a source ML algorithm trained on your catalog, and choose the signal weights.
- We sync the customized weights, and the algorithm can be viewed, tested, and applied to all or select queries (or categories).
- This strategy is ideal when you have a dedicated in-house data science team that can provide comprehensive data insights to optimize the signal weights.
- Catalog-specific ML algorithm
- This strategy allows you to create a distinct source ML algorithm that learns specifically from your catalog and performance data.
- When you start ML training, the algorithm learns the signal weights with the training framework.
- It trains only on your product catalog and user traffic data.
- Upon training completion, the algorithm results can be viewed, tested, and applied to all or select queries (or categories).
- This approach empowers teams with less engineering bandwidth or high-quality custom signals to benefit from catalog-specific trained models with minimal effort.
All these strategies are covered in the workflow below.
Create and customize ranking algorithm
The workflow below illustrates customizing the core Bloomreach Search ranking algorithm for both Search and Category pages.
- Navigation
- View ranking studio homepage
- Create new algorithm
- Customize algorithm
- View and edit algorithm
1. Navigation
-
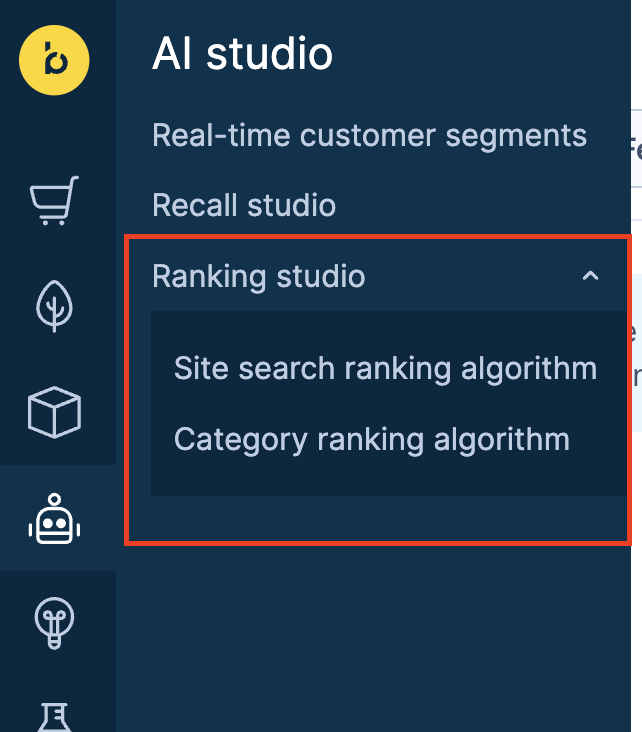
Go to AI Studio > Ranking studio > Site search ranking algorithm to view the existing Search ranking algorithms.
-
Alternatively, go to AI Studio > Ranking studio > Category ranking algorithm to view the existing Category ranking algorithms.
2. View ranking studio homepage
You can now see the ranking studio homepage with the following elements:

2.1 Algorithms and Rules tabs

Algorithms tab
This tab displays the default Search or Category ranking algorithms and all newly created or existing ML algorithm(s). The following algorithms are visible:
-
Classic Search/Category ranking: This is the existing default ranking algorithm for Search and Category experiences.
-
Bloomreach-Optimized Search/Category ranking: This is a new ML-based algorithm that computes the weights of each signal by analyzing the global catalog data. The below visual illustrates how you can start the algorithm training.
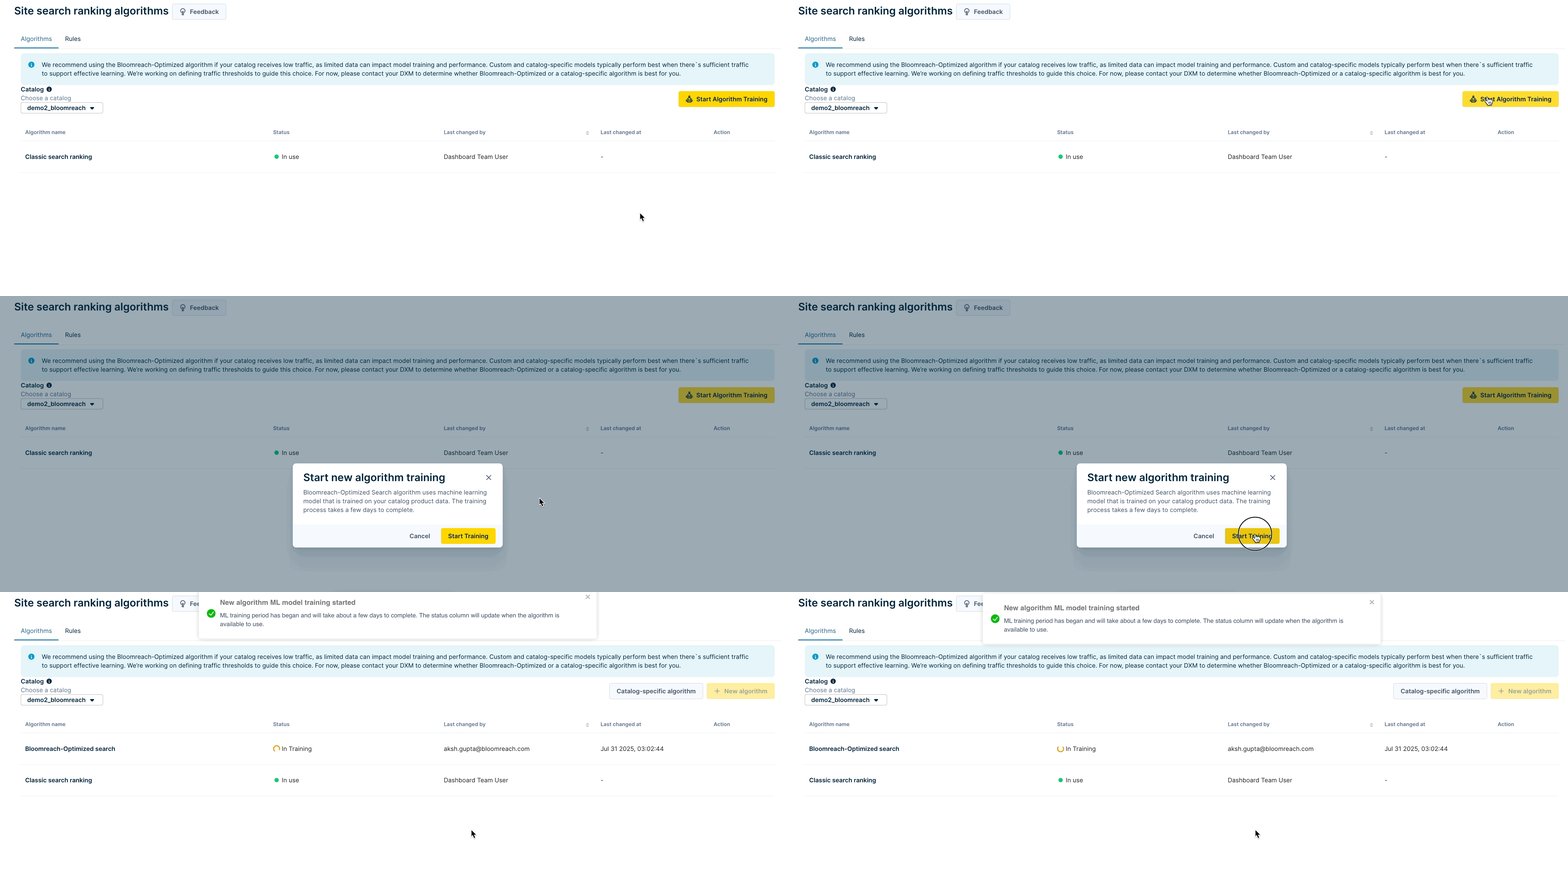
Once the training is complete and the algorithm status is “Available,” you can view the signal distribution and create new algorithms using this as the source algorithm.
Rules tab
This tab displays the default algorithm for all Search/Category queries. Here, you can apply the ranking algorithm to all queries.
2.2 Catalog selection dropdown
Use this dropdown to choose the catalog to use for algorithm training. New algorithm(s) will be created at the selected catalog level. All the sites associated with this catalog appear next to the Catalog selection dropdown.

2.3 Algorithms’ details
This section displays details of the default Search/Category ranking algorithms and the new algorithms. These details include the algorithm name, status, the user who changed the algorithm, the date of the change, and algorithm actions.

3. Create new algorithm
3.a. New custom algorithm
-
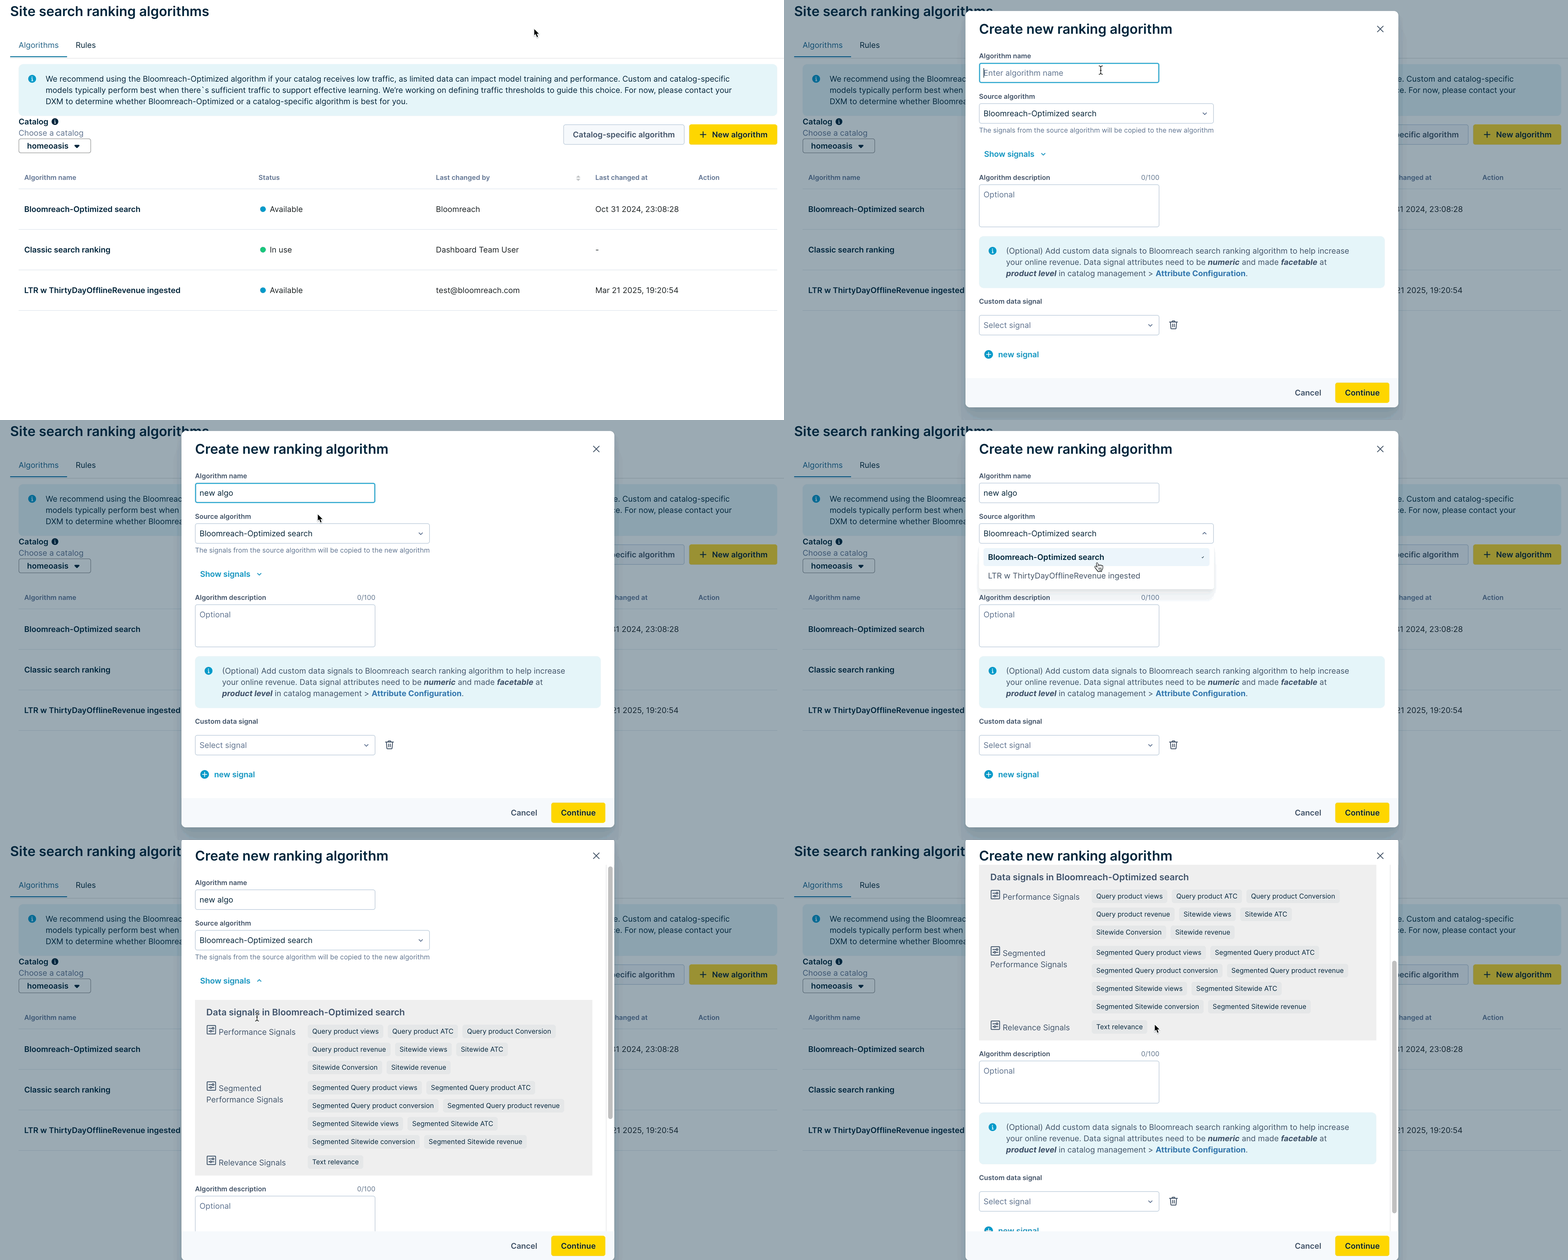
Click + New Algorithm. This opens the algorithm setup modal.
-
Add a name and description for the new algorithm.
-
Choose the Source algorithm from which you want us to clone signals. Since the new algorithm uses cloned signals, the signals are not synced if the source algorithm is updated. You can choose the Bloomreach-Optimized search algorithm or any other created ML algorithm as the source algorithm.
-
To view the ranking score distribution, click Show signals.
3.b. New catalog-specific ML algorithm
-
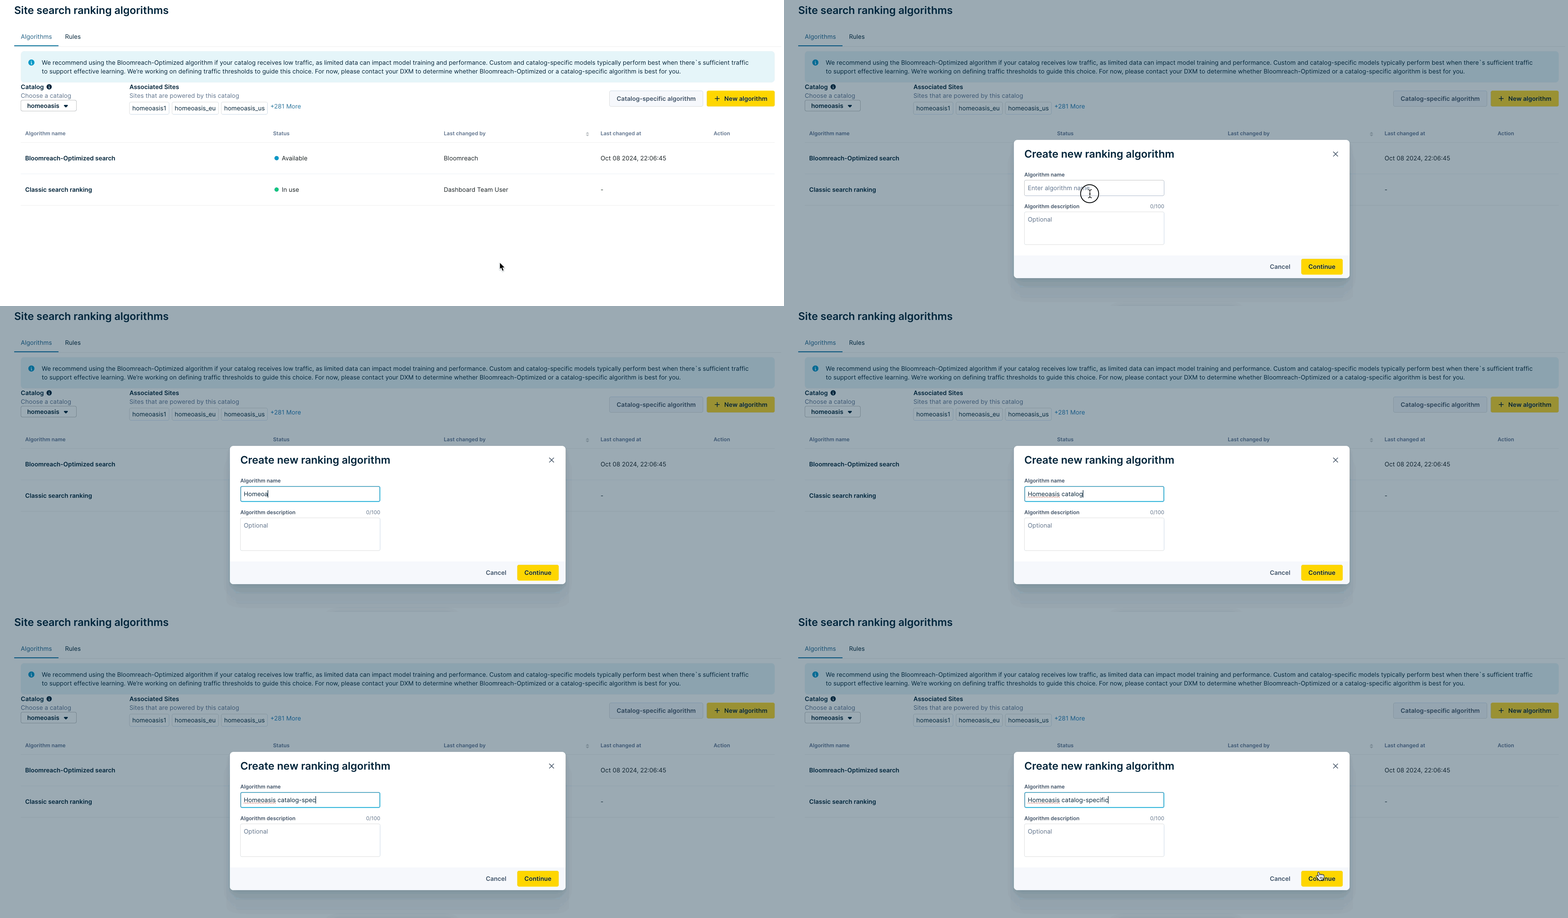
Click Catalog-specific algorithm. This opens the algorithm setup modal.
-
For a catalog-specific algorithm, only a name and description can be added.
-
Click Continue to start the algorithm training on the catalog selected in step 2.2.
-
Move directly to Step 5.
4. Customize algorithm: add signals or change signal weights
You may either want to overwrite the algorithm signal weights or add new signals to customize the algorithm. Follow the steps for the chosen case:
4.1 Overwrite signal weights
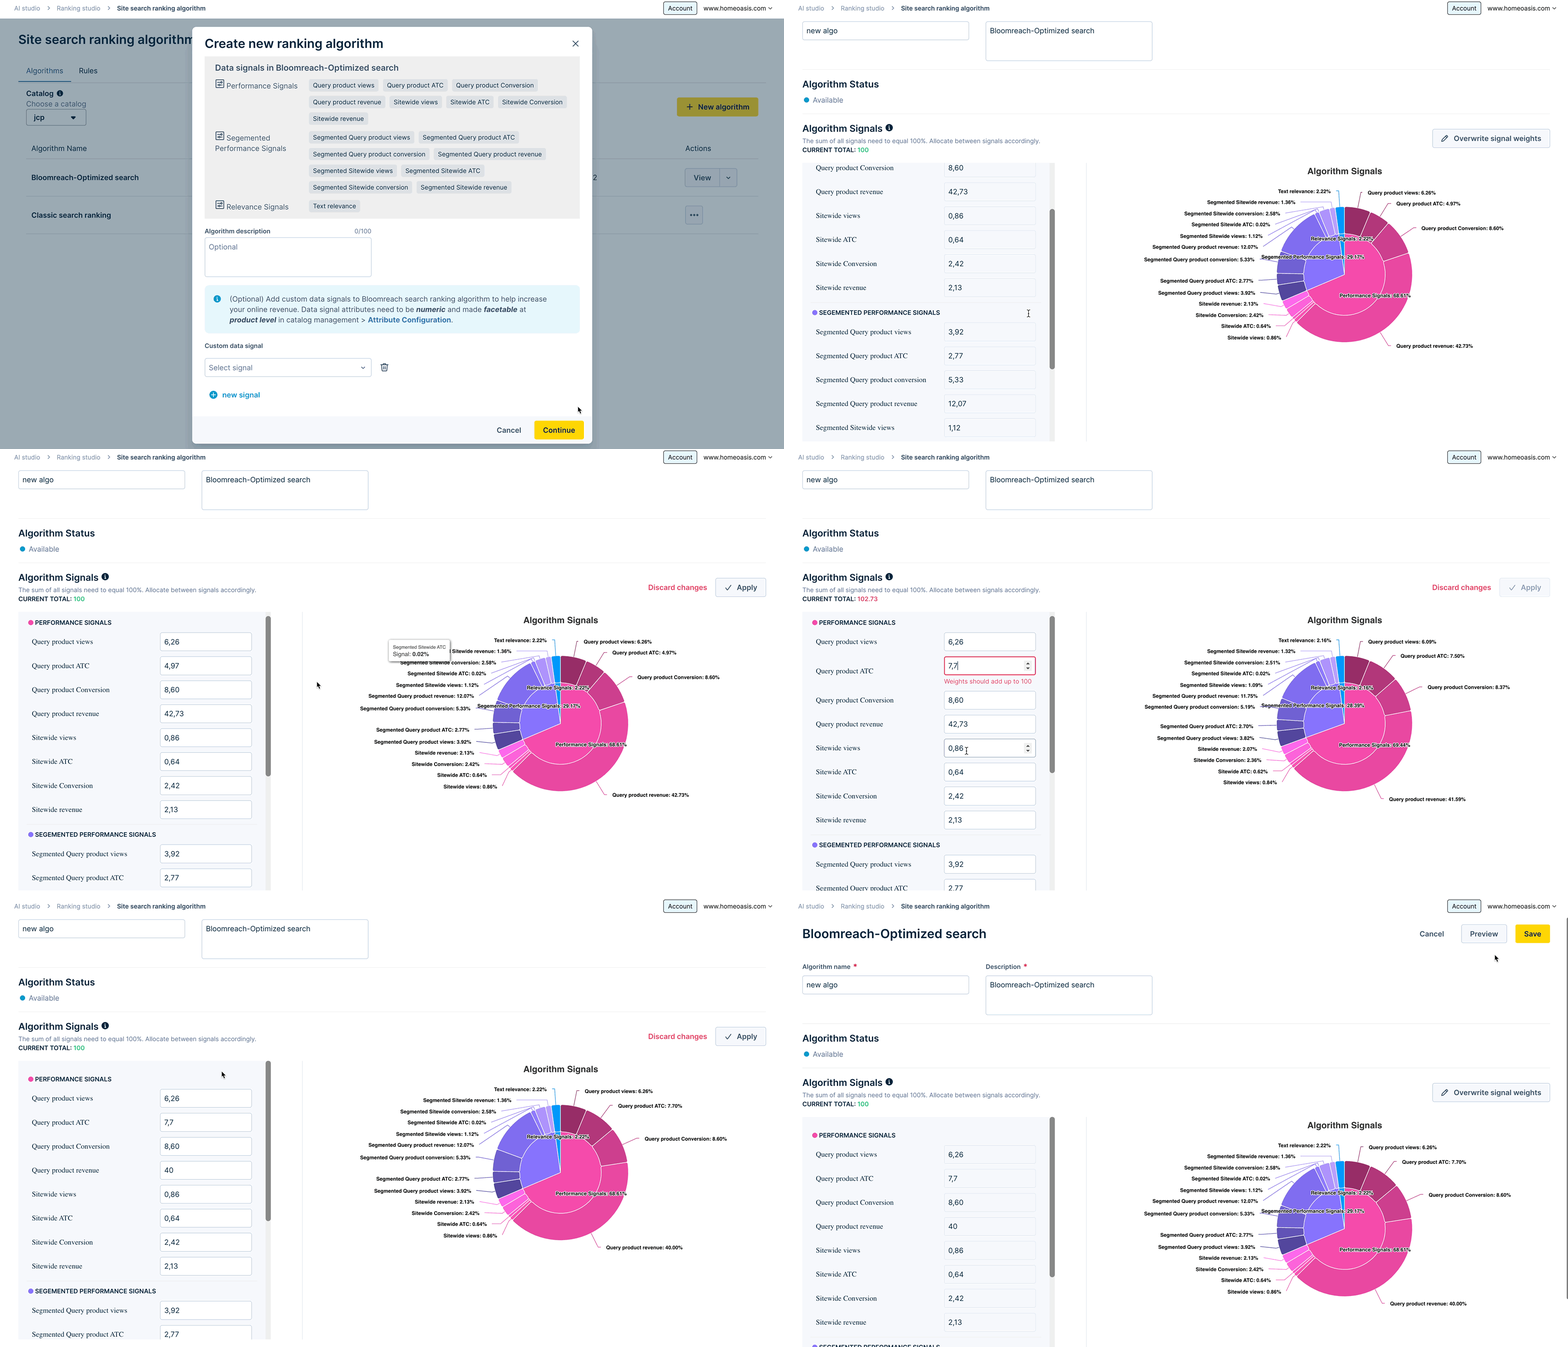
- Click Continue. This opens a detailed visual breakdown of all the signal weights.
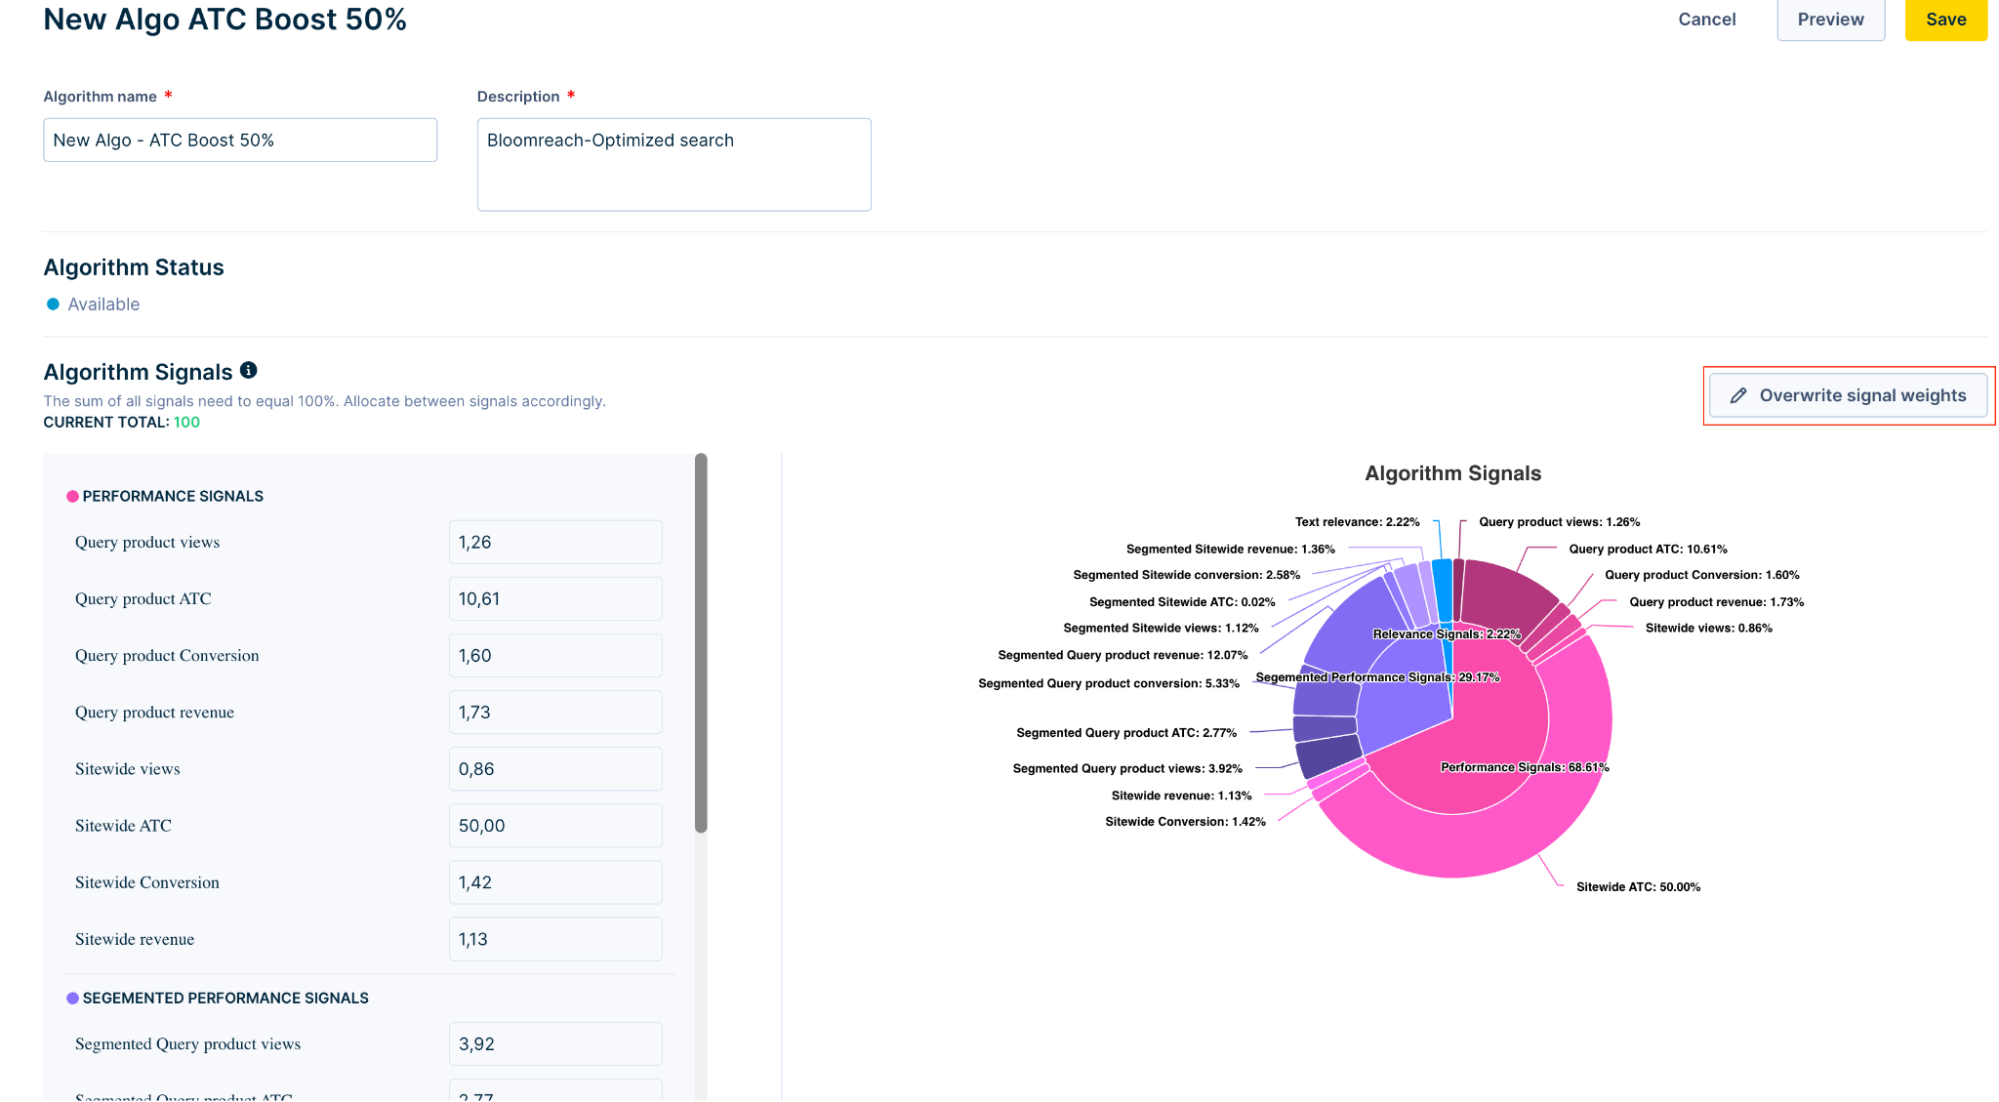
- Click Overwrite signal weights to edit the weights. Now, set the signal weights in percentage numbers that add up to 100. Note that if any of the weights of the ML algorithm are updated manually, it will no longer be an ML algorithm. It becomes a non-ML custom algorithm.
- Click Apply to apply the weights.
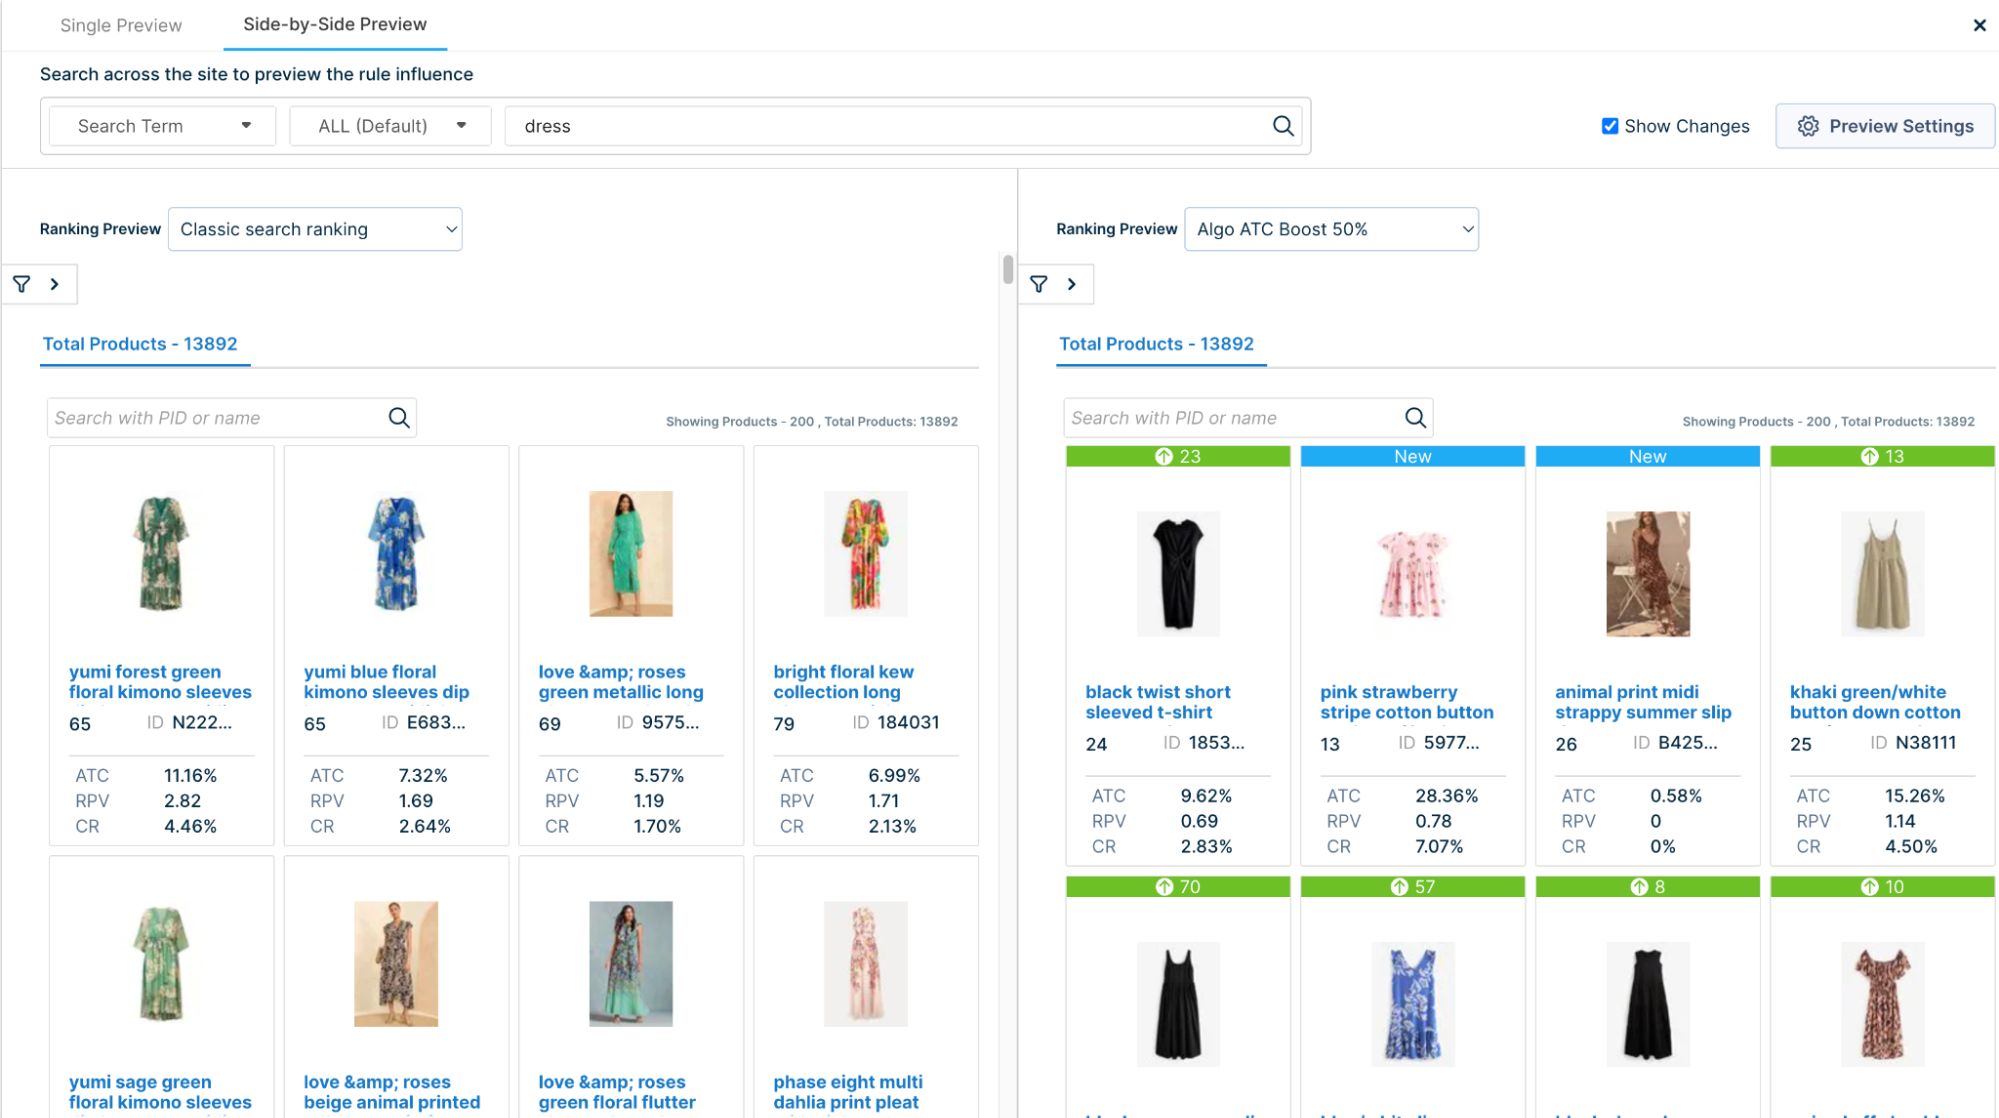
- Click Preview to see changes in search results.
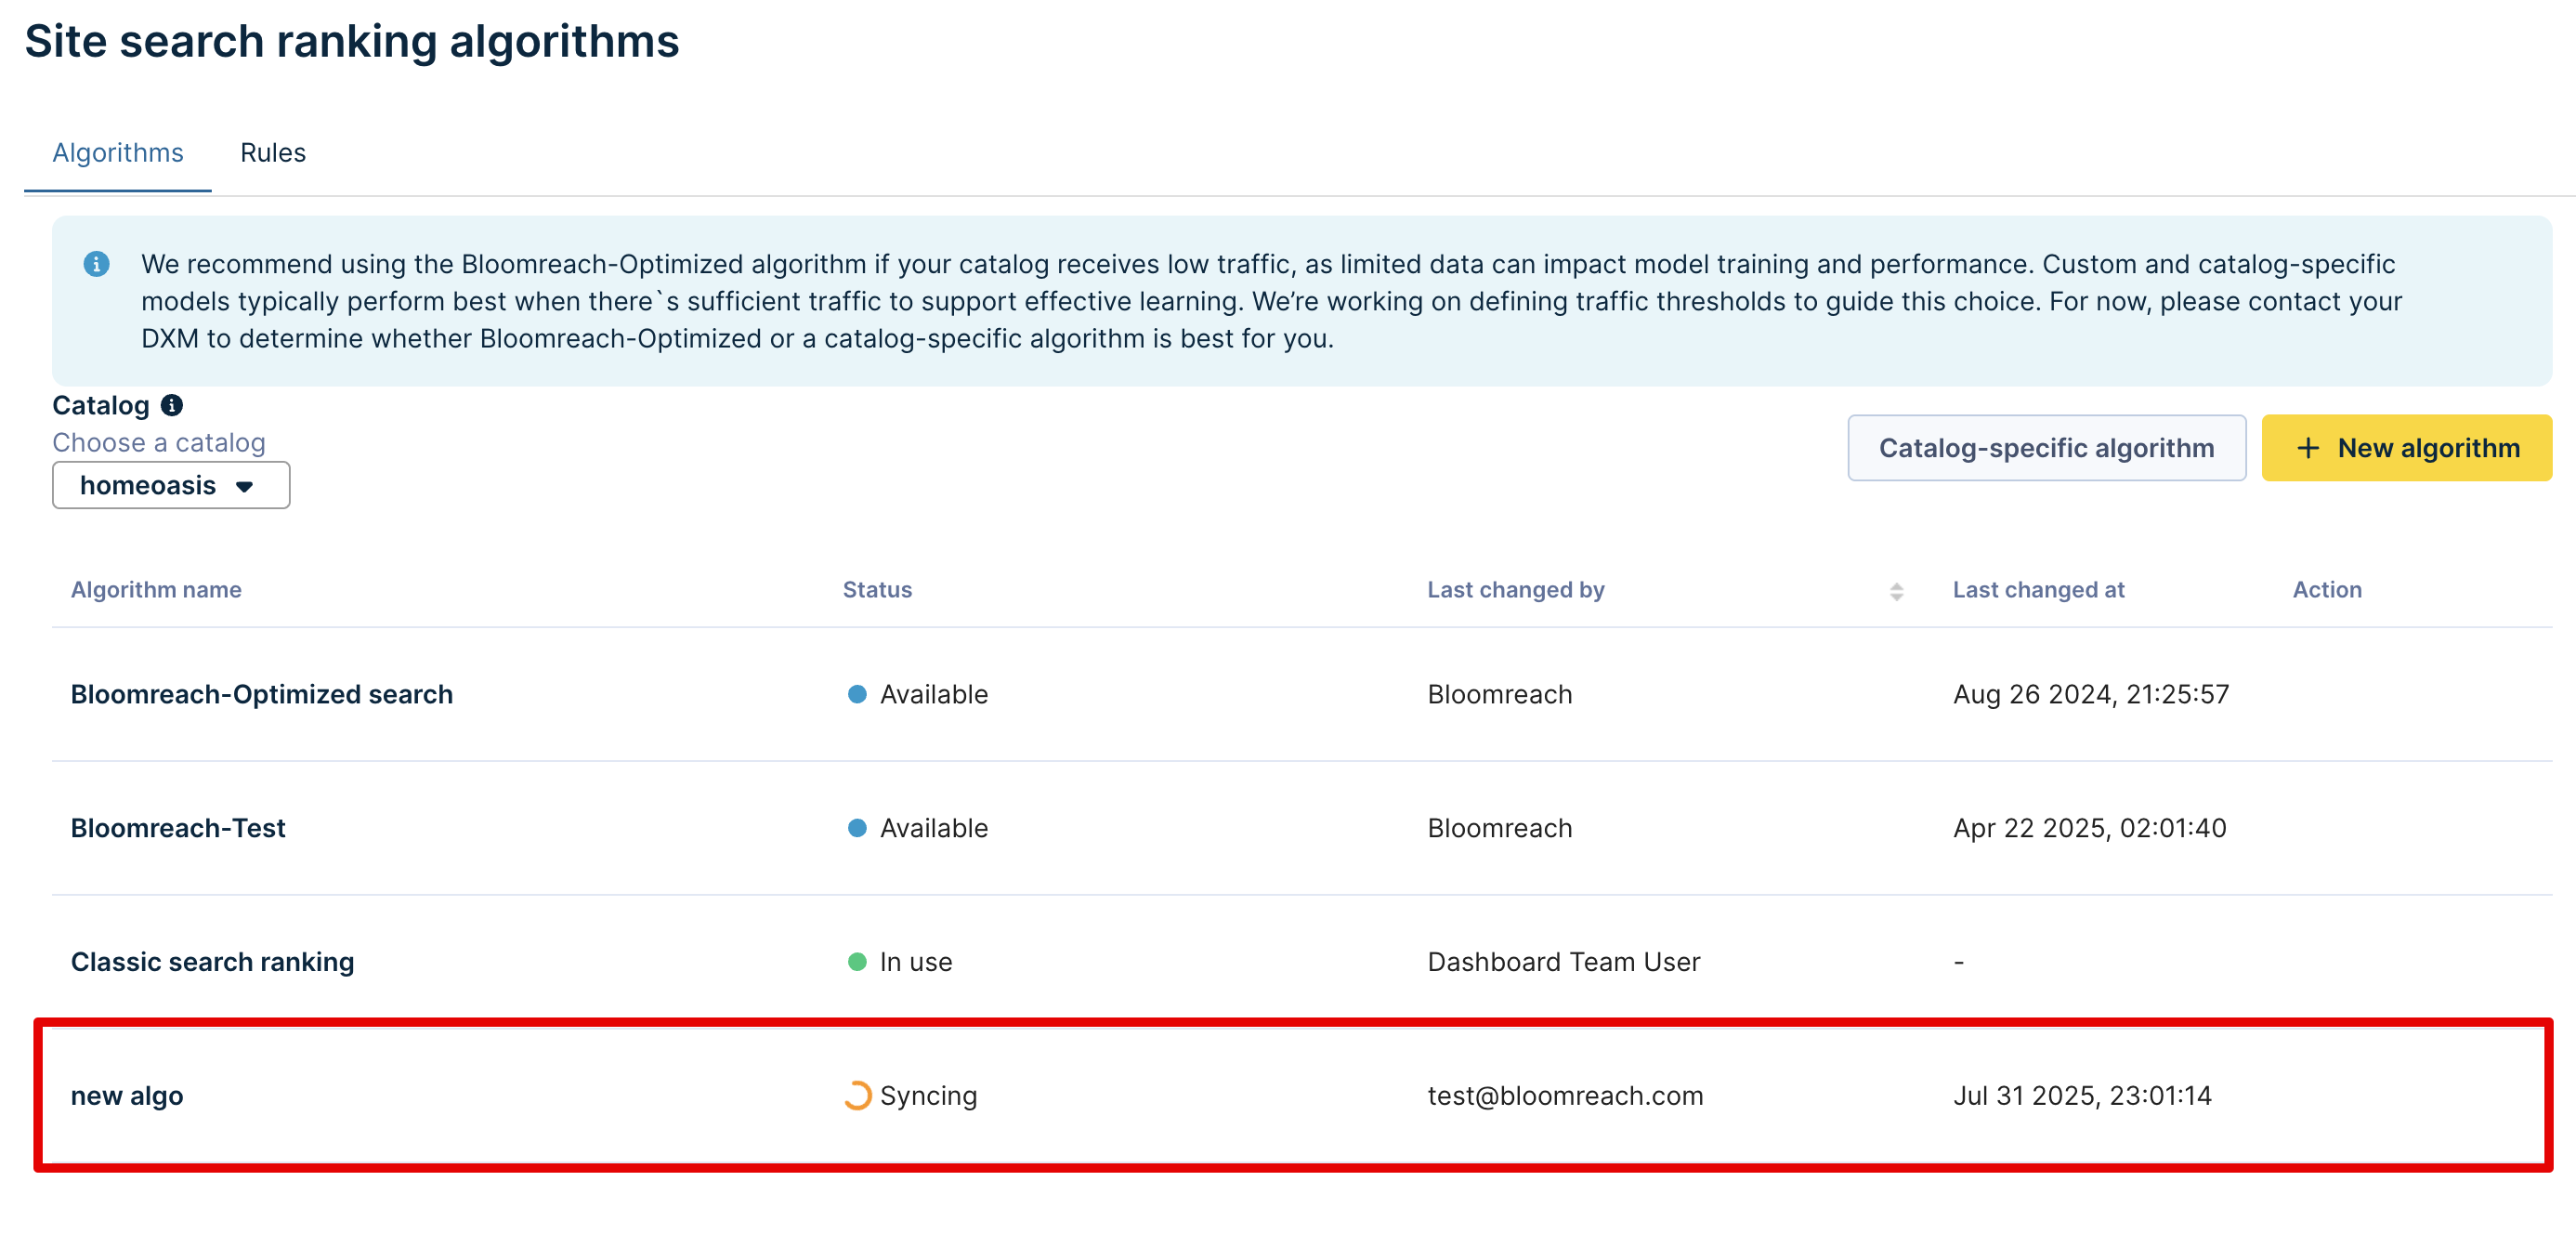
- Now, Save the changes to sync the new weights. The algorithm status shows Syncing. The syncing process typically takes 20 minutes.
4.2 Add new signals
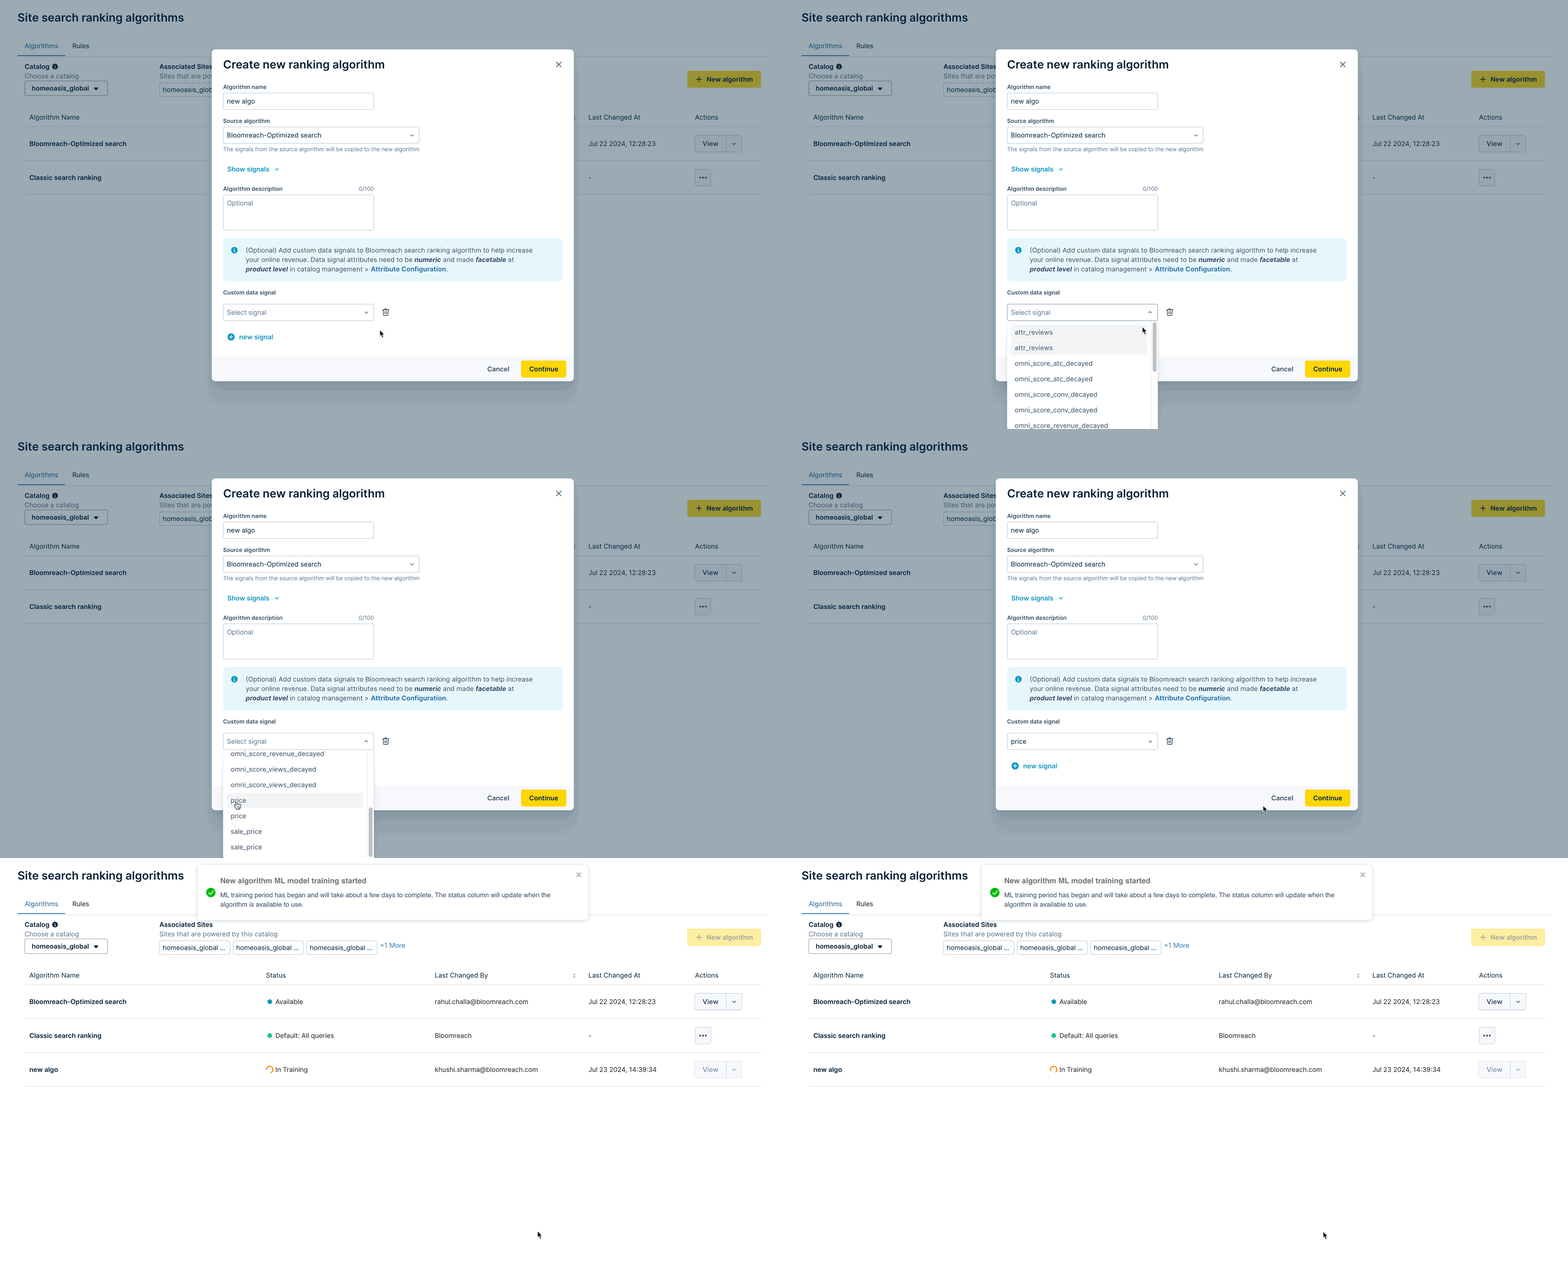
- Select the custom data signal(s). Click + new signal to add more data signals to the signal mix. The selection list populates only the attributes configured as Numeric and Facetable (Dynamic or Manual) at the Product (PID) level. Attribute names must consist only of alphanumeric or underscore characters (a-z A-Z 0-9 _ ) and must not start with a digit. Check the best practice guidelines.
- Click the Continue button to confirm and begin the training process. You can define the weights of these new signals only when training is complete.
- Now, the newly created algorithm’s status shows In Training. The training typically takes 24-48 hours to complete. You can train one algorithm at a time.
-
Cancel algorithm training (if needed)
If the algorithm training is in progress and you wish to cancel it:-
Go to AI Studio > Ranking studio > Site search ranking algorithm (or AI Studio > Ranking studio > Category ranking algorithm).
-
Locate the algorithm for which you would like to cancel the training.
-
Click the Action dropdown
vand select Cancel algorithm training.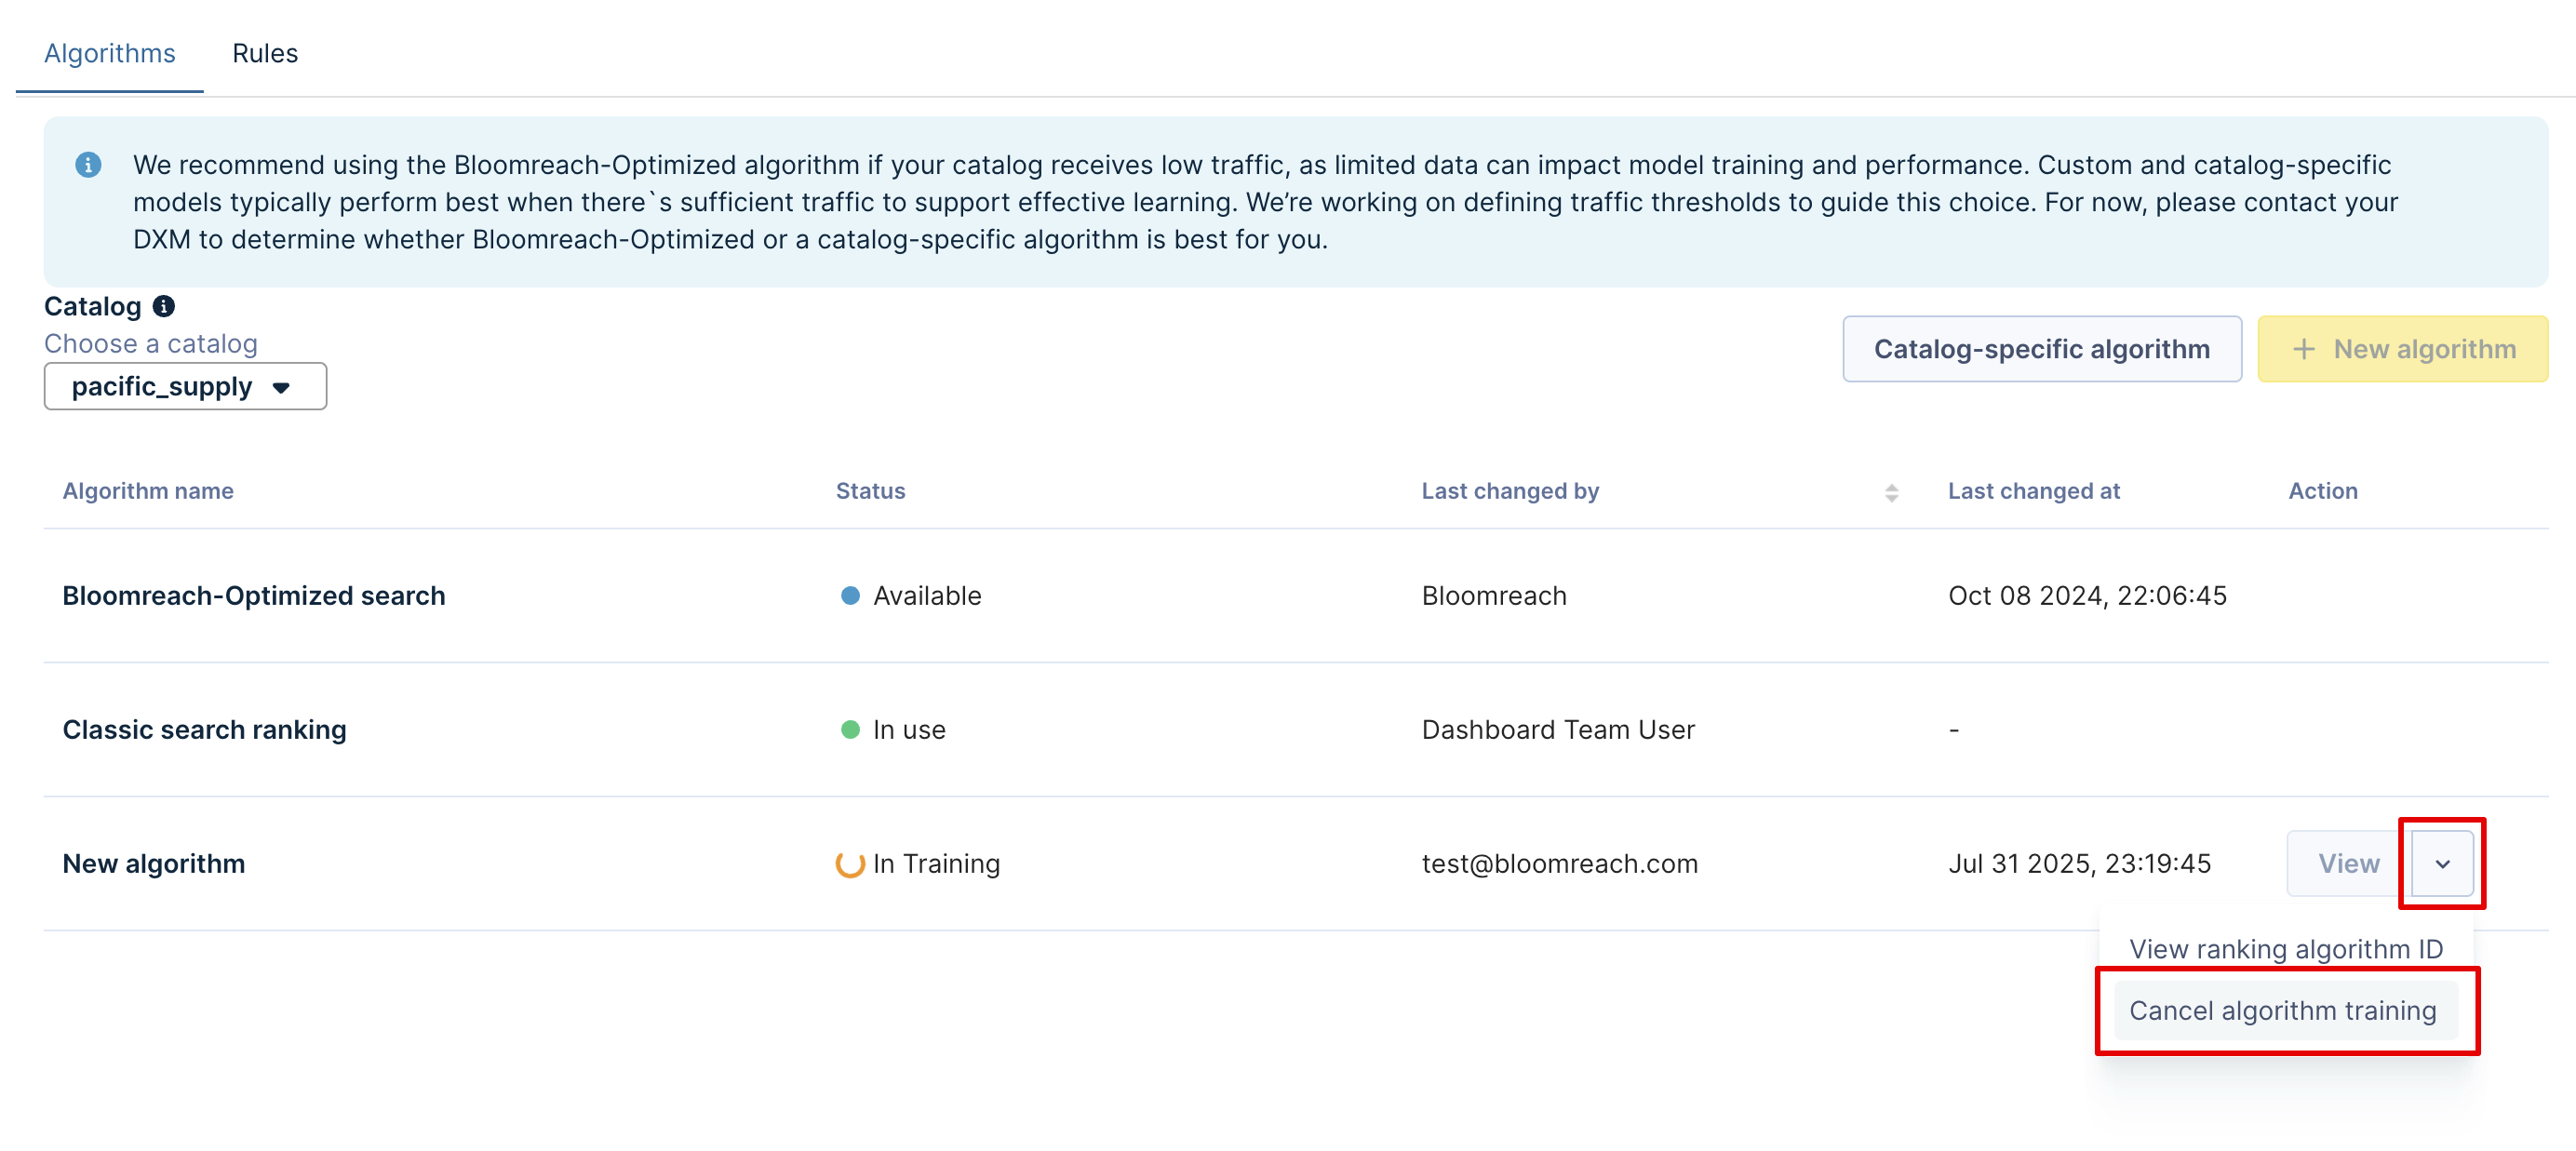
-
Confirm the cancellation by clicking Cancel and delete.

You will see a message that the algorithm has been deleted.

-
Notes
- Please note that you cannot edit the Source algorithm directly. If you want to modify the Bloomreach-Optimized search algorithm, you must first choose it as a Source algorithm and then apply the customizations.
- Training cancellation is not allowed for the Bloomreach-Optimized search algorithm that is undergoing training.
5. View and edit the algorithm after syncing/training
-
When the syncing/training is complete, the algorithm shows the Available status.
-
Click the View action to see the algorithm details and a breakdown of the ranking signals’ weights.

-
You may want to edit the weights by clicking Overwrite signal weights. Repeat the steps as provided in the 4.1 case above.
-
Click Preview to see changes in search results.
-
Now Save the changes.
After you have made all the desired customizations and the algorithm is in the Available state, you can test the new algorithm by creating algorithm rules and applying them to all queries or selected queries.
Manage existing algorithms
-
To delete an existing algorithm, click the Action dropdown to select the Delete option.

-
Five customized algorithms are allowed per catalog. Before creating a new algorithm, consider editing or deleting an existing one.
Click the dropdown next to View action. This shows the option to View ranking algorithm ID option. The algorithm ID available here can be copied and used to configure an AB test via API.
Configure algorithm rules and AB tests
Go to the Rules tab to create, manage algorithm rules, and configure AB tests.
1. Create new algorithm rules
1.1 Apply new rule for all queries
-
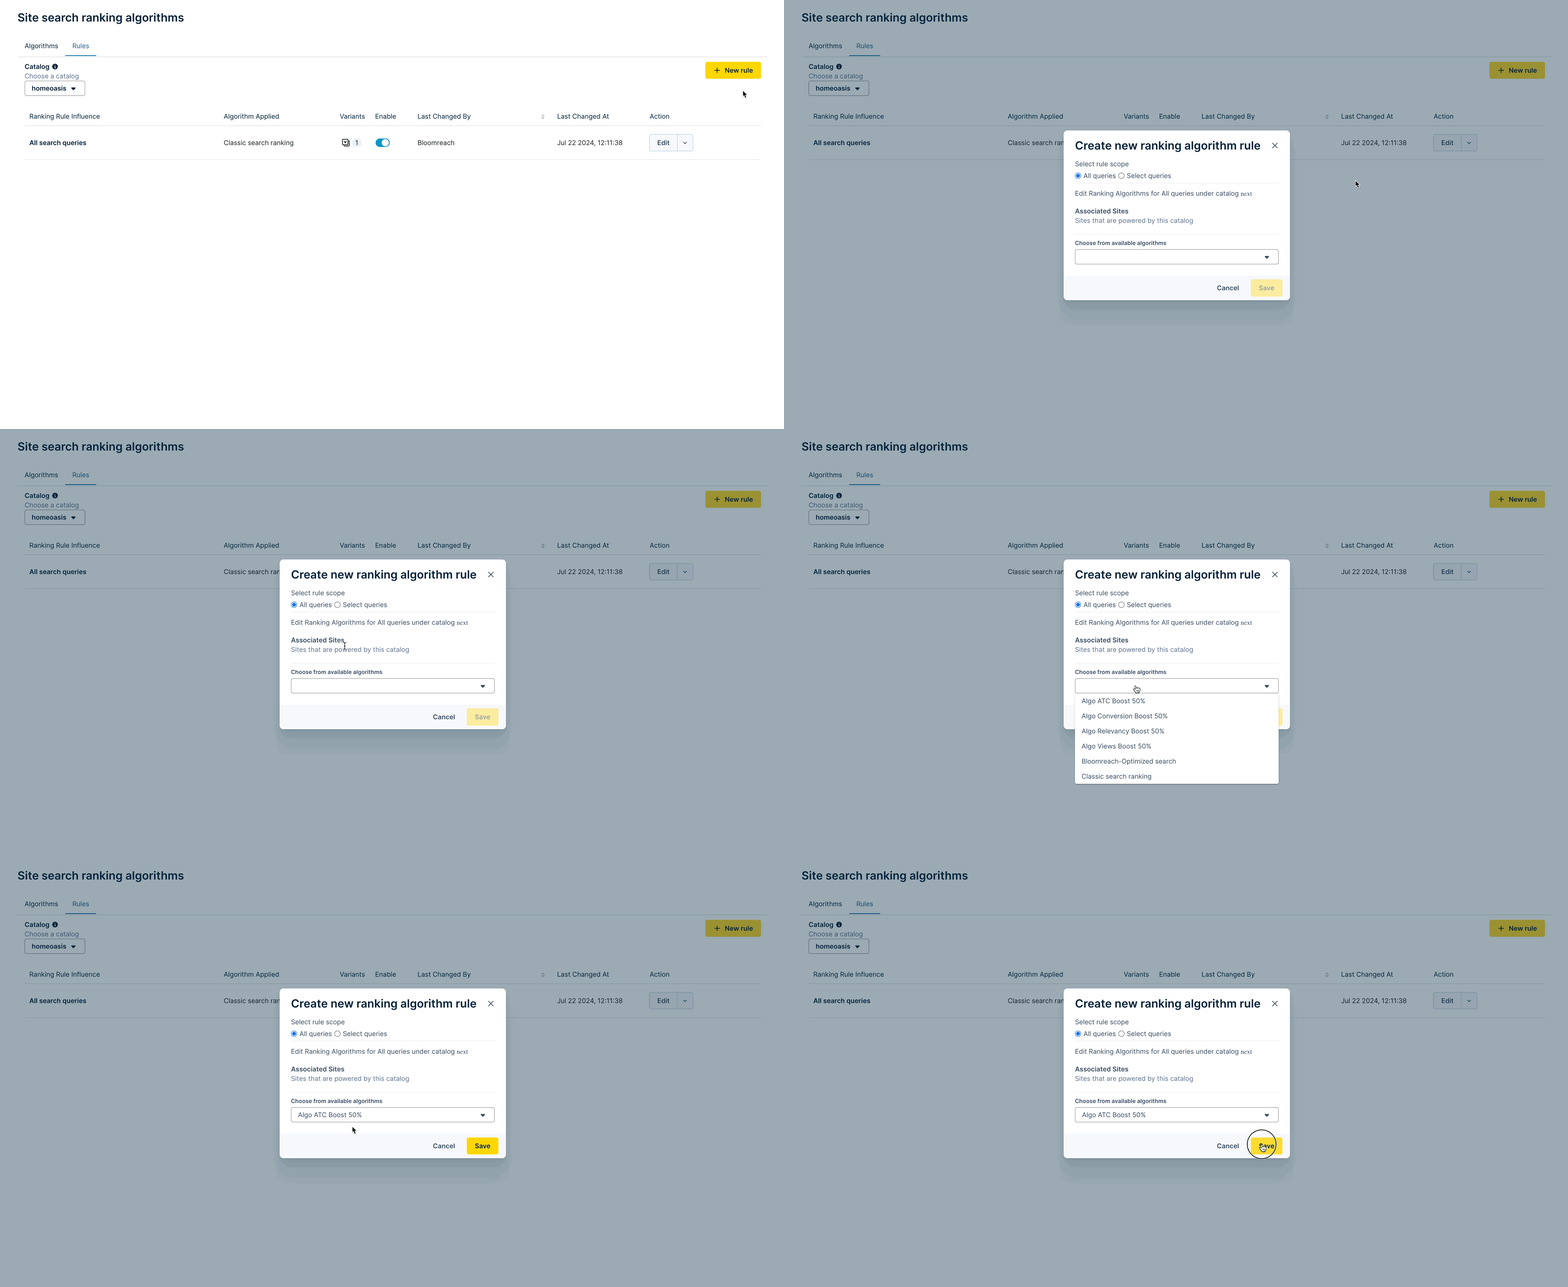
Click the + New rule button. This opens the modal to create a new ranking algorithm rule. Select the rule scope as All queries.
-
Choose the new algorithm from the dropdown. This algorithm applies to all queries.
-
Save the rule.
 1.2 Apply new rule to select queries
 -
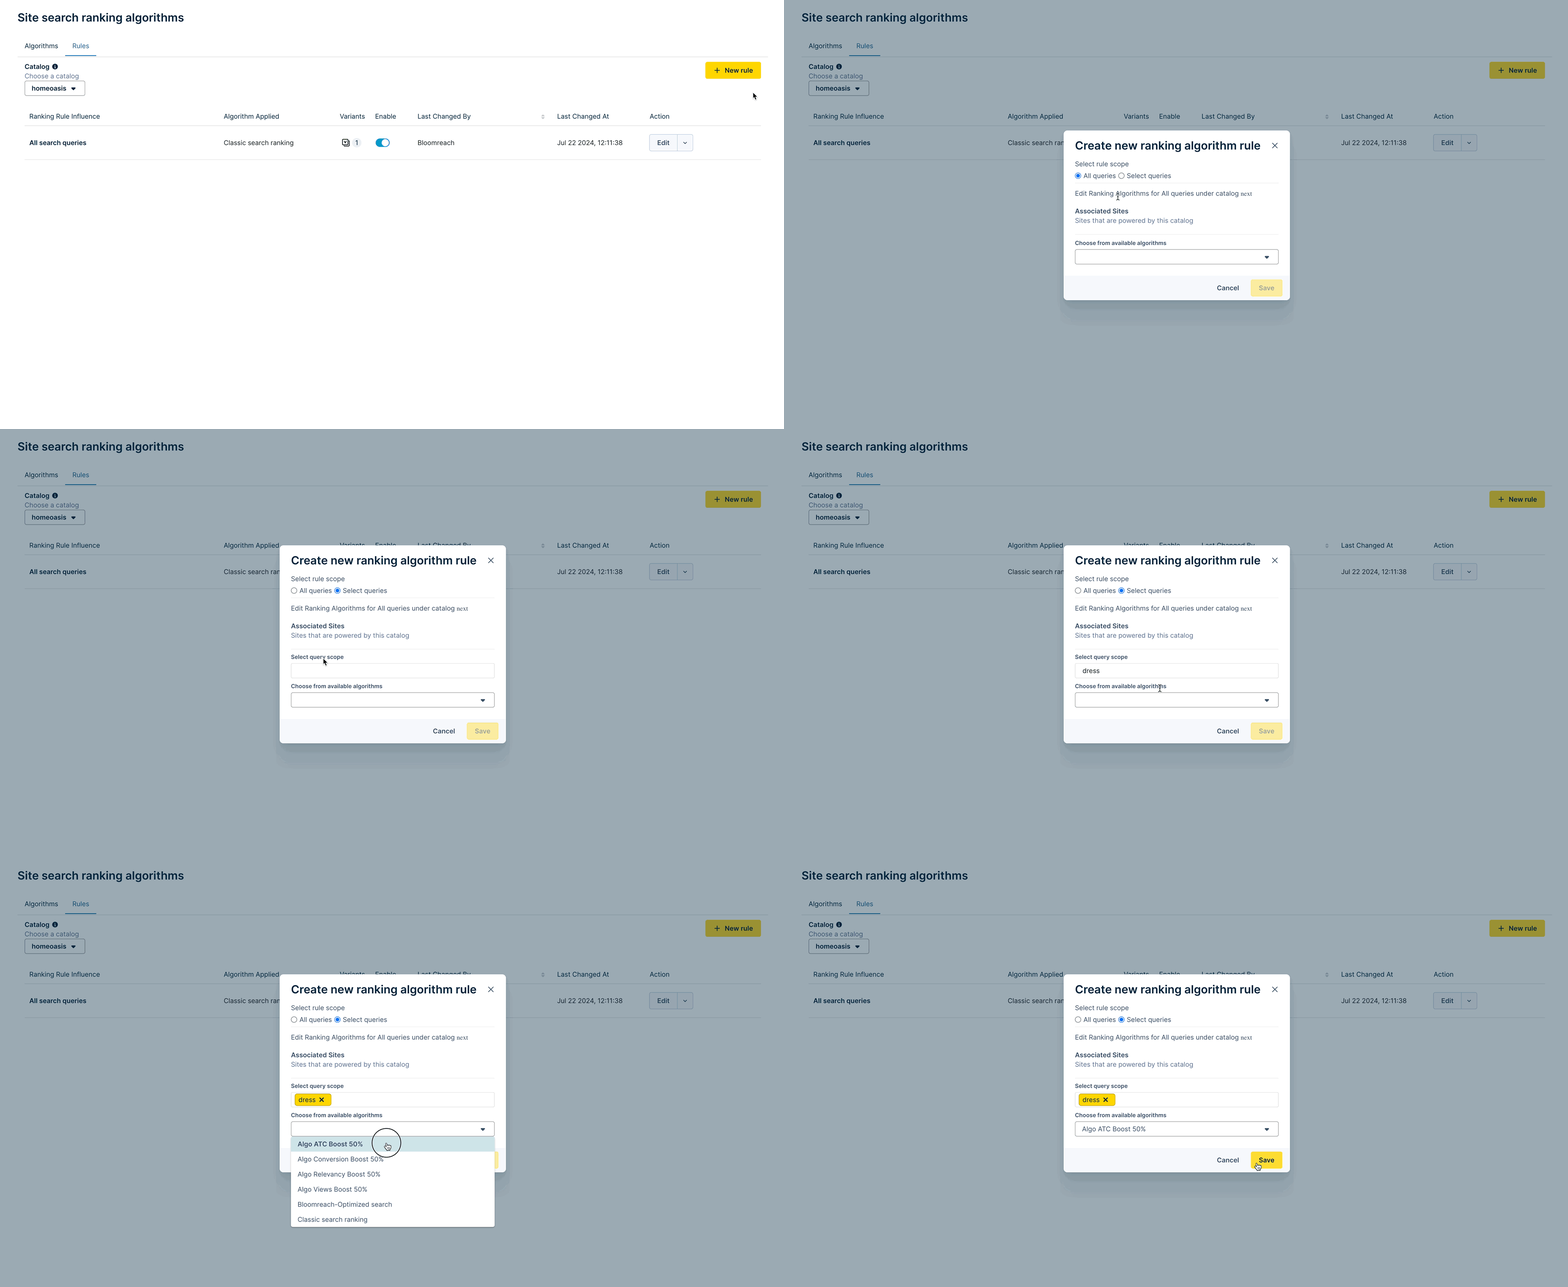
Click the + New rule button. This opens the modal to create a new ranking algorithm rule. Select the rule scope as Select queries.
-
Enter the queries that you want to target with this rule. Choose the desired algorithm from the dropdown for these selected queries.
-
Save the rule.
2. Manage existing algorithm rules
2.1 Edit Rule
-
To edit an existing ranking algorithm rule for all queries/select queries, click the Edit button next to the rule.

-
Choose a different algorithm from the dropdown.
-
Save the rule.
2.2 Delete Rule
Click the Action dropdown to select the Delete rule option.

3. Setup AB test for algorithm rule
Example Test Goal
Validate the new algorithm's performance compared to the default ranking algorithm for a select set of queries.
-
Go to an existing algorithm rule and click the Edit button next to the rule.
-
Make the query/algorithm changes to the rule (as mentioned in sections 1.1 and 1.2 above).
-
Now, click Save as test variant. This opens a Rule Variants modal to include the new variant in the test.
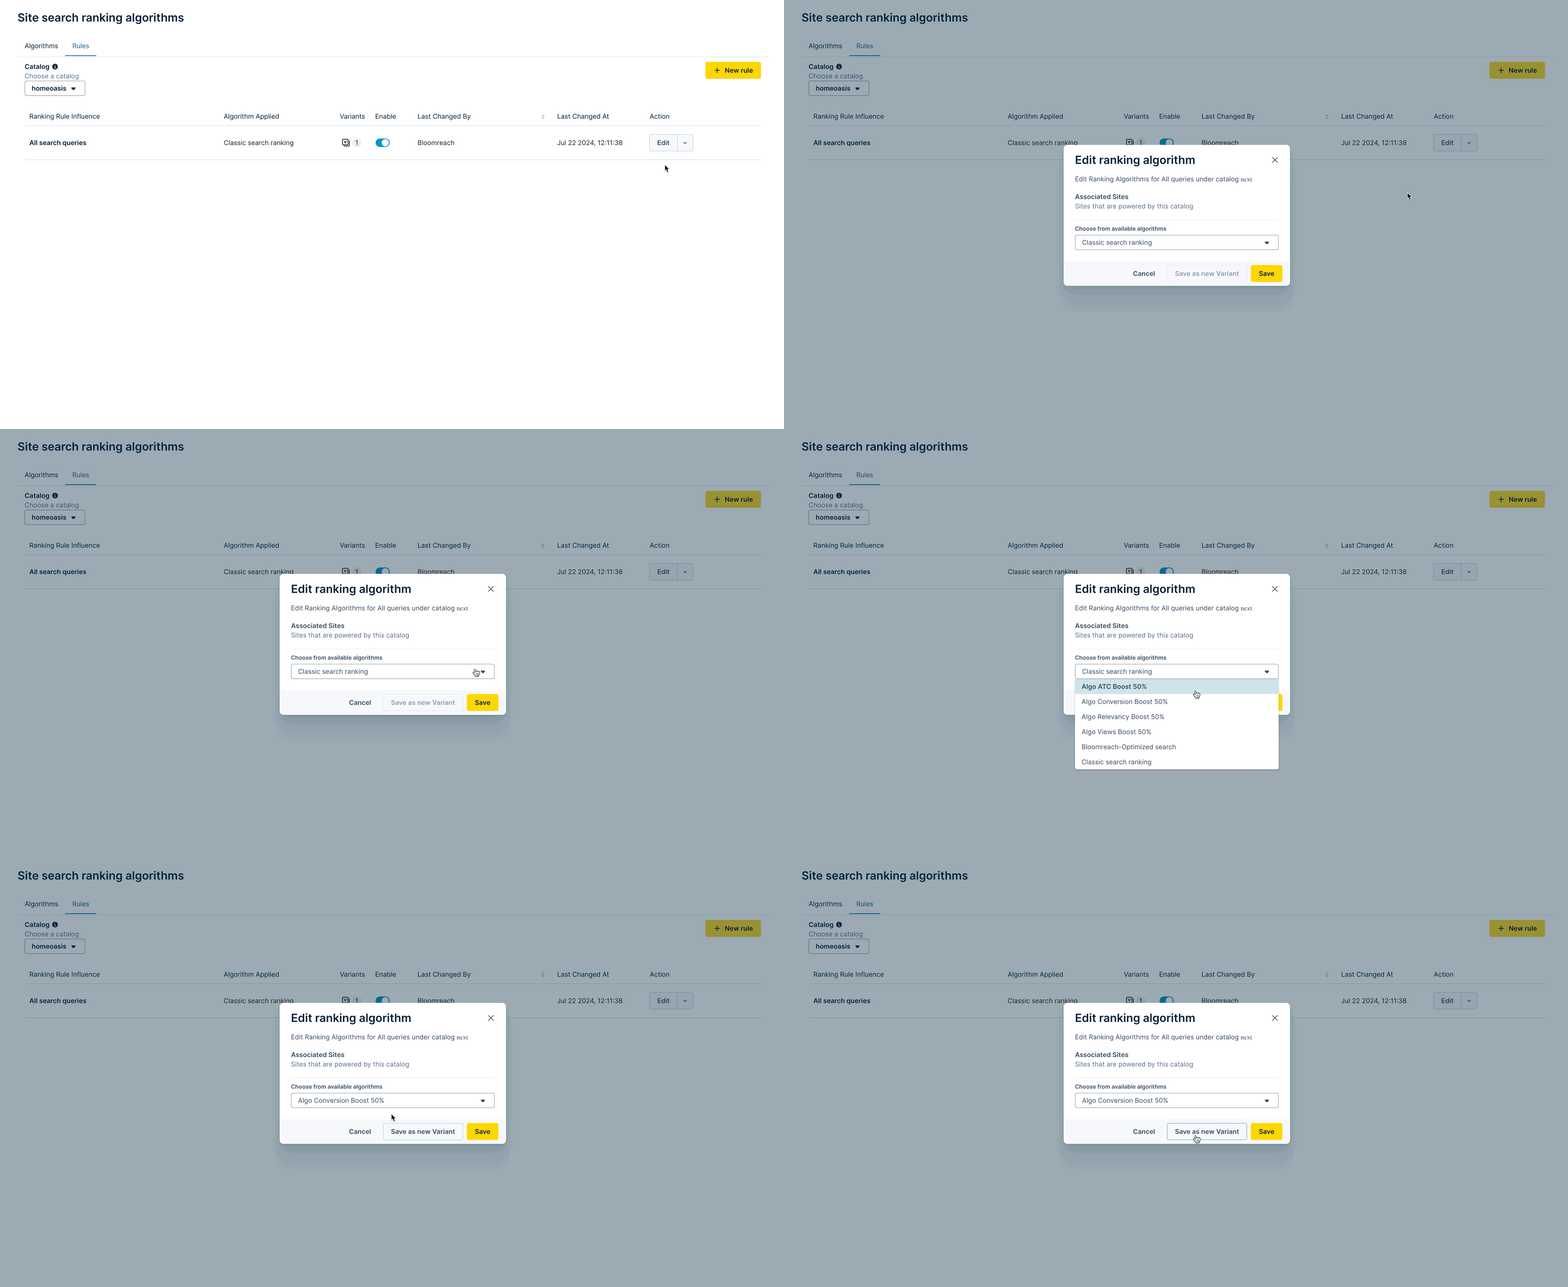
-
Click Set up new test.
Notes:
-
You can see all test variants associated with a query rule by clicking the Variants icon or the downward arrow next to the Edit option.

-
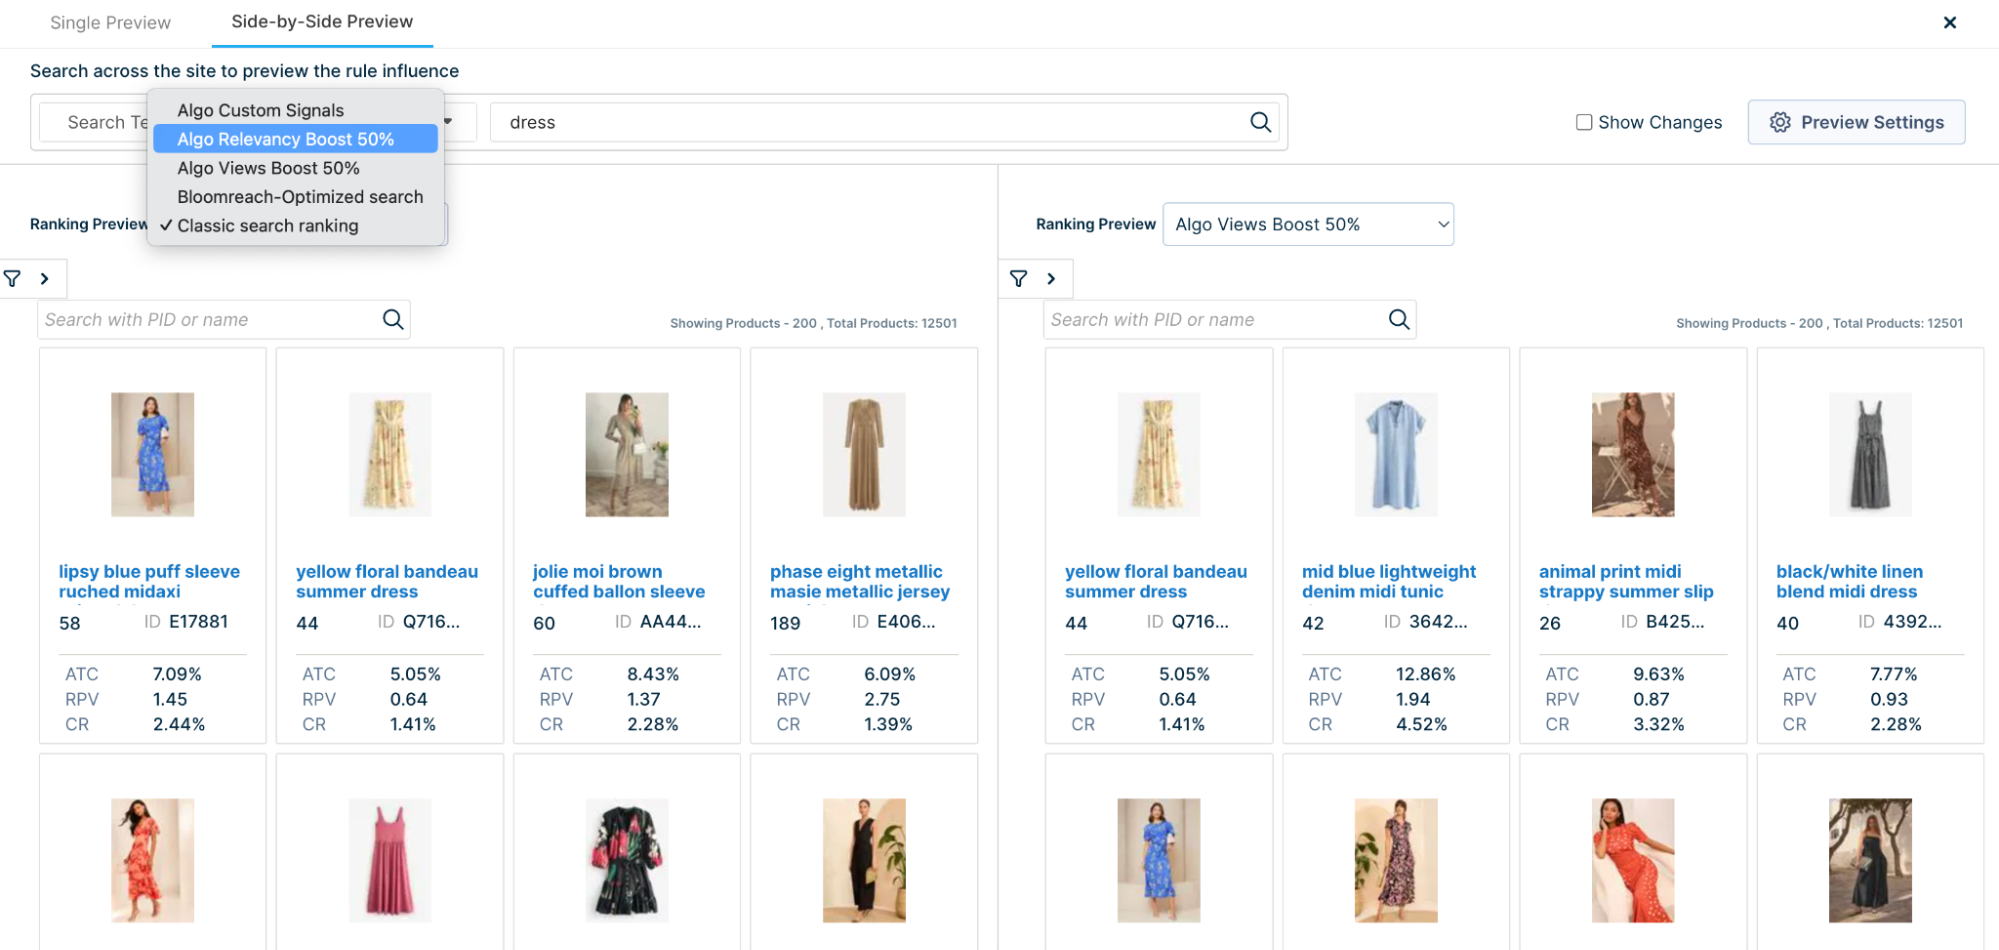
Dashboard Preview is not supported for AB tests. We will add this capability in subsequent feature iterations. You can instead follow the below steps to compare the variants: Suppose we want to compare the results of Algo Relevancy Boost 50% vs. Algo Views Boost 50%.
-
To do so, click the View option next to any of the test algorithms.

-
Then, click Preview and go to the Side-by-Side Preview tab. On the right side, you can see the results for the selected test algorithm. To preview and compare results with the other algorithm on the left side, open the Ranking Preview dropdown and select the desired algorithm.
- If you want to AB test an algorithm with an “All queries” scope, a similar test setup applies as above.
Conflict resolution
1. If two or more algorithms overlap, which one applies? For instance, two algorithms are applied for all queries.
If multiple algorithms are applied for all queries, then we choose the one that was most recently applied.
2. What happens when there are existing overrides on the API?
The values passed in API will decide the ranking behavior. Note that the algorithm sent on the API takes precedence over the selection in the Dashboard.
- If you have disabled relevance attributes (
br_ranking.relevance = off), the algorithm's performance and custom signals will be used, but the text relevance scoring will be ignored and set to zero. - If you have disabled performance attributes (
br_ranking.performance = off), then the text relevance portions of the algorithm will be used, but the performance and custom signals scores will be ignored and set to zero. - If you have disabled both performance and ranking attributes (
br_ranking = off), the ranking algorithm will not be used. Instead, it will be entirely based on your ranking rules.
3. Suppose a setting is passed at various levels on the API and Dashboard. How are these handled?
Conflict resolution order works as follows:
- API parameters passed directly on front-end API call
- Query Override on the Dashboard
- Site-level rules on Dashboard
- Site group-level rules on the Dashboard
- Account-level rules on the Dashboard
Updated 6 months ago

