Thematic pages tool
From your merchant dashboard, you can view, create, edit, and manage your Thematic Pages end-to-end and also apply Merchandising rules.
The dashboard operations for Thematic Pages are given below:
View Thematic Pages
Thematic Pages can be viewed in the Bloomreach Dashboard.
To view Thematic Pages,
- Log in to the Bloomreach Dashboard.
- Go to SEO. A list of Thematic Pages (both Bloomreach-generated and manually created) is displayed under All Pages as shown below:

Note
If using Manual launch mode, Thematic pages that pass Bloomreach's QA process appear in the Suggested Pages tab. You must manually approve the pages before they go live. Read about launch modes.
The following are the details of the Thematic pages that you can view on this screen:
| Field | Description |
| Theme Name | Name of the Thematic Page. |
| URL | Relative URL of the Thematic Page. |
| Date Created | Creation date of the Thematic Page. |
| Live? | This setting allows you to choose if the Thematic Page should render on your site or not. You can select from the following options: - Live: Specifies that a page should render - Not Live: Specifies that a page should not render. This setting will trigger a timeout and serves an HTTP 404 error. |
| Index Setting | Determines how the robots meta tag on a Thematic Page should be set, if Live. If indexed, the Thematic Page will be made searchable by search engines. - Index: Specifies that the Thematic Page will be indexed (eg. ). - Auto: Specifies that the Thematic Page is only indexed if it passes all the quality filters, and will not be indexed if it fails to meet quality standards. - No Index: the Thematic Page will not be indexed (results in a HTTP 200 response if Live). (eg. ) |
| Index Status | Indicates the current index status according to Index Setting, including the outcome of Auto indexing. |
Common actions
There are a few capabilities within the Thematic Pages Tool that help you find, manage, and view your Thematic Pages more easily. These are listed below:
Search
To search for pages, use the search box near the top left of the list. You can search by theme name, title, header, or URL.
Favorite
To favorite a Thematic Page, click the star icon in the left column of the list and the page will be saved in the Starred section.
Columns
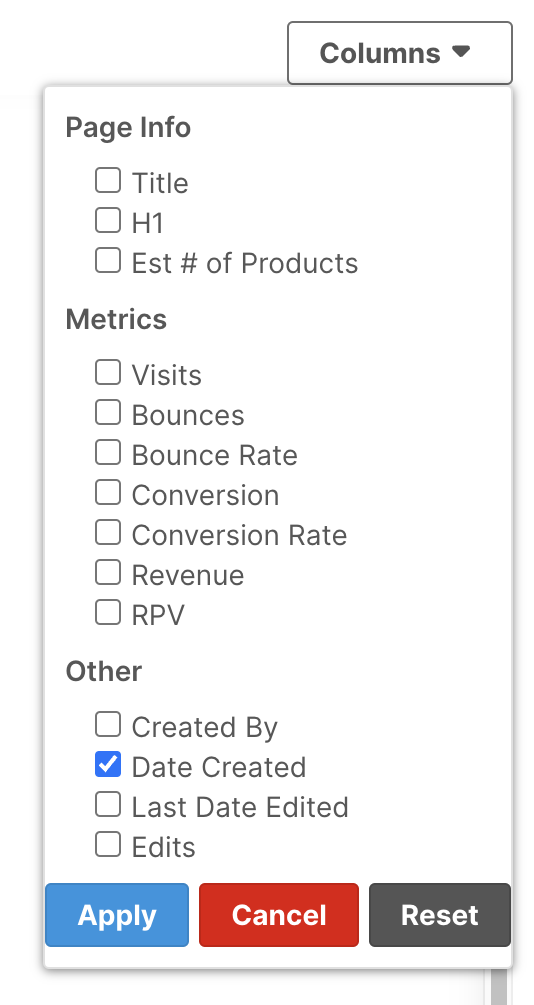
The Columns menu allows you to toggle additional information to display in your Dashboard.
- Click Columns on the top right. A drop-down menu will appear as shown below:
Note
All the data in the columns visits, bounces, bounce rate, conversion, conversion rate, revenue, and RPV are all over the past 30 days.
| Column Name | Description |
|---|---|
| Title | The title of the Thematic Page. |
| H1 | The header of the Thematic Page. |
| Est # of Products | Estimated number of products present on the Thematic Page. |
| Visits | Number of visits made to the Thematic Page. |
| Bounces | Number of bounces (sessions without product views or ATC events) from this Thematic Page. |
| Bounce Rate | Percentage of visits that resulted in bounces. |
| Conversion | Number of conversions from this Thematic Page. |
| Conversion Rate | Percentage of Visits that resulted in Conversions. |
| Revenue | Revenue generated from Conversions on this Thematic Page. |
| RPV | Revenue Per Visit (Revenue divided by Visits). |
| Created By | Name of the user who created the Thematic Page. Suggested Pages will be created by Bloomreach. |
| Date Created | Creation date of the Thematic Page. This column is displayed by default. |
| Last Date Edited | Date of the last edit. |
| Edits | A broad description of how the Thematic Page was edited, such as “Product Grid Modified” or “Content Added”. |
The Reset will uncheck every option except Date Created.
- Select the options you'd like to display on the Dashboard.
- Click Apply to save.
Edit Thematic pages
- Log in to the Bloomreach dashboard. Go to SEO.
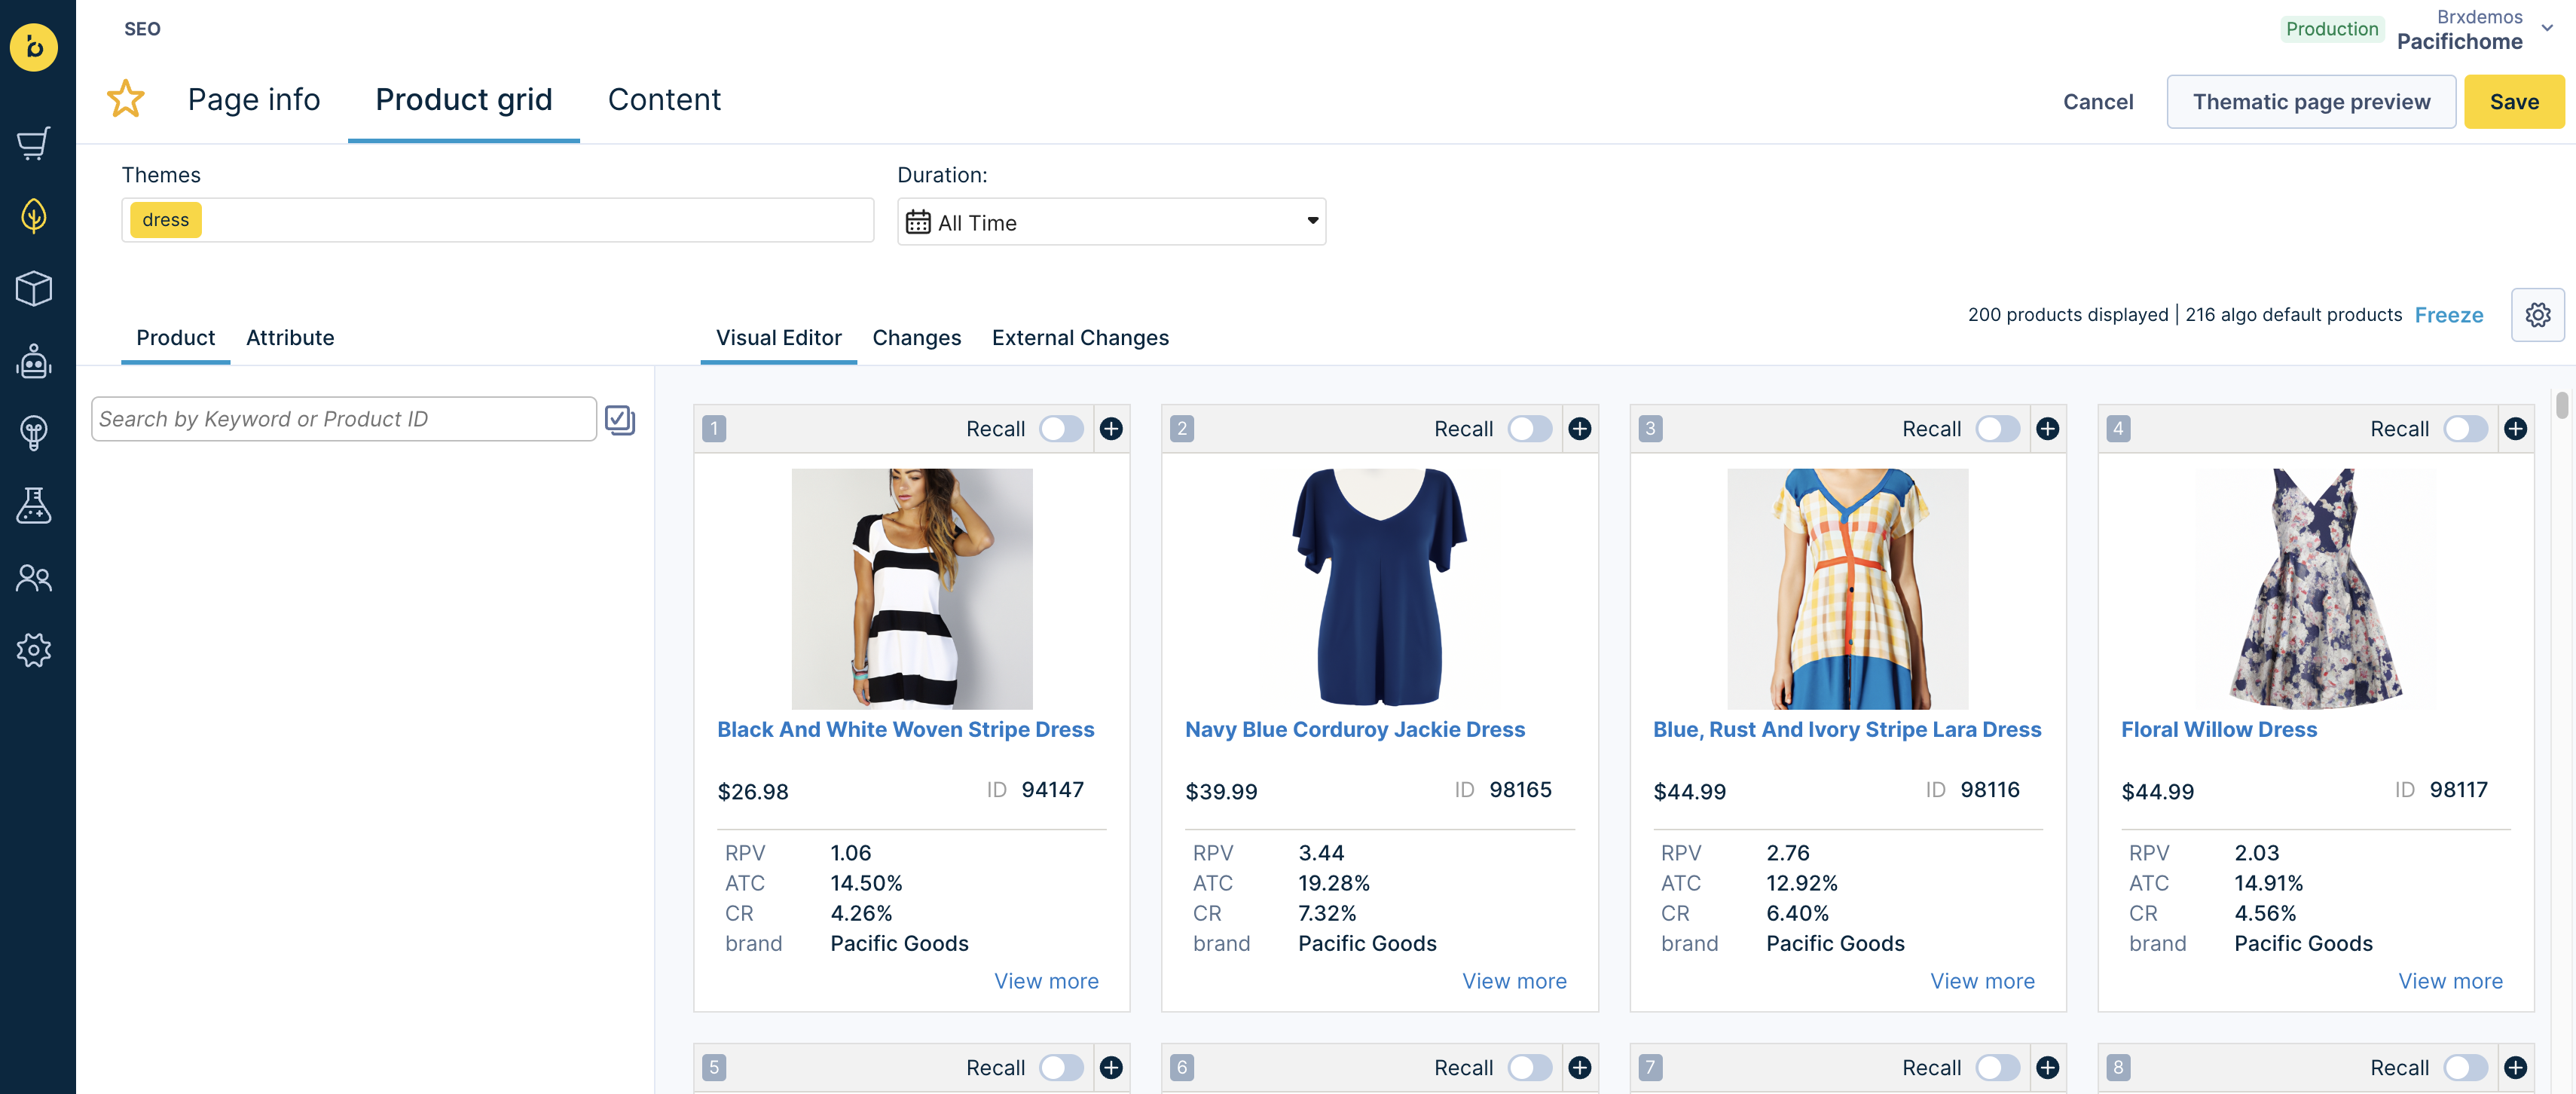
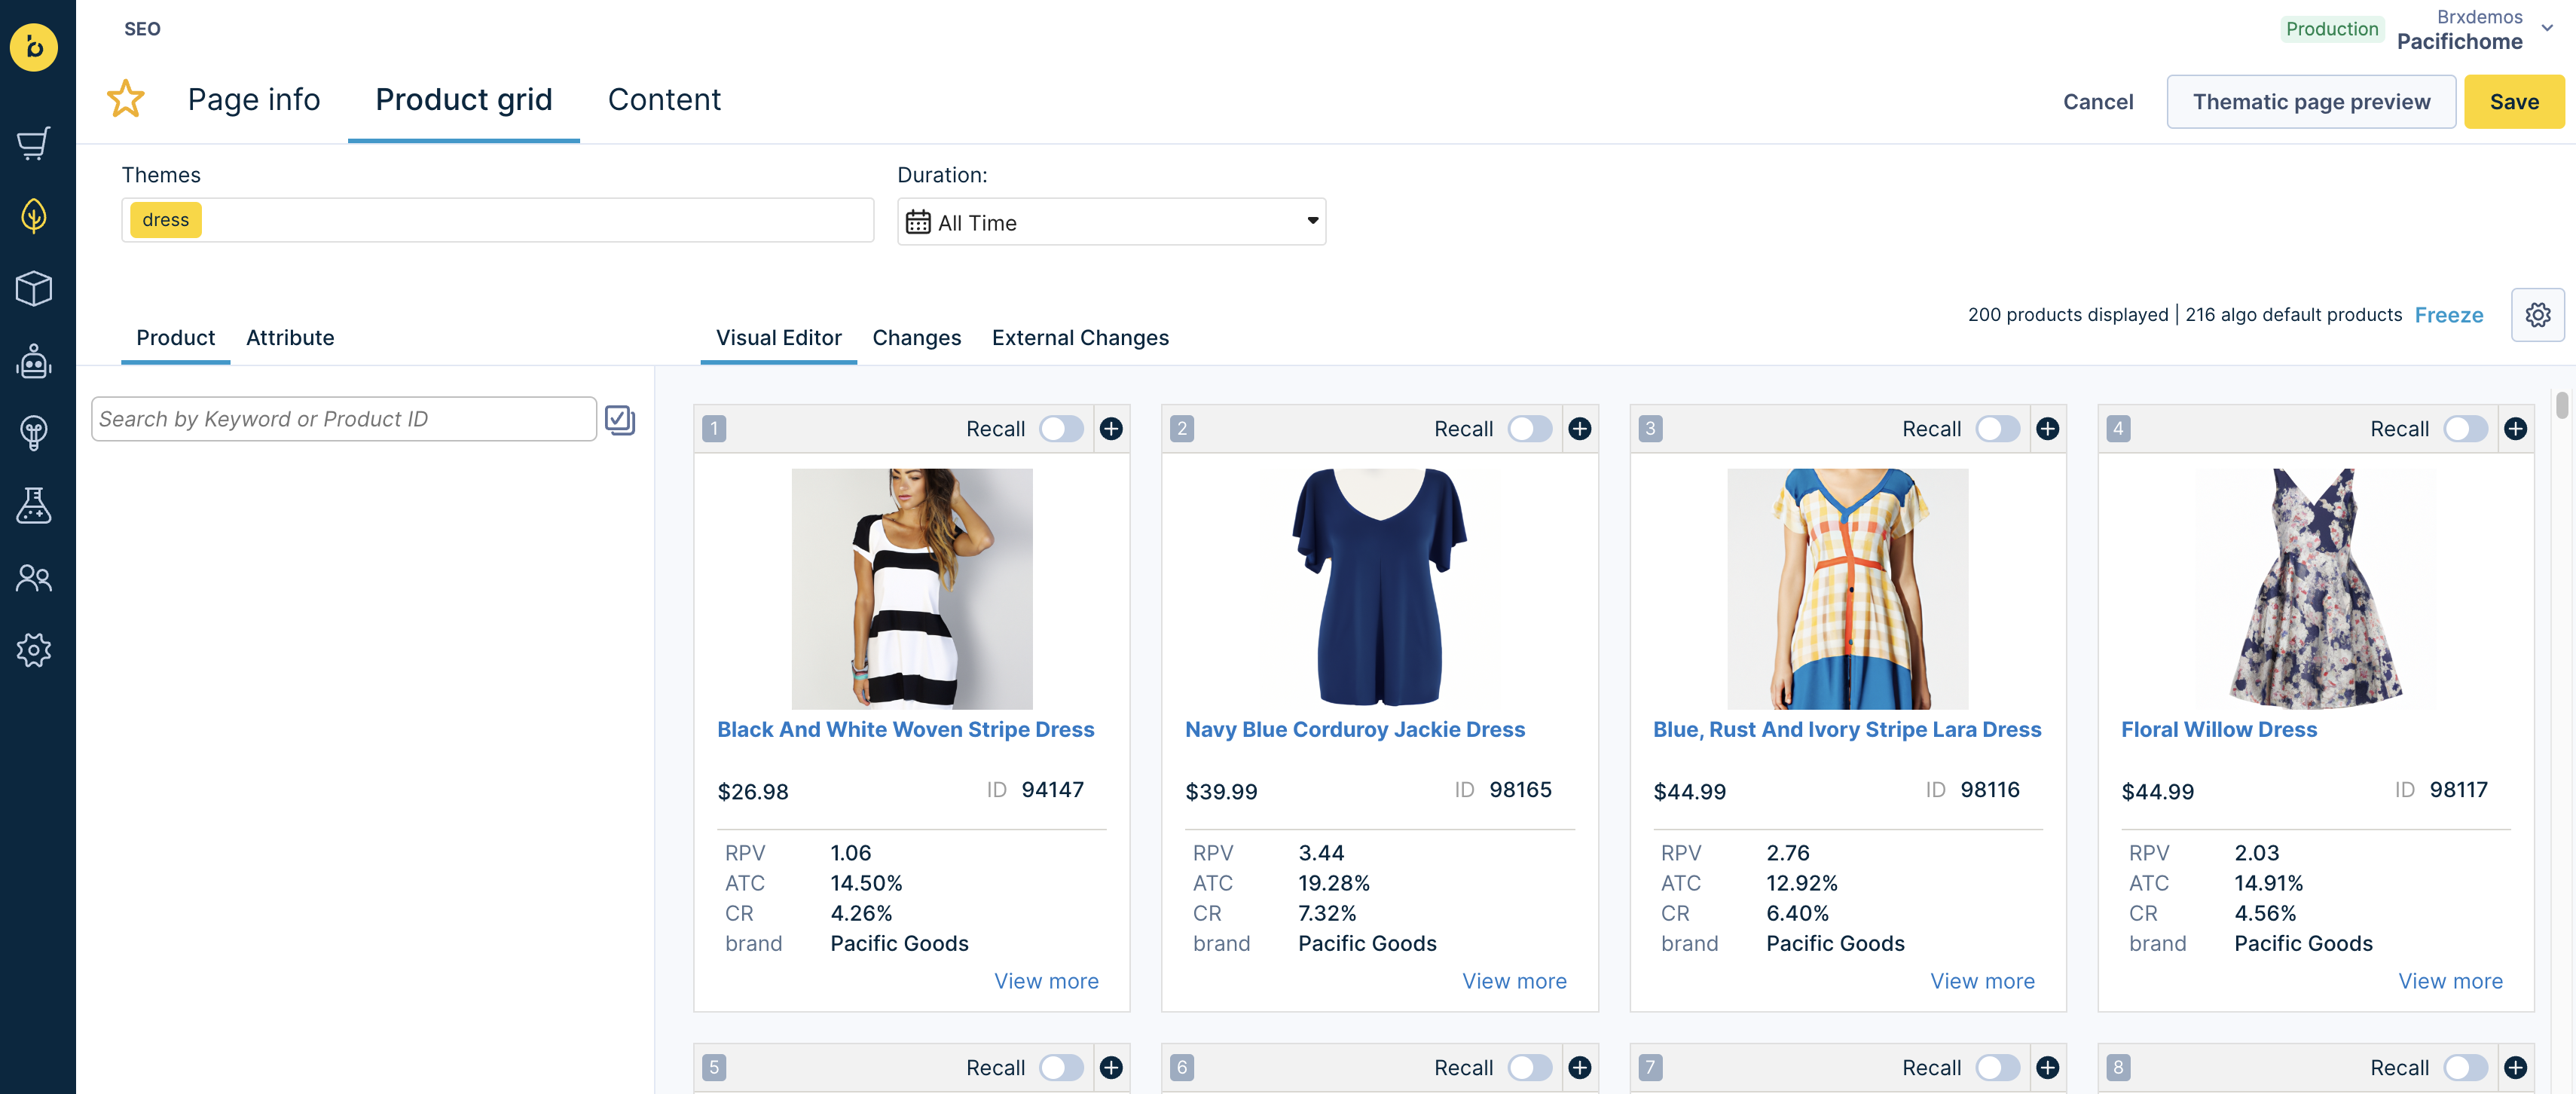
- Click on the theme name, such as “dress,” of the Thematic Page you wish to edit. This will display the Product Grid Editor (as shown below) from where you can edit the details of the Thematic Page:
Manually create a Thematic Page
In addition to the auto-generated Thematic Pages, you can manually create your own Thematic Page and apply any type of merchandising capabilities that you need.
How do I find the pages I created?
Go to the All Pages section, then use the Columns menu to display the Created By column.
To manually create a new Thematic Page,
- Click Create Page and enter a theme name. This opens the Product Grid Editor. You can now edit the page or add merchandising rules like boost, bury, etc.
The Bloomreach algorithm will attempt to populate the Product Grid with matching products based on your chosen theme name. However, if Bloomreach cannot identify the products or attributes, we will not be able to match products to the theme automatically. In that case, you can edit the Thematic Page by manually adding or removing products, as explained in the following section.
To learn more about how Bloomreach matches products to a manually created Thematic Page, click here.
Adding or Removing Products
After you create a Thematic Page, you can add or remove products available in your catalog to customize your Thematic Page. You can also apply merchandising rules such as boost, bury, block mentioned in the Merchandising section.
To add products,
- In the Product Grid Editor, go to Product in the left panel and search for products by keyword or product ID.
- Once the desired product appears, drag and drop the product into the product grid. Products that already exist in the Thematic Page will be marked as Already in Grid in the results.
To remove the product,
- Click the + button on the product you want to remove and then select Block.
Changing Page Info
You can also view and change the details of the page by clicking on Page Info. In the Page Info section, you can edit the title, header, Index Setting, and Live Setting.

Adding Content to Thematic Pages
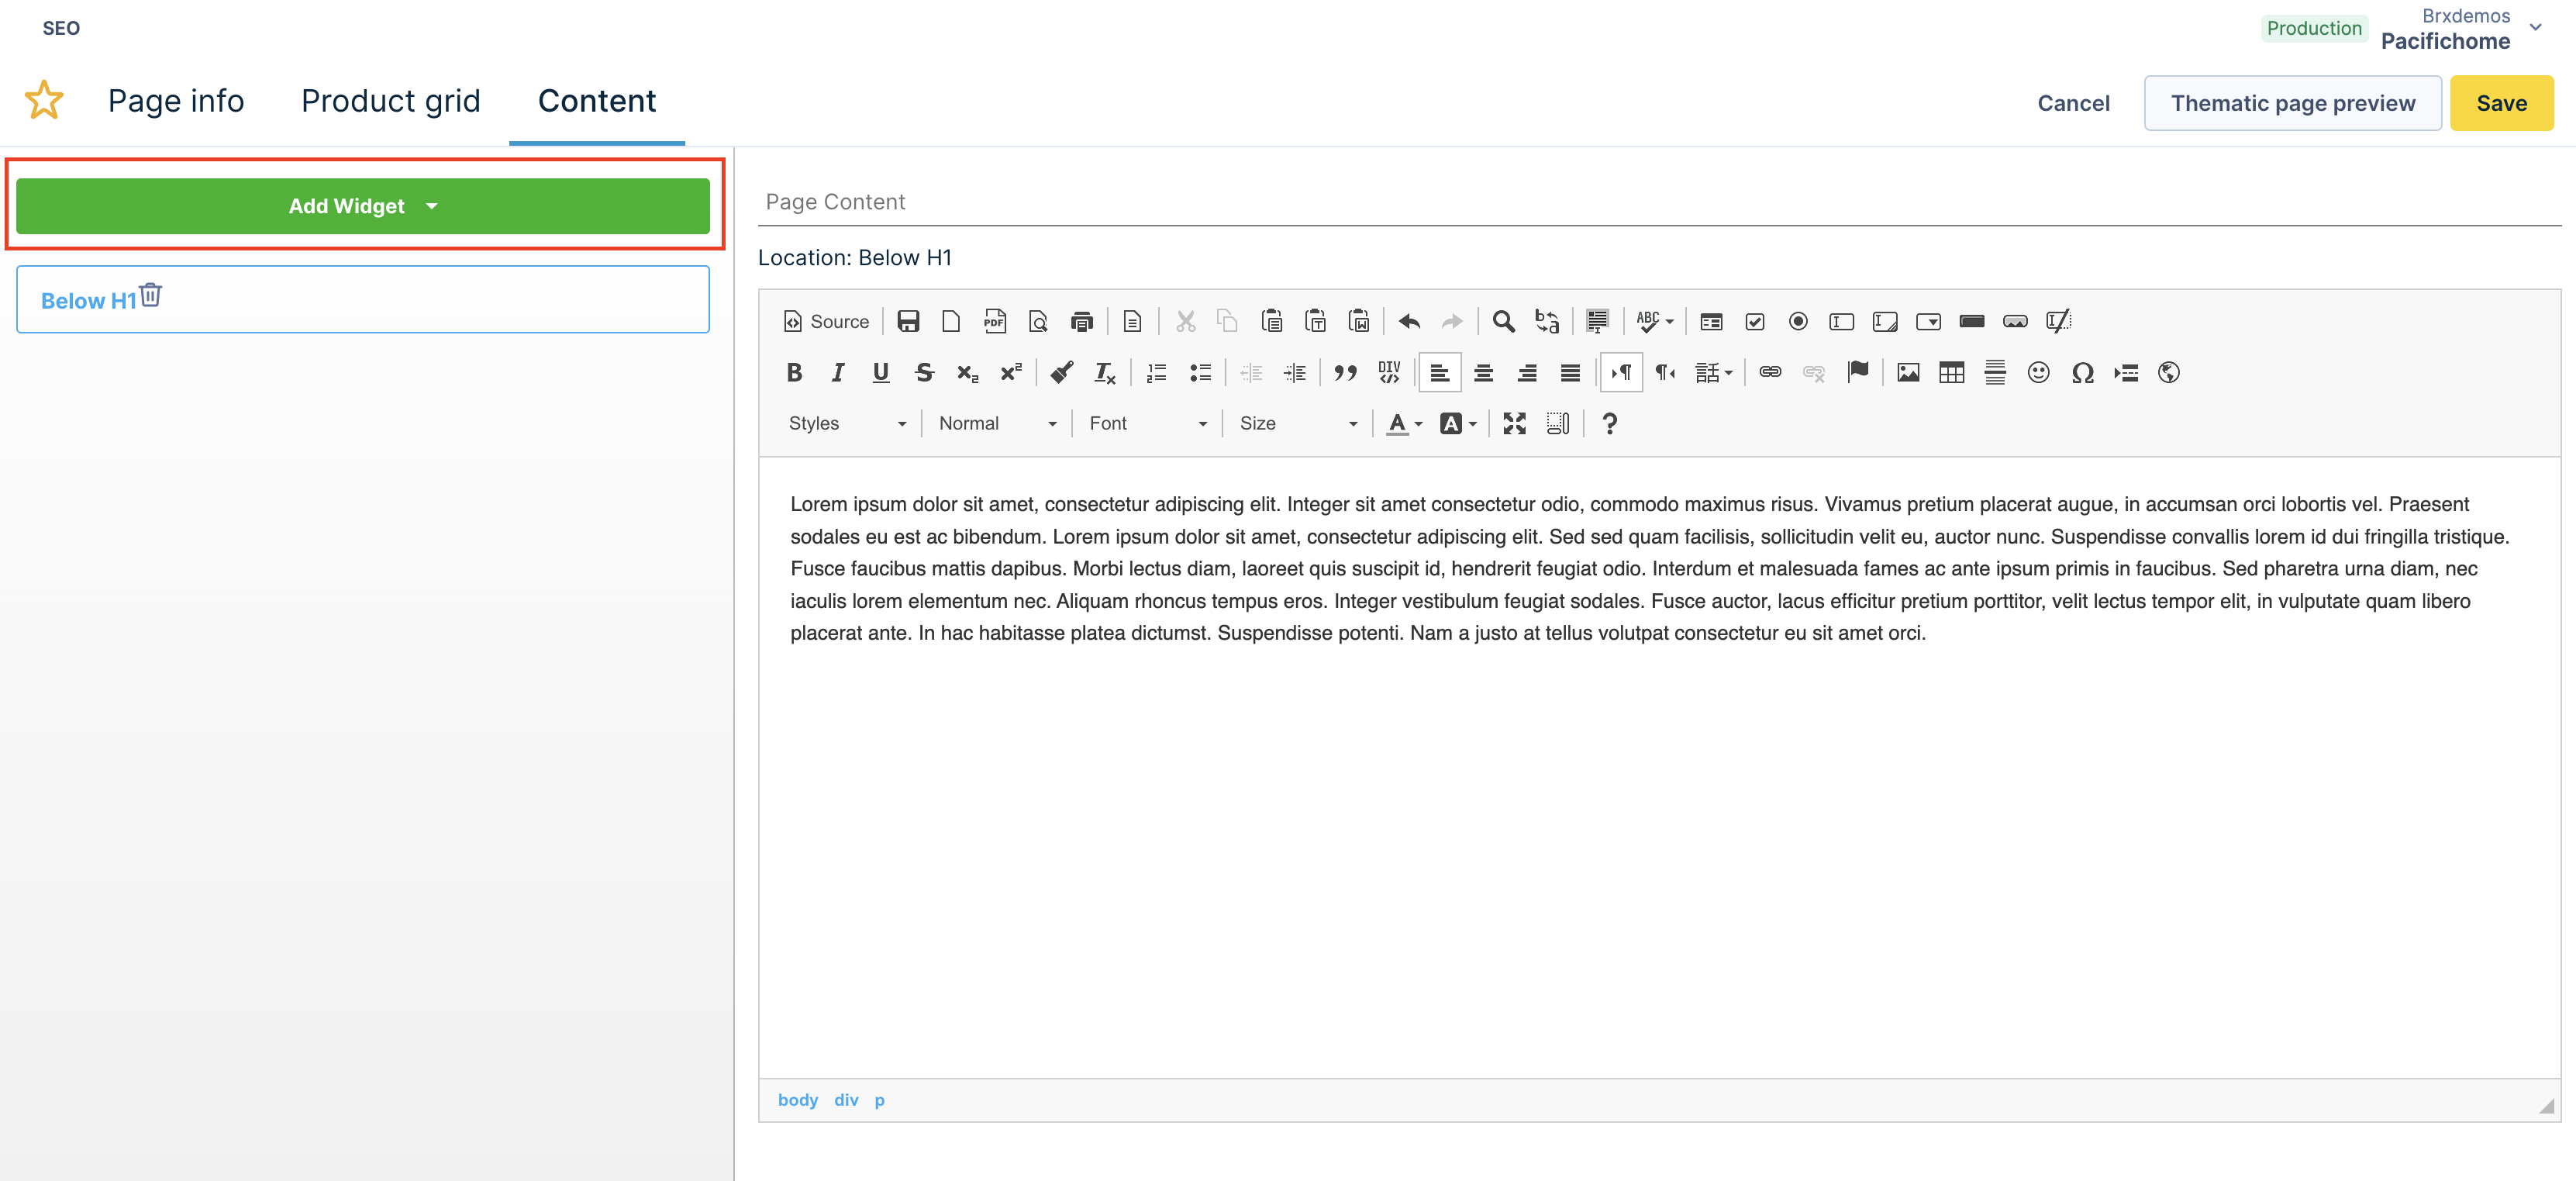
You can also add content blocks to your page to enable your customers to know more about your products. The default content blocks are placed above H1, below H1, and below the Product Grid.
To add a content block,
- Click Add Widget
- Select an area where you’d like to add the widget. You can then edit the widget’s content as shown below:
- When you're finished, click Save.
Suggested Pages
Suggested Pages are Thematic Pages that have been automatically generated by the Bloomreach algorithm based on demand and are pages that are awaiting to be reviewed by you before they can be launched to your side.
Thematic Pages created by Bloomreach will appear in the Suggested Pages tab only if you have chosen to manually review pages before they are launched i.e., you have opted for "Manual Launch Mode" during integration. To read about the Manual and Auto Launch Modes, go to Launching Bloomreach Generated Thematic Pages section in the Thematic Pages.
Viewing Suggested Pages
To view a Suggested Thematic Page,
- Go to SEO.
- Click the theme name to view or edit the products in the Suggested Page.
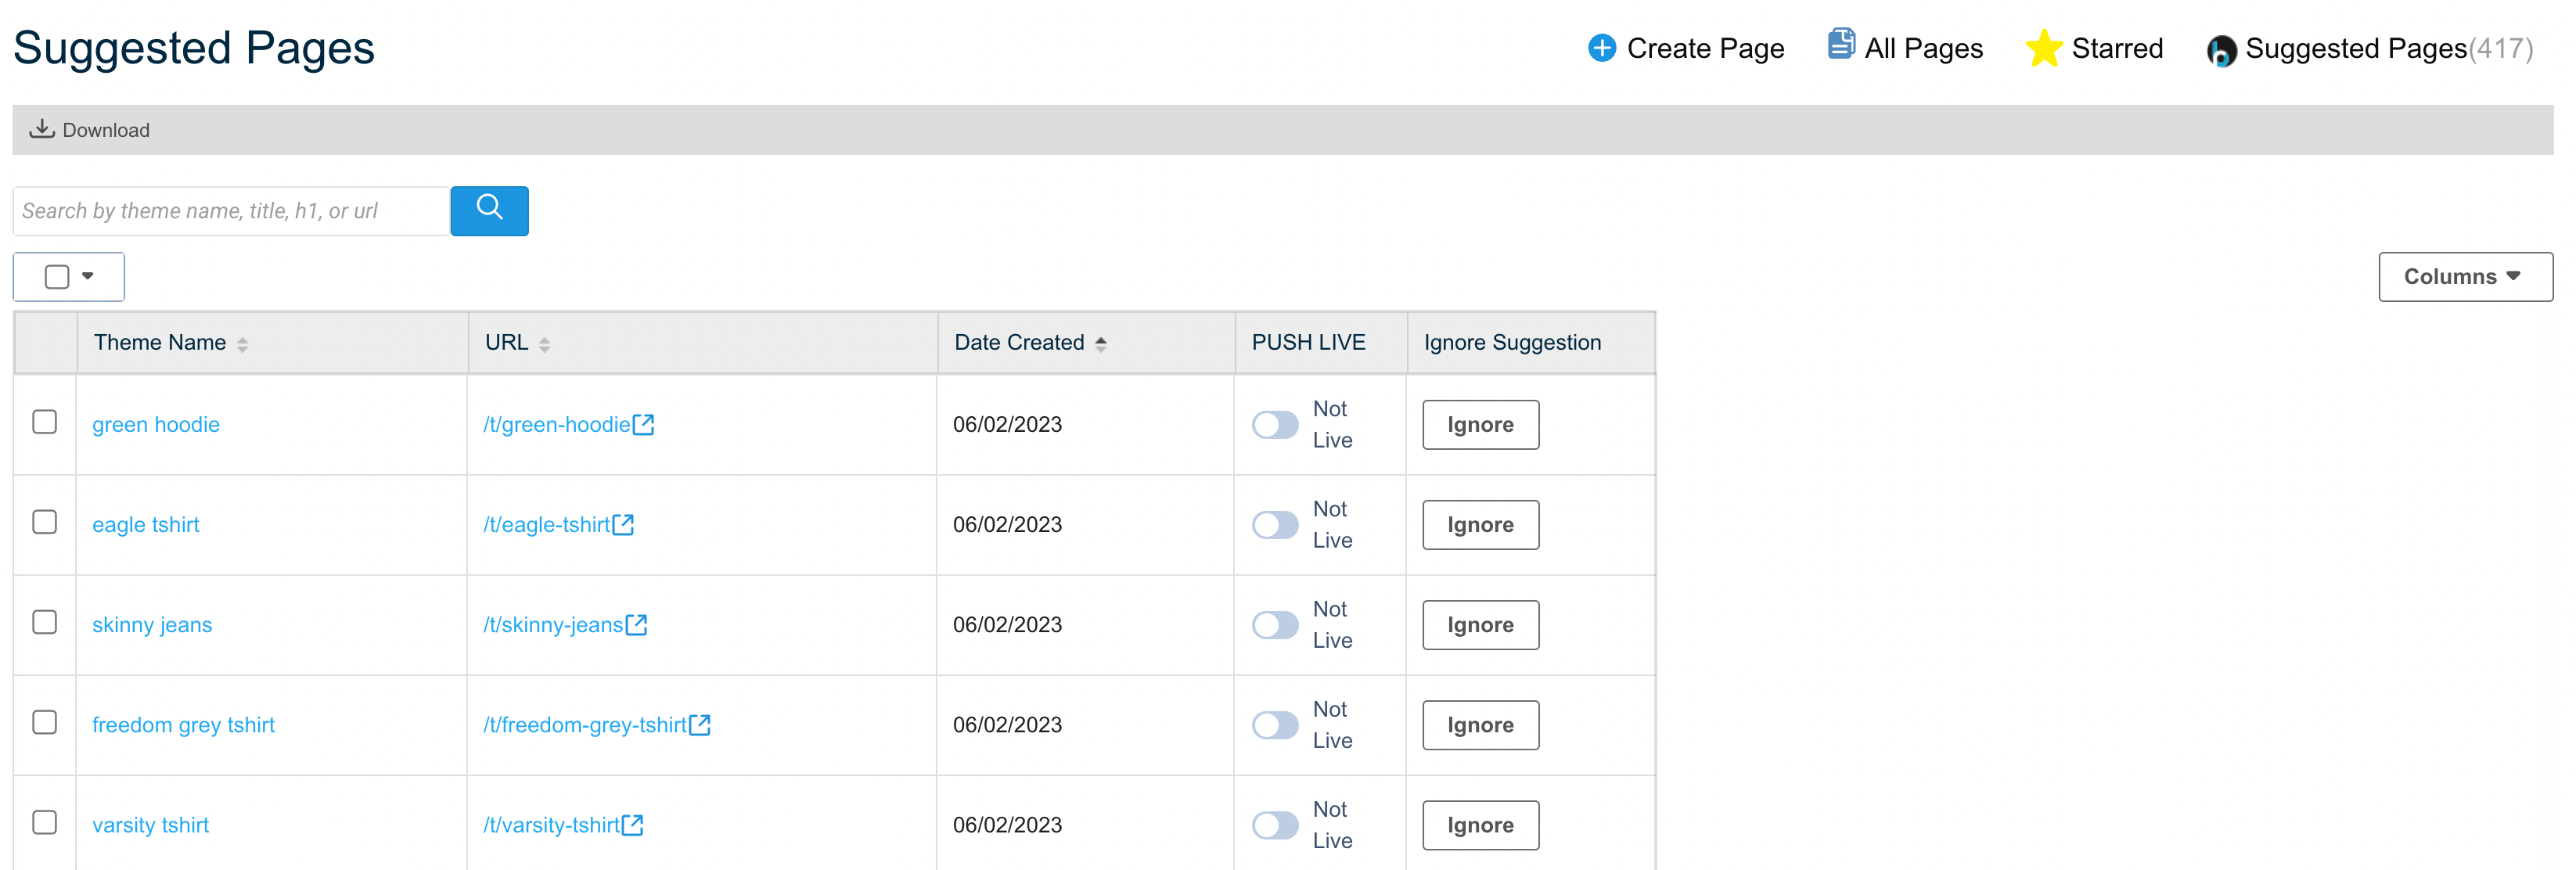
In this section, you will see the following details:
| Field | Description |
| Theme Name | Displays the name of the theme as identified by Bloomreach. |
| URL | The relative URL of the Thematic Page. |
| Date Created | Creation date of the Suggested Thematic Page. |
| PUSH LIVE | This setting allows you to choose if the Thematic Page should render on your site or not. You can select from the following options: - Live: Specifies that a page should render - Not Live: Specifies that a page should not render. This setting will trigger a timeout and serve an HTTP 404 error. |
Further, you can display more options by selecting options given in the Column drop-down menu.
Editing Suggested pages
You can edit the Suggested pages just like the other Thematic Pages. Click here to learn about the steps to do this.
Thematic Pages created by Bloomreach will appear in the Suggested Pages tab only if you have chosen to manually review pages before they are launched i.e., you have opted for "Manual Launch Mode" during integration. To read about the Manual and Auto Launch Modes, go to Launching Bloomreach Generated Thematic Pages section in the Thematic Pages.
Ignoring Suggested pages
The Suggested Pages can be ignored if you do not wish to use them on your site.
To remove/ignore a Suggested Page,
- Click the Ignore button that is next to the Suggested Page you wish to ignore.
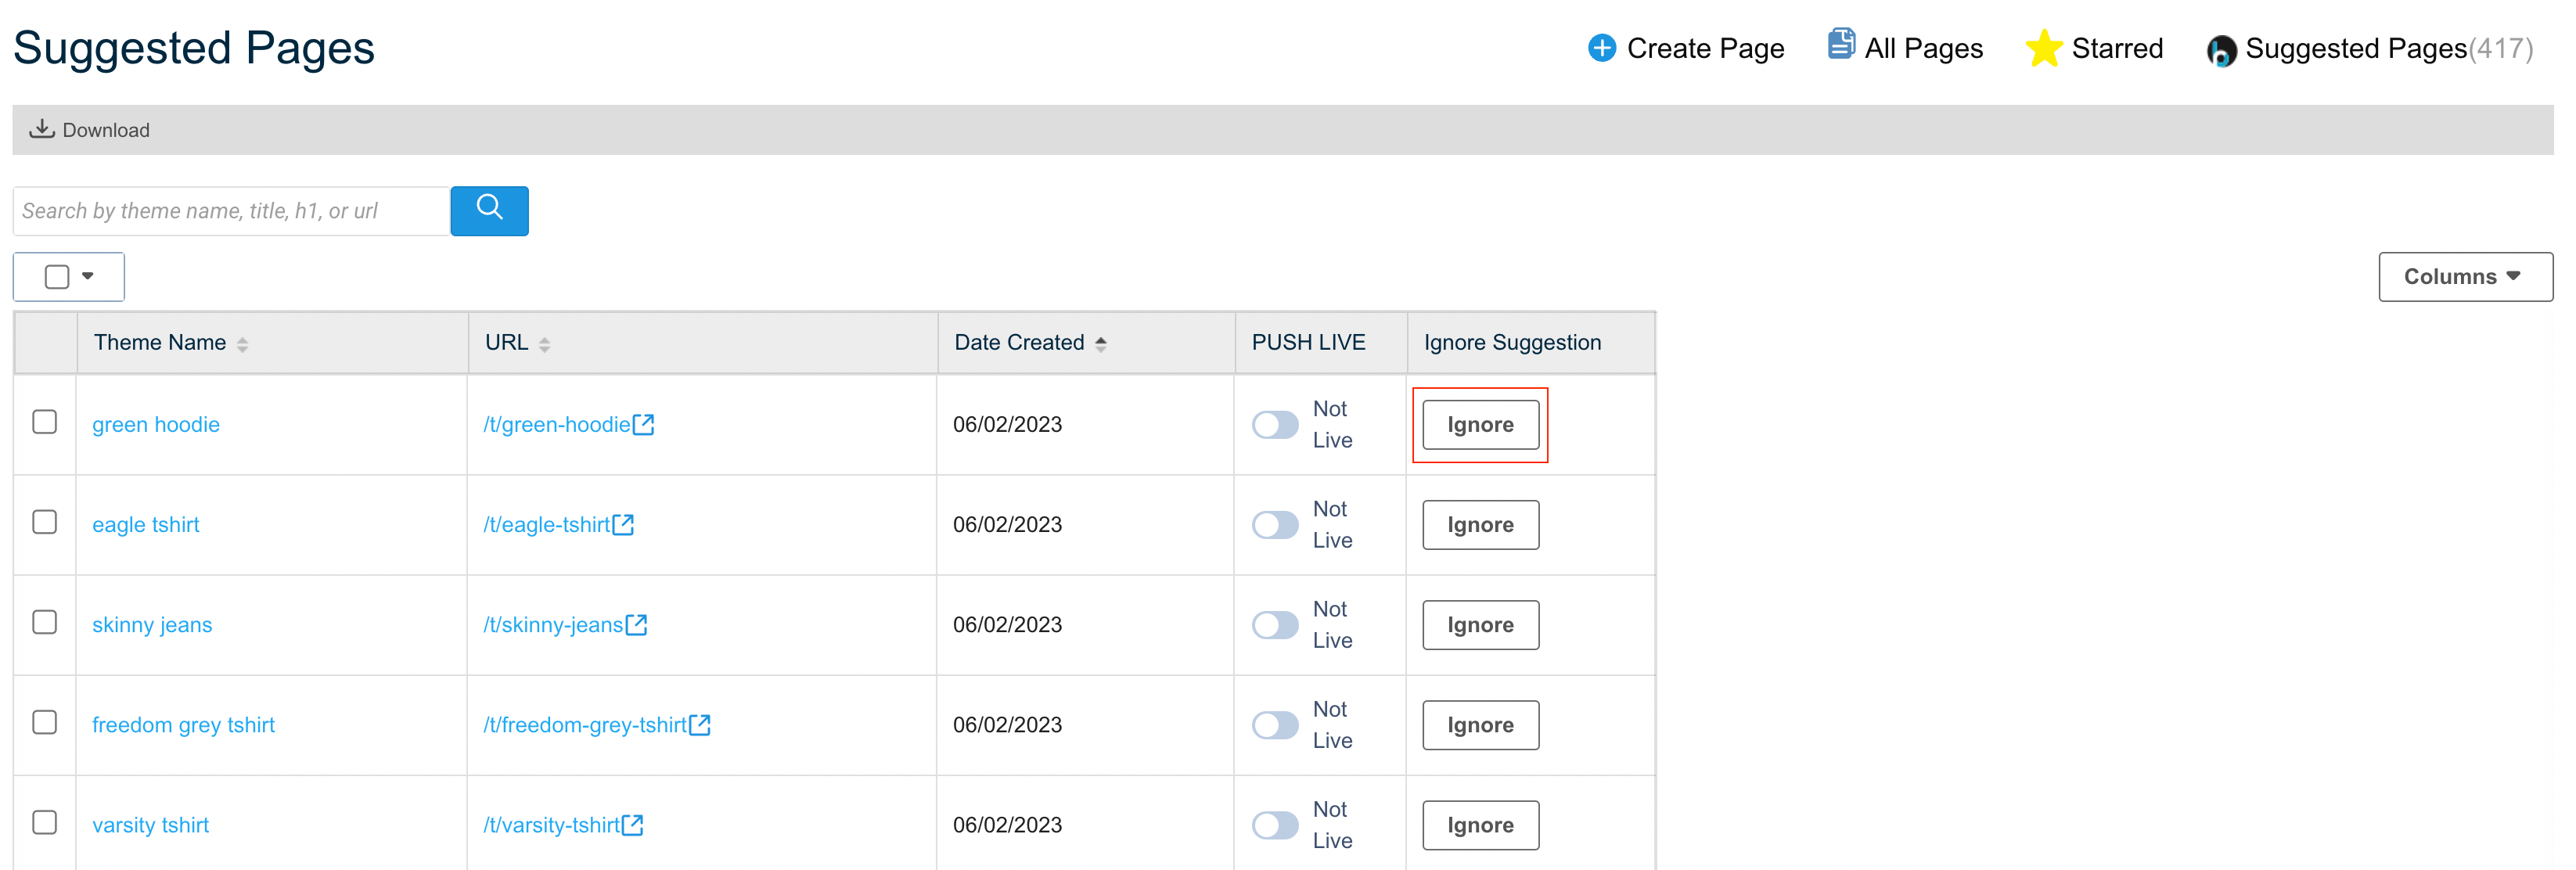
- The dashboard will ask for confirmation before removing the page. Click Ignore this page or Cancel.
Merchandising Thematic pages
Thematic Pages can be merchandised using the Product Grid Editor.
To open the Product Grid Editor from Thematic Pages
- Go to SEO.
- Click on the theme name, such as “kitchen accessories,” of the Thematic Page you wish to edit. This will display the Product Grid Editor (as shown below), where you can apply the merchandising rules. You can read about Product Grid Merchandising here.
Related articles
Updated 10 months ago
