Add a campaign
This page will help you set up your campaign for personalization.
Note:
Content personalization features must be enabled on a per-environment basis. To get started with personalization, reach out to your Bloomreach account manager or sales representative.
Introduction
Goal
Add a Bloomreach Engagement email campaign to Content audiences in order to personalize pages.
Background
For an engaging experience, Bloomreach Content enables personalization of pages using the Experience manager based on segmentations used in Bloomreach Engagement email campaigns. Visitors entering your site from a targeted email campaign are assigned a segment based on that campaign and are subsequently served personalized pages for that segment.
This page explains how to prepare your email campaign in Bloomreach Engagement for page personalization and how to add your campaign to Content audiences.
Set up an email campaign in Bloomreach Engagement
Before you can personalize pages in the Experience manager, you must create a segmentation and set up an email campaign in Bloomreach Engagement.
In the design for your email campaign, include some targeted rows and set each to a different segment:
- Add a new row or select an existing row in the design.
- Under Row properties, Display conditions, select Set segment/s and select a segmentation and segment.
Within each targeted row, add links to the page(s) you will personalize for this campaign. To find the URL for a page, browse to the page in the Experience manager, open the Page menu, and select Info:

In the settings for your design, set Link transformation to Manual and configure the following Bloomreach Tracking Module (btm) parameters:
| URL parameter name | Description | Example value |
|---|---|---|
| btm_campaign_id | Must match the campaign's hexadecimal identifier in the URL of the Bloomreach Engagement application. For example, "612d6bbf7cff765e90dc0d62" in https://cloud.exponea.com/p/my-project-1/campaigns/email-campaigns/**612d6bbf7cff765e90dc0d62**?action=design. | 612d6bbf7cff765e90dc0d62 |
| btm_segment | The Jinja code for your segmentation. You can find this code in the design editor by clicking on the {} button at the bottom and selecting your segmentation. | {# Bloomreach fans #}{{ segmentations['611f6fc56f0610307a1ae332'] }} |
| btm_ttl (Optional) | The number of days the personalization should be valid. The default value is 7 days and the maximum value is 28 days. | 7 |
Tip
Bloomreach Tracking Module (btm) parameters are link parameters used to pass segmentation information from Bloomreach Engagement to the Content module. These are used to start the personalization and store the relevant info in the Bloomreach cookie.
Add the campaign to Content audiences
In Commerce Experience Cloud, open the Content audiences application.

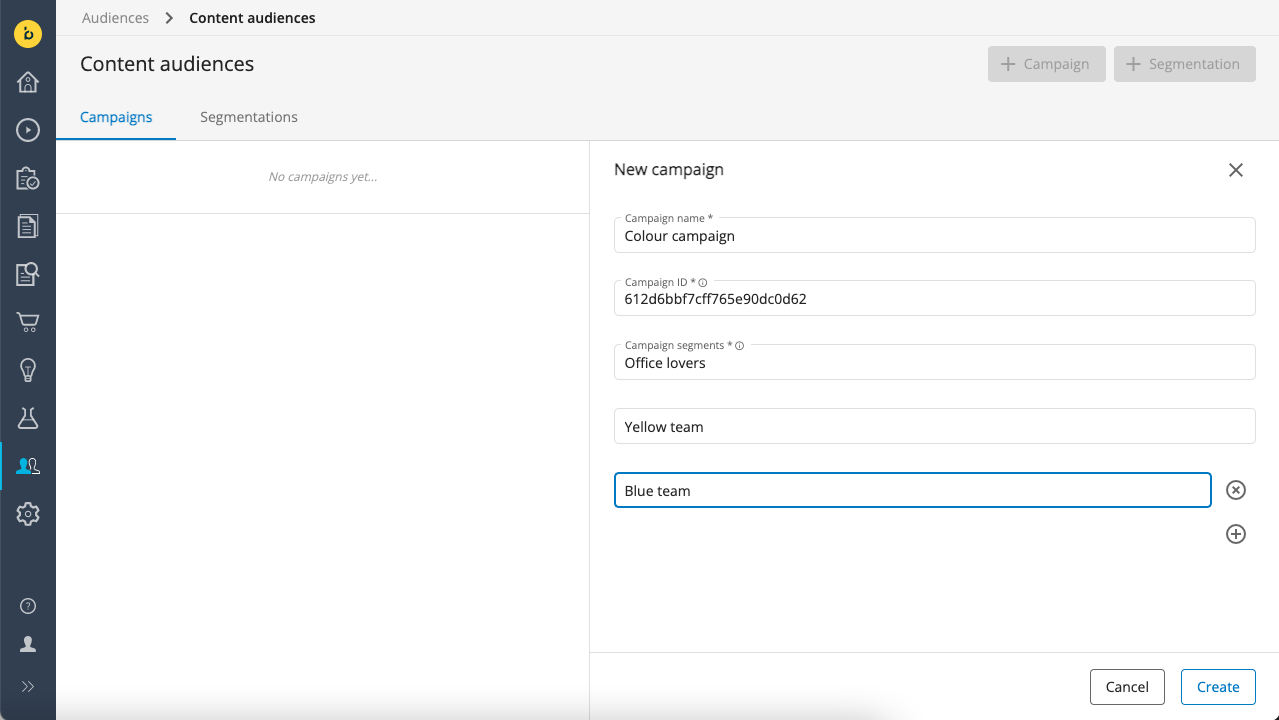
Click on the +Campaign button in the top right to add a new campaign.
Enter a Campaign name. It's a good idea to let it match the name of your email campaign in Bloomreach Engagement but it's not required.
Enter the Campaign ID of your email campaign. To find the Campaign ID, open the email campaign in Bloomreach Engagement and copy the hexadecimal ID from the URL. For example, "612d6bbf7cff765e90dc0d62" in https://cloud.exponea.com/p/my-project-1/campaigns/email-campaigns/**612d6bbf7cff765e90dc0d62**?action=design.
Enter all relevant Campaign segments. These have to exactly match the segment names in Bloomreach Engagement.

Click on Create to add the campaign.
You are now ready to personalize pages.
Updated over 1 year ago
