

Add a channel
Add a new channel in the Experience manager
Introduction
Goal
Add a new channel in the Experience manager.
Role required
This task requires the Site Admin role.
Background
Users with Site Admin privileges can add new channels in the Experience manager app.
Channels are created either from out-of-the-box channel templates or by copying an existing channel and can be localized by specifying a country and language.
Add a new channel
Open the Experience manager app and make sure the main channels overview is visible.
Click on the + Channel button in the top right:

The New channel wizard will appear. In the first step, you must select a template to bootstrap the new channel:
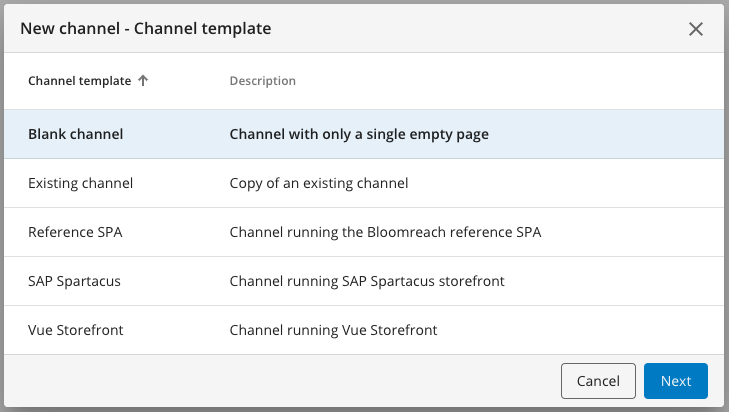
You can choose to start with an out-of-the-box channel template (either blank or for one of the supported storefronts), or a copy of one of your existing channels.
Using an out-of-the-box channel template
If you want to use a blank or out-of-the-box channel template to create the new channel, choose the appropriate option in the New channel wizard and click on Next to go to the next step.
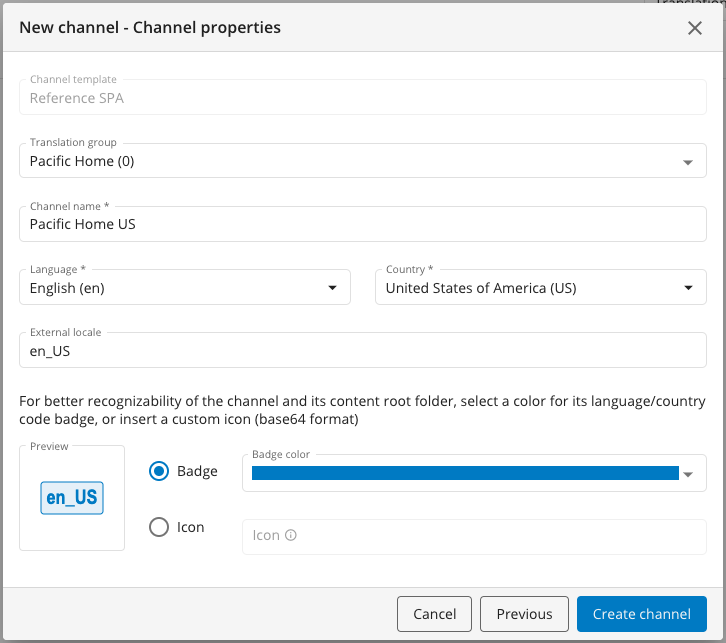
In the Channel properties step, you must specify a Name, a Language and a Country (together these will form the External locale), and either a Badge color or an Icon.
Optionally, you can select a Translation group or create a new one to add the new channel to.
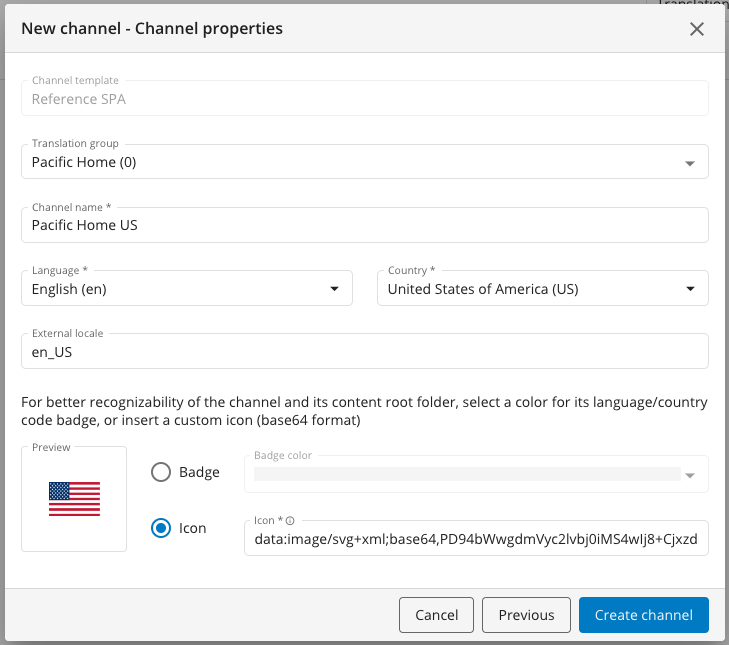
When choosing the Icon option, you must specify the data URI for a base64 encoded image. For example, the URI below is for the Bloomreach logo:
data:image/svg+xml;base64,PHN2ZyB4bWxucz0iaHR0cDovL3d3dy53My5vcmcvMjAwMC9zdmciIHZpZXdCb3g9IjAgMCA3MS44NyA3MS44NyI+PGRlZnM+PHN0eWxlPi5jbHMtMXtmaWxsOiNmZmQ1MDA7fS5jbHMtMntmaWxsOiMwMDI4NDA7fTwvc3R5bGU+PC9kZWZzPjxnIGlkPSJMYXllcl8yIiBkYXRhLW5hbWU9IkxheWVyIDIiPjxnIGlkPSJibG9vbXJlYWNoLWxvZ28iPjxjaXJjbGUgY2xhc3M9ImNscy0xIiBjeD0iMzUuOTQiIGN5PSIzNS45NCIgcj0iMzUuOTQiLz48cGF0aCBjbGFzcz0iY2xzLTIiIGQ9Ik00My4yMiwyOC40Nyw0MS40NiwzM2E2LjYsNi42LDAsMCwxLDMsNS42NCw2LjM4LDYuMzgsMCwxLDEtMTIuNzYsMEE2LjM2LDYuMzYsMCwwLDEsMzcuODMsMzJsMS42NS00LjZBMTEsMTEsMCwwLDAsMjYuNzEsMzguMjloMFY0OS44NGg1VjQ4YTExLjcsMTEuNywwLDAsMCw2LjM4LDEuODIsMTEuMjYsMTEuMjYsMCwwLDAsNS4xMS0yMS4zN1oiLz48cGF0aCBjbGFzcz0iY2xzLTIiIGQ9Ik0yNi42OSwyNy45MmExNS41MSwxNS41MSwwLDAsMSw1LTMuNDFWMTcuMjdoLTVaIi8+PC9nPjwvZz48L3N2Zz4=Use an online base64 image encoder (for example https://elmah.io/tools/base64-image-encoder/) to generate the data URI for your icon.
Once you have specified all the properties, click on the Create channel button and the new channel will be added to the channels overview.
Copying an existing channel
If, instead of using a blank or out-of-the-box storefront template, you want to make a copy of an existing channel, choose Existing channel in the New channel wizard:
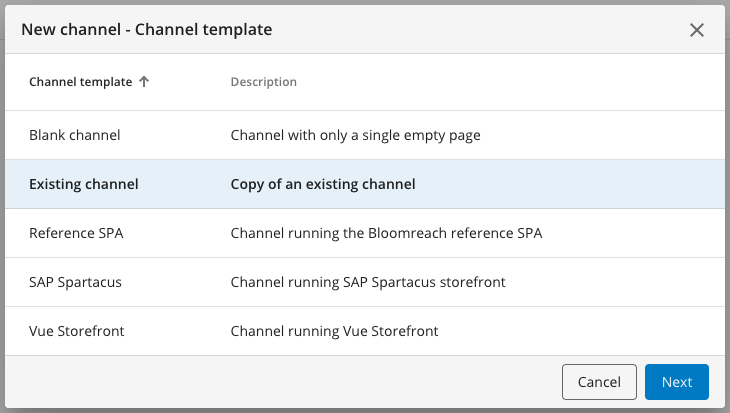
Click on Next to go to the next step.
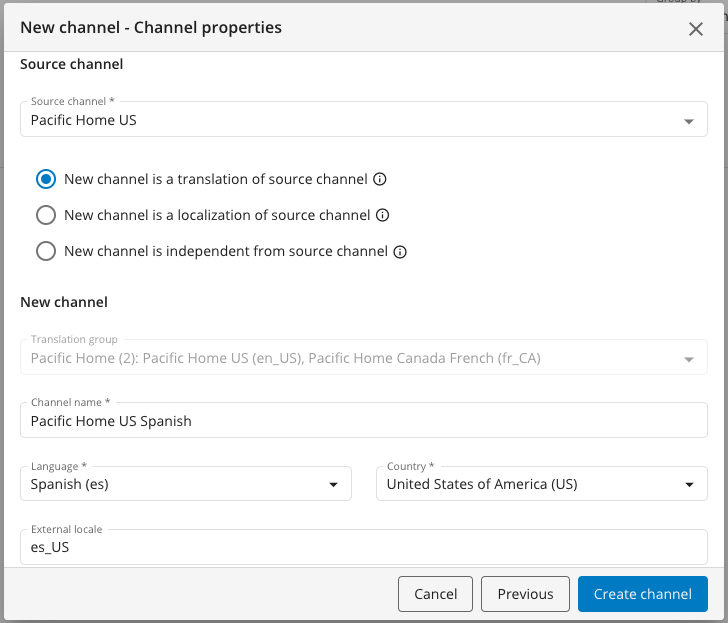
In the Source channel section, select the Source channel you want to make a copy of and choose one of the following three options:
- New channel is a translation of source channel
Use this option to add a translated channel in a different language than the source channel.- All pages, documents, and folders in the source channel will be copied to the new channel.
- All copied pages, documents, and folders will be automatically linked as translations to the corresponding originals in the source channel.
- The new channel will be automatically added to the same translation group as the source channel.
- The new channel is set up to disable the Update content during page sync setting by default when adding a page-specific components to a page.
- New channel is a localization of source channel
Use this option to add a localized channel in the same language as the source channel.- All pages and folders in the source channel will be copied to the new channel.
- Any documents in the source channel will not be copied.
- All copied pages and folders will be automatically linked as translations to the corresponding originals in the source channel.
- The new channel is set up to re-use documents from the source channel but they can be localized for the new channel as needed.
- The new channel will be automatically added to the same translation group as the source channel.
- The new channel is set up to enable the Update content during page sync setting by default when adding a page-specific components to a page.
- Please note that if the source channel uses any shared components, it must be configured by site developers to Share content between channels.
- New channel is independent from source channel
Use this option to make a carbon copy of the source channel that is not linked to the source channel.- The new channel is set up to disable the Update content during page sync setting by default when adding a page-specific components to a page.
If you are not sure which option to pick, have a look at the table below.
| "Existing channel" creation options | Explanation | Use case example |
|---|---|---|
| New channel is a translation of source channel | This option allows for creating a new website that will have the same content structure as the source one which can be translated. | I have a website for the US market in English. I want to create new, identical website and translate its content to Spanish. |
| New channel is a localization of source channel | This option allows for sharing content between websites without the need of creating separate documents. | I have a website for the US market in English. I want to create a new, identical website for Canada, which will be also in English, that will have not only identical pages, but also content (unless specifically localized). |
| New channel is independent from source channel | A new channel will be an independent, carbon copy of the source channel. | I want to reuse an existing website for testing purposes. |
From here, the New channel section requires the same properties to be specified as when adding a new channel using an out-of-the-box channel template.
Once you have specified all the properties, click on the Create channel button and the new channel will be added to the channels overview.
NoteOnly published documents will be copied from the source channel.
TipDepending on the size and complexity of the source channel, it might take up to several minutes to create the new channel. Please don't refresh your browser while waiting for the channel to be created.
Next steps
Configure frontend app
Once a channel has been added, it will use a generic, hosted, and shared frontend application to render the preview in the Experience manager. This way the channel is immediately functional and users can explore the out-of-the-box pages and components.
Typically your organization will develop (or have previously developed) their own unique frontend app to render the channels. You must configure the newly added channel(s) to use this frontend app in the Channel settings. Make sure to coordinate with your organization's Site Developers.