

Unified SSO authorization for Microsoft Entra ID (formerly Azure Active Directory)
Single sign-on (SSO) authorization is an extension of SSO authentication. It enables you to define user privileges and control what they can access within Bloomreach products.
This guide explains how to configure SSO authorization for Microsoft Entra ID (formerly Azure Active Directory).
NoteThe SSO authorization uses
role_mappingto determine user permissions. For role mapping configuration details, see the Unified SSO overview guide.
Prerequisites
Before configuring SSO authorization for Microsoft Entra ID, you must complete the SSO authentication setup first. You will also need:
- Admin role in Bloomreach.
- Admin access to your Microsoft Entra ID account.
- Understanding of your organization's role structure.
- Active SSO feature enabled on your account.
Configure role mapping in Microsoft Entra ID
Add the role mapping claim in Microsoft Entra ID
Microsoft Entra ID sends the role_mapping value as a SAML attribute. This value must match the mapping role names you configure in Bloomreach.
- Open the Microsoft Entra admin center.
- Go to Manage > Enterprise Applications.
- Select your Bloomreach SSO application.
- From the Manage menu, select Single sign-on.
- Click Edit in the Attributes & Claims section.
- Click + Add new claim.
- Configure the new claim:
- Name:
role_mapping. - Source: Attribute.
- Source attribute: Select your preferred value (for example,
user.department).
- Name:
- Click Save.
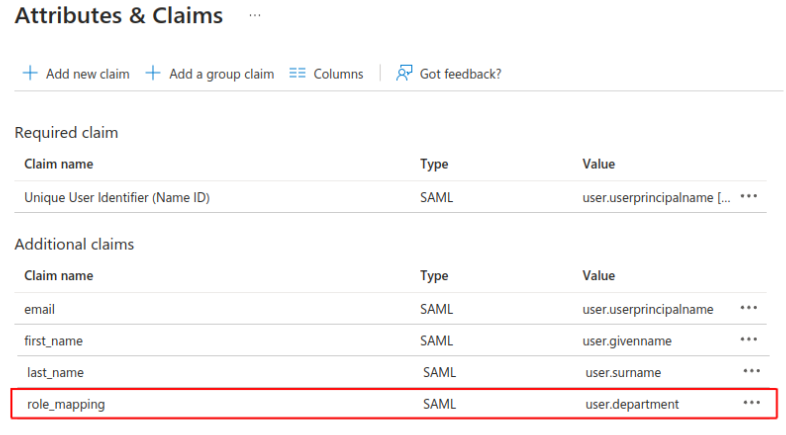
Role mapping claims in Microsoft Entra ID.
Sarah's department in Microsoft Entra ID is "Product Management." When you configure role_mapping to use user.department, Microsoft Entra ID sends "Product Management" during login. You'll map this value to permissions in {user.br} next.
Using group membership for role mapping
Use Microsoft Entra ID group membership instead of user attributes. This allows sending multiple groups as part of the claim and gives you more flexibility when assigning roles based on group combinations.
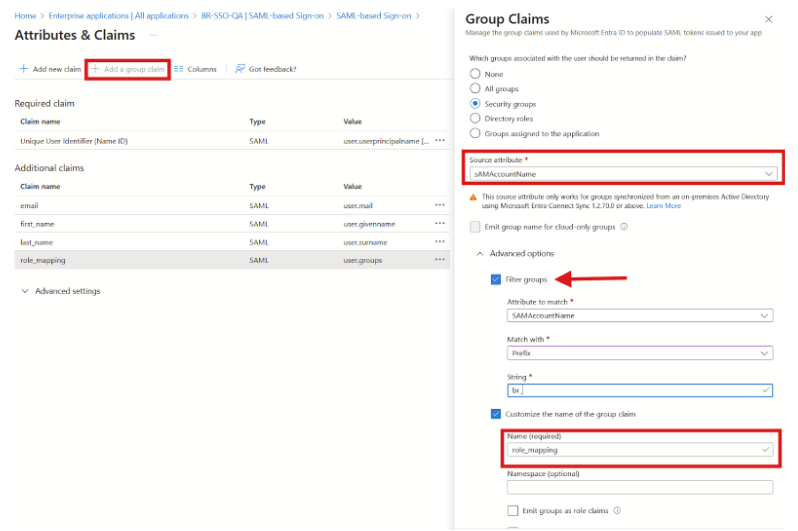
Group role mapping claims in Microsoft Entra ID.
Set up authorization in Bloomreach
Configure role mapping in Bloomreach to connect identity provider values with application permissions.
Create role mapping
- Go to Administration > Users > Mapping roles.
- Click New mapping role.
- Enter a mapping role name that exactly matches the
role_mappingvalue from your identity provider to the “Incoming role name” field. - Add an optional description for the mapping role.
- In the Permissions section, select an application (for example, Marketing).
- Choose at least one scope (the part this role can access in Bloomreach):
- Workspace: Users can access all projects within a workspace (for example, department-wide access).
- Project: User can access only specific projects you select (for example, project-specific members or limited access).
- Select one or more roles for the chosen scope.
- Click Add permission to add roles for additional scopes or applications.
- Click Save to finish role mapping setup.
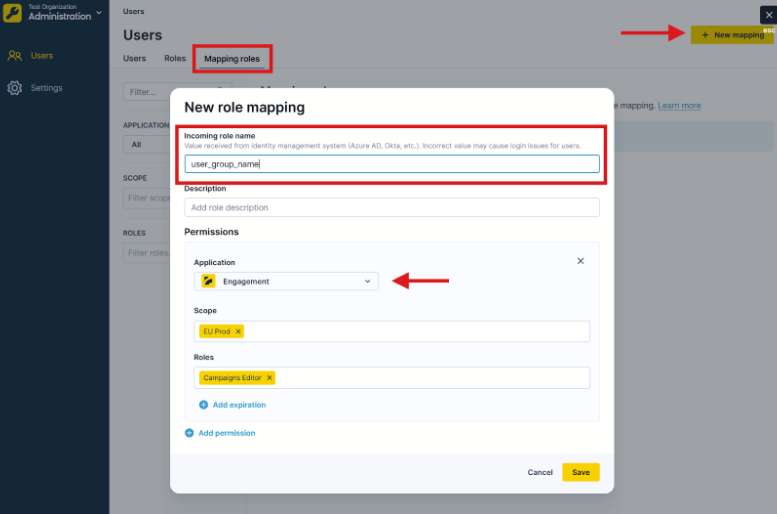
Create role mapping in Bloomreach.
Sarah's Microsoft Entra ID sends "Product Management" as her role_mapping value. In {user.br}, you create a mapping role with "Product Management" as the incoming role name and assign it Campaign Editor access in {user.mkg}. When Sarah logs in, she automatically receives these permissions.
Enable SSO authorization
After creating and configuring the role mapping setup, activate SSO authorization in Bloomreach.
Important prerequisites
- Ensure you have created a role mapping setup containing SSO admin role to prevent locking out of configuration.
- Verify that mapping roles in Bloomreach match
role_mappingclaim values in Microsoft Entra ID. Incorrect configuration can prevent login acces.
- Go to Administration > Settings > Single sign-on > Preferences.
- Scroll to the bottom of the page.
- Enable Single sign-on authorization.
- Click Save changes.
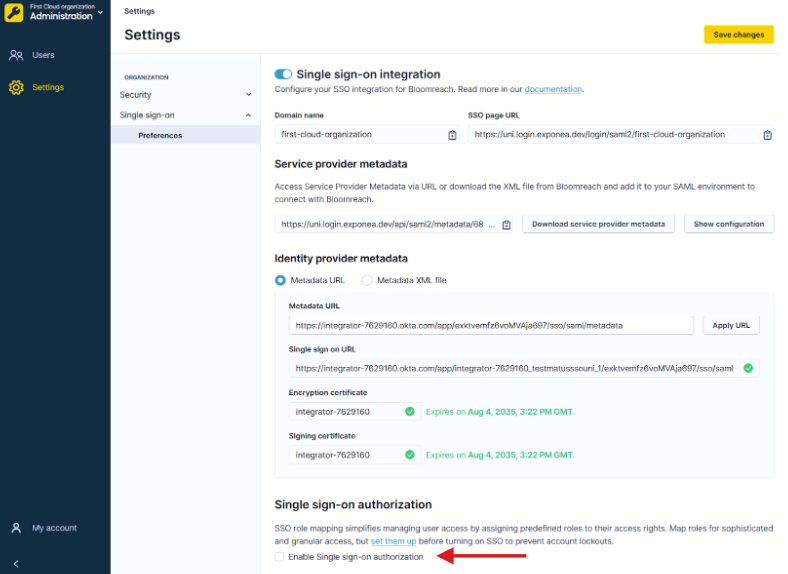
Enable SSO authorization in Bloomreach.
Users with the SSO Admin role (Cloud Organization scope) can disable this option later if needed.
Next steps
- Invite your users to use the SSO login.
- Manage user access and user roles.
Updated 11 days ago