

Integrate Loomi AI for Shopify
This guide explains how to connect your Shopify store to Bloomreach through Data hub. You'll configure the integration, set up consent management, and optionally customize product data imports.
Integrate Loomi AI for Shopify through Data hub only. Don't run it alongside the Engagement Shopify connector. If you're migrating from the Engagement connector, disconnect it before you set up Loomi AI for Shopify. If you can't disconnect the connector, see Troubleshooting.
Overview
Integrating Loomi AI for Shopify requires 2 steps:
- Configure the integration in Data hub (this guide): Connect your Shopify store, select your Bloomreach projects, and configure data sync settings.
- Set up web tracking (next step): Enable behavioral tracking and personalization features.
After completing this guide, continue to Set up web tracking for Loomi AI for Shopify.
Prerequisites
Before you begin, ensure you have:
Data hub
Access to Bloomreach Data hub where you'll configure the integration.
Engagement project (if using Engagement)
A project with this exact ID configuration:
email_id: Hard ID (lowercase, trim) - primary customer identifiershopify_id: Soft ID (numeric) - Shopify customer identifiercart_id: Soft ID (alphanumeric) - shopping cart token for cart trackingcookie: Soft ID - device cookie identifier
WarningID names must match exactly and aren't customizable. Don't use the "registered" ID—the integration ignores it.
Discovery catalog (if using Discovery)
An existing default catalog to receive your Shopify product data.
Shopify store
Your store URL (for example, bloomreach_store.myshopify.com) and store owner or staff member permissions to install apps and grant access.
Set up the integration
Follow these steps to connect your Shopify store to Bloomreach and configure your integration settings.
Connect to Shopify
-
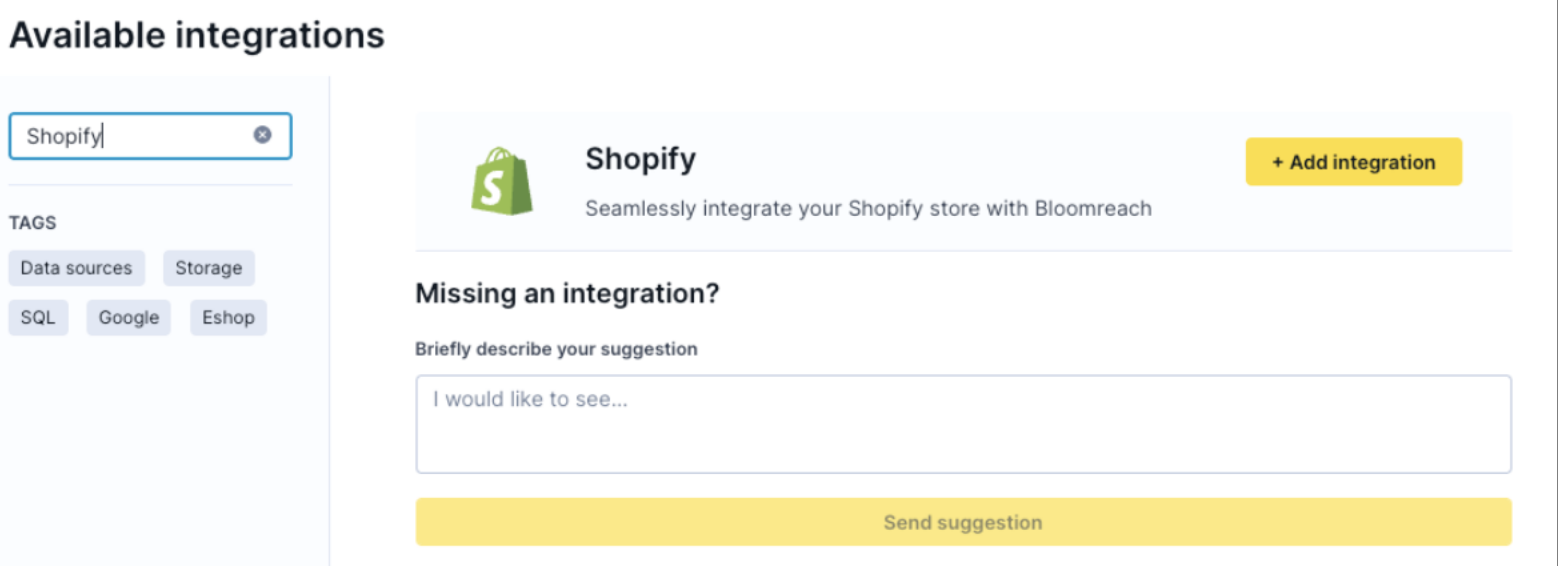
Go to Data hub > Integrations.
-
Search for "Shopify" and click Add integration.
- Log in to the Shopify store you want to connect with Bloomreach.
- Navigate to Bloomreach: Loomi AI app by clicking the Shopify app link in Data hub.
- Click Install.
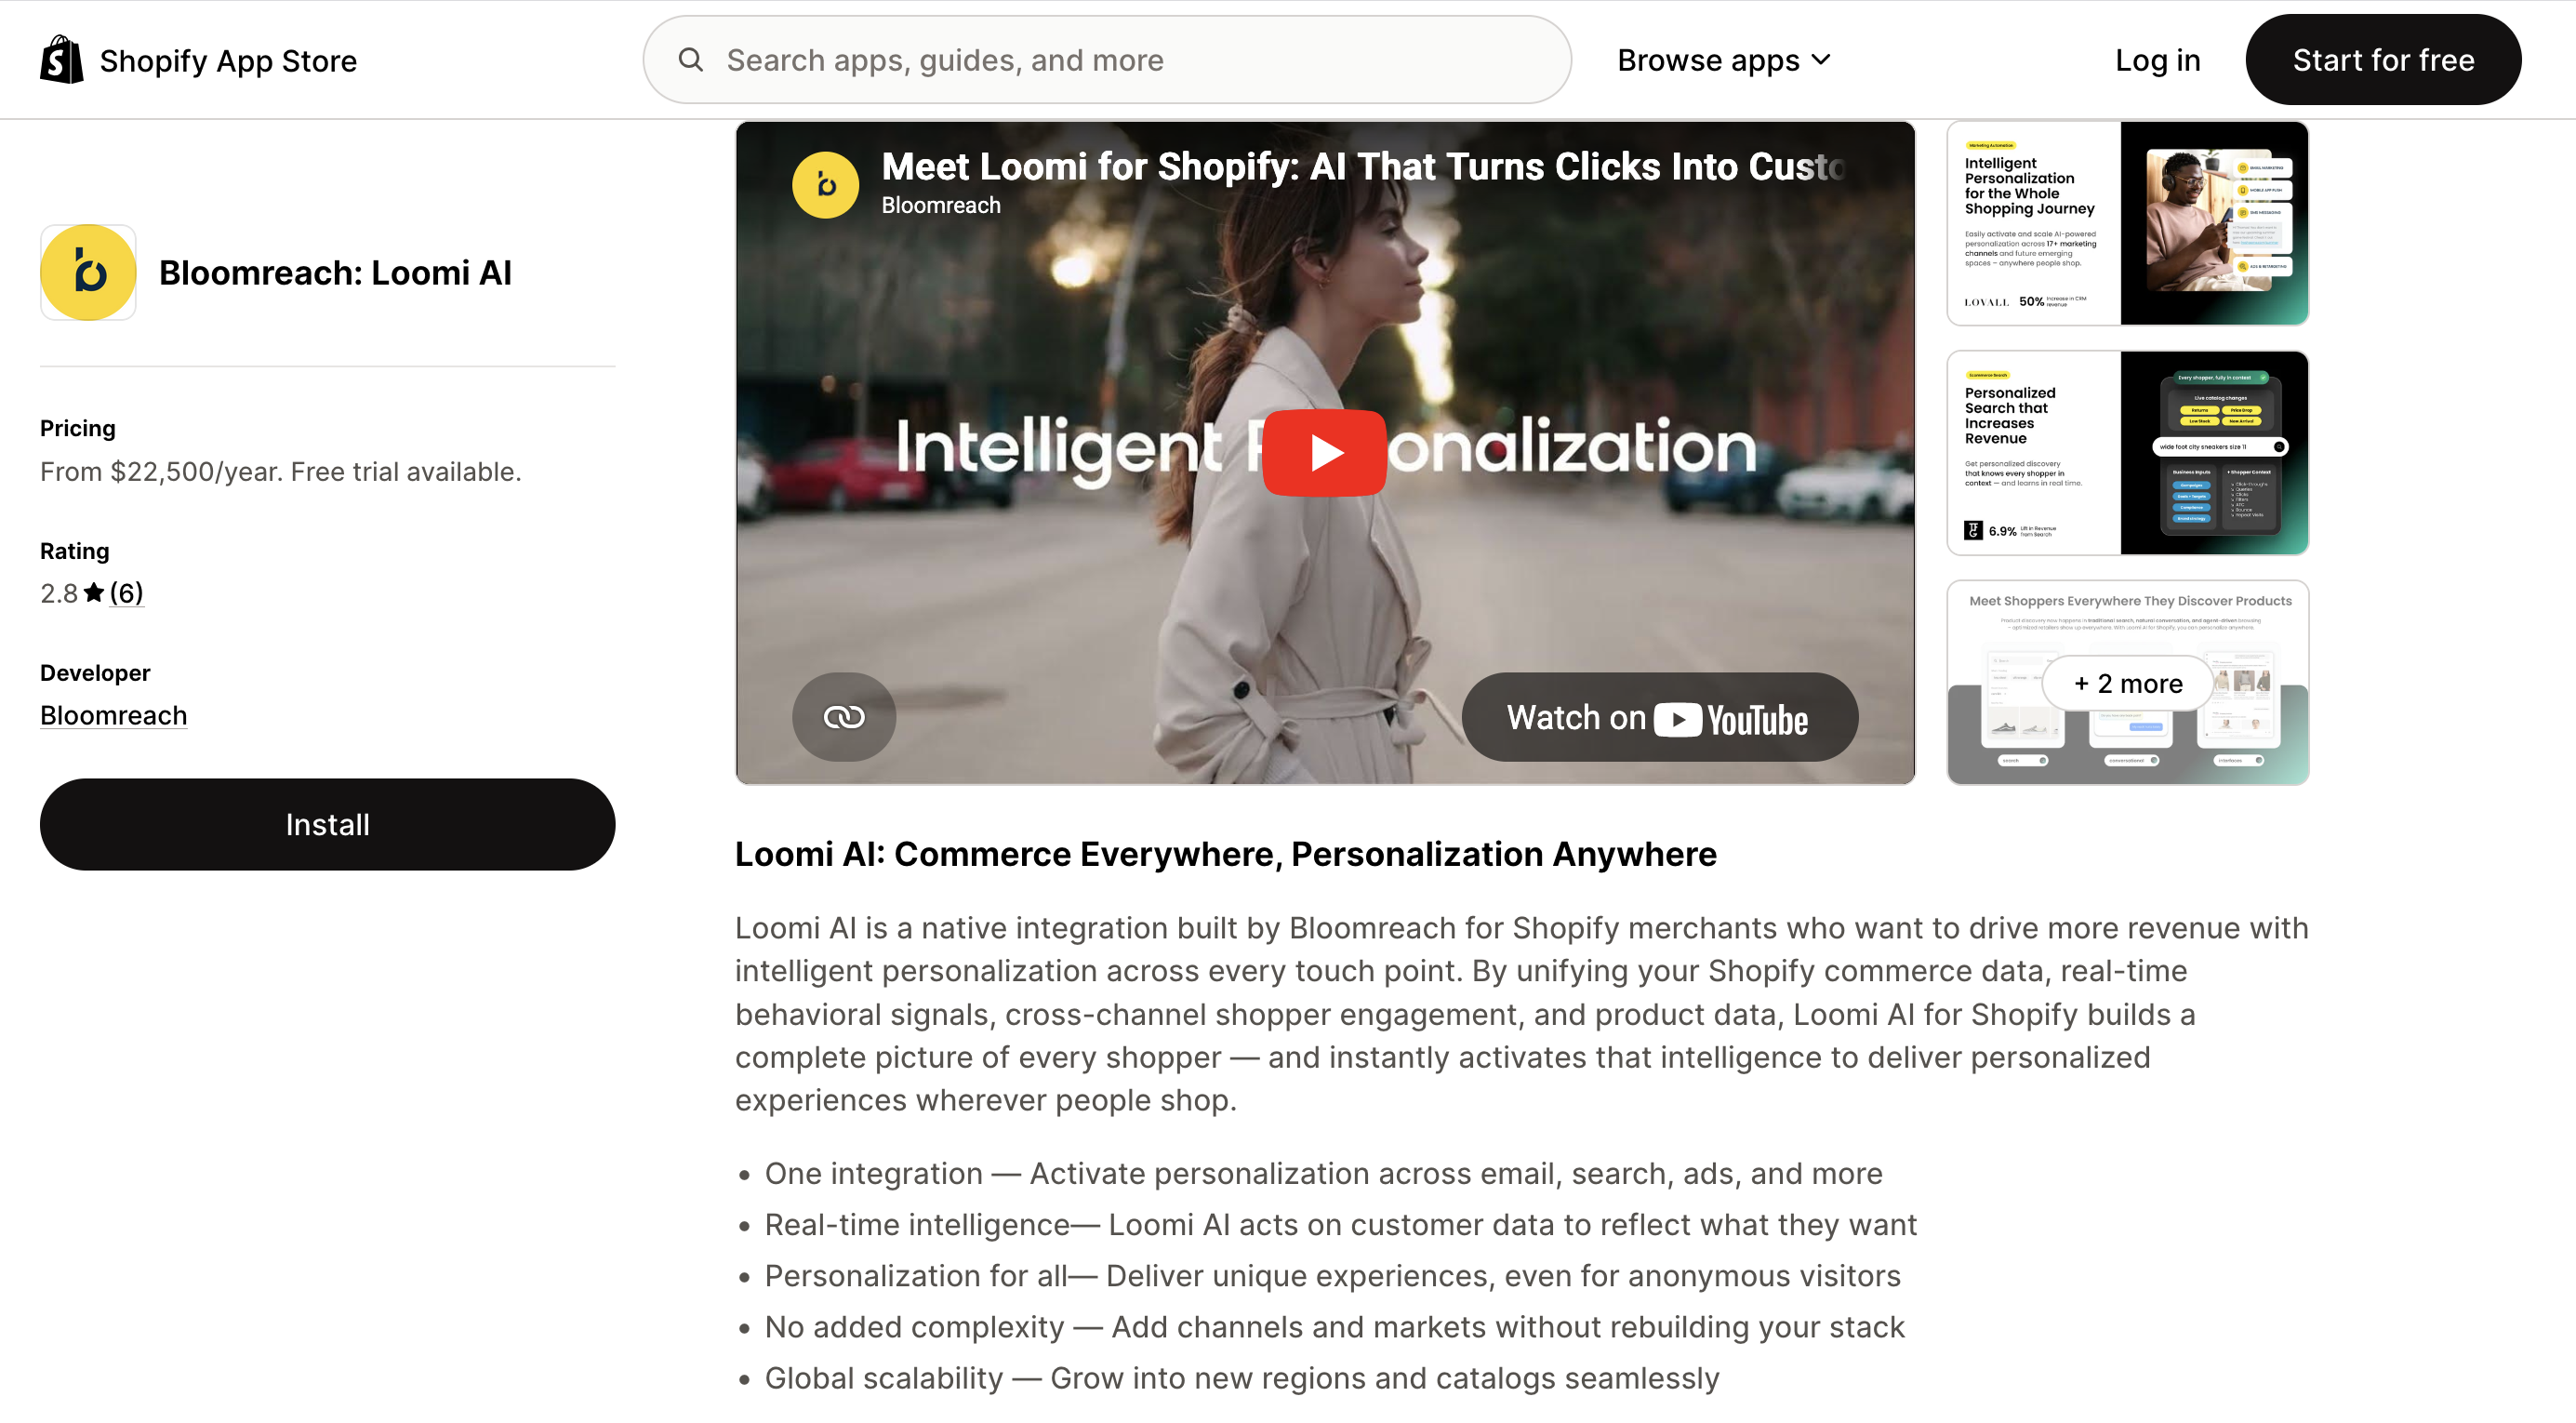
- After installing the app, open the Bloomreach: Loomi AI app in your Shopify admin.
- Reveal the integration token in the app, and copy it.
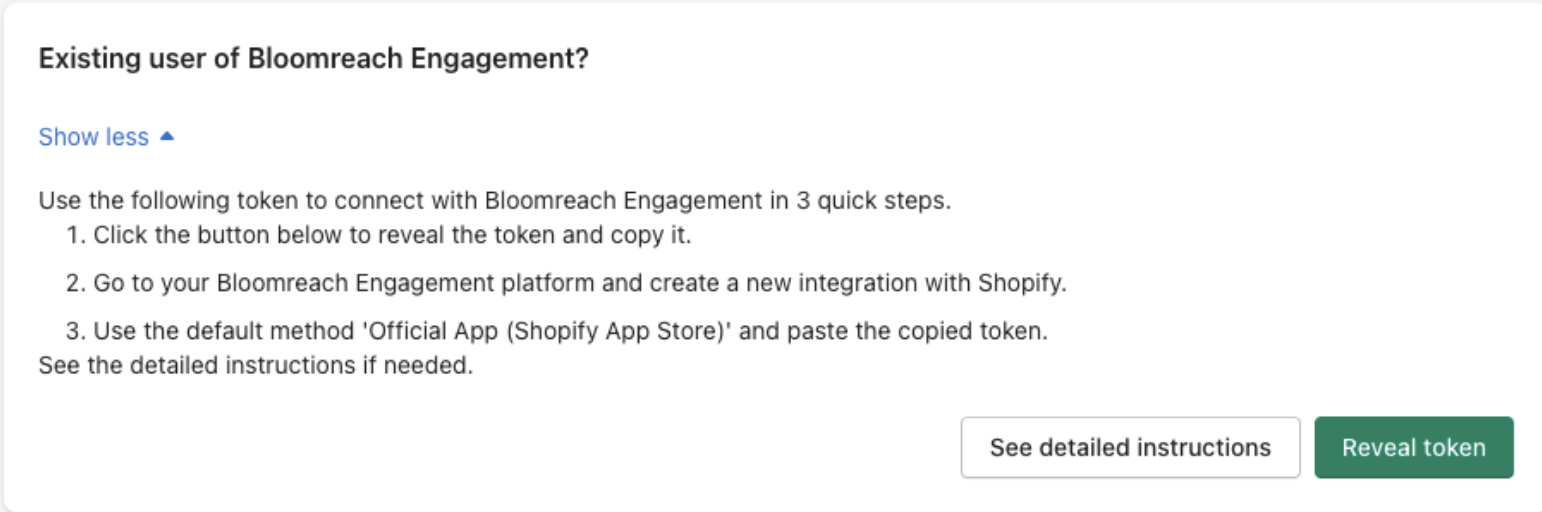
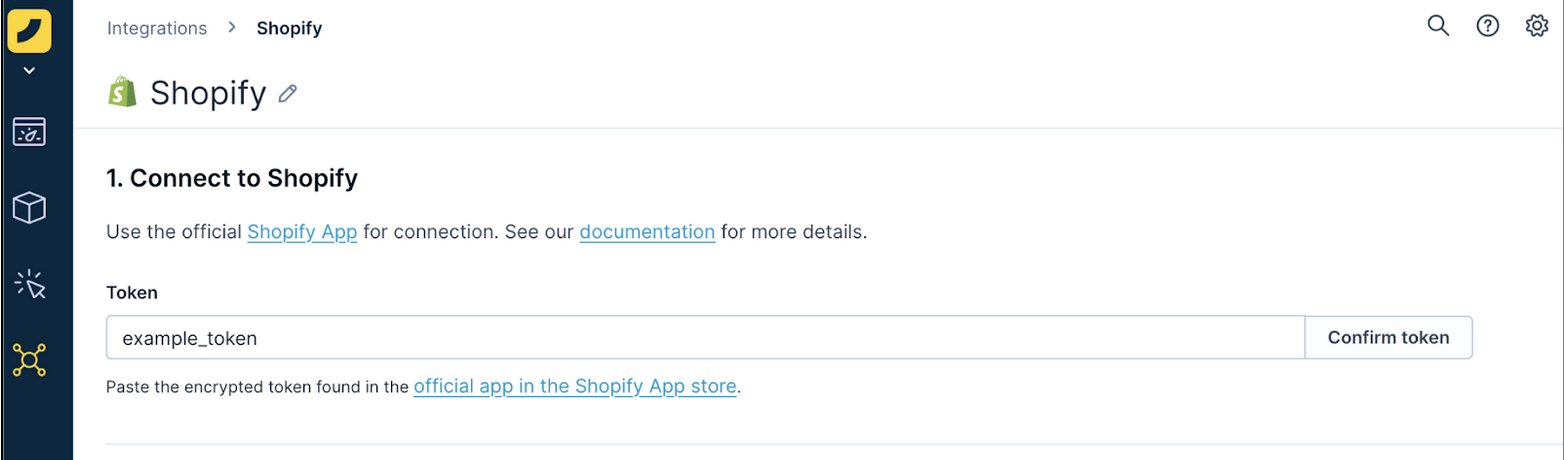
- Paste the token in the Token field in Data hub and click Confirm token to verify the connection.
Choose destination
Select which Bloomreach products you want to use with Shopify. This syncs the right data for each product. You can select one Engagement project and one Discovery account per integration.
- Select your Engagement project from the drop-down (if using Engagement).
- Select your Discovery account from the dropdown (if using Discovery).

Customize configuration
Use default settings or customize configuration areas based on your needs.
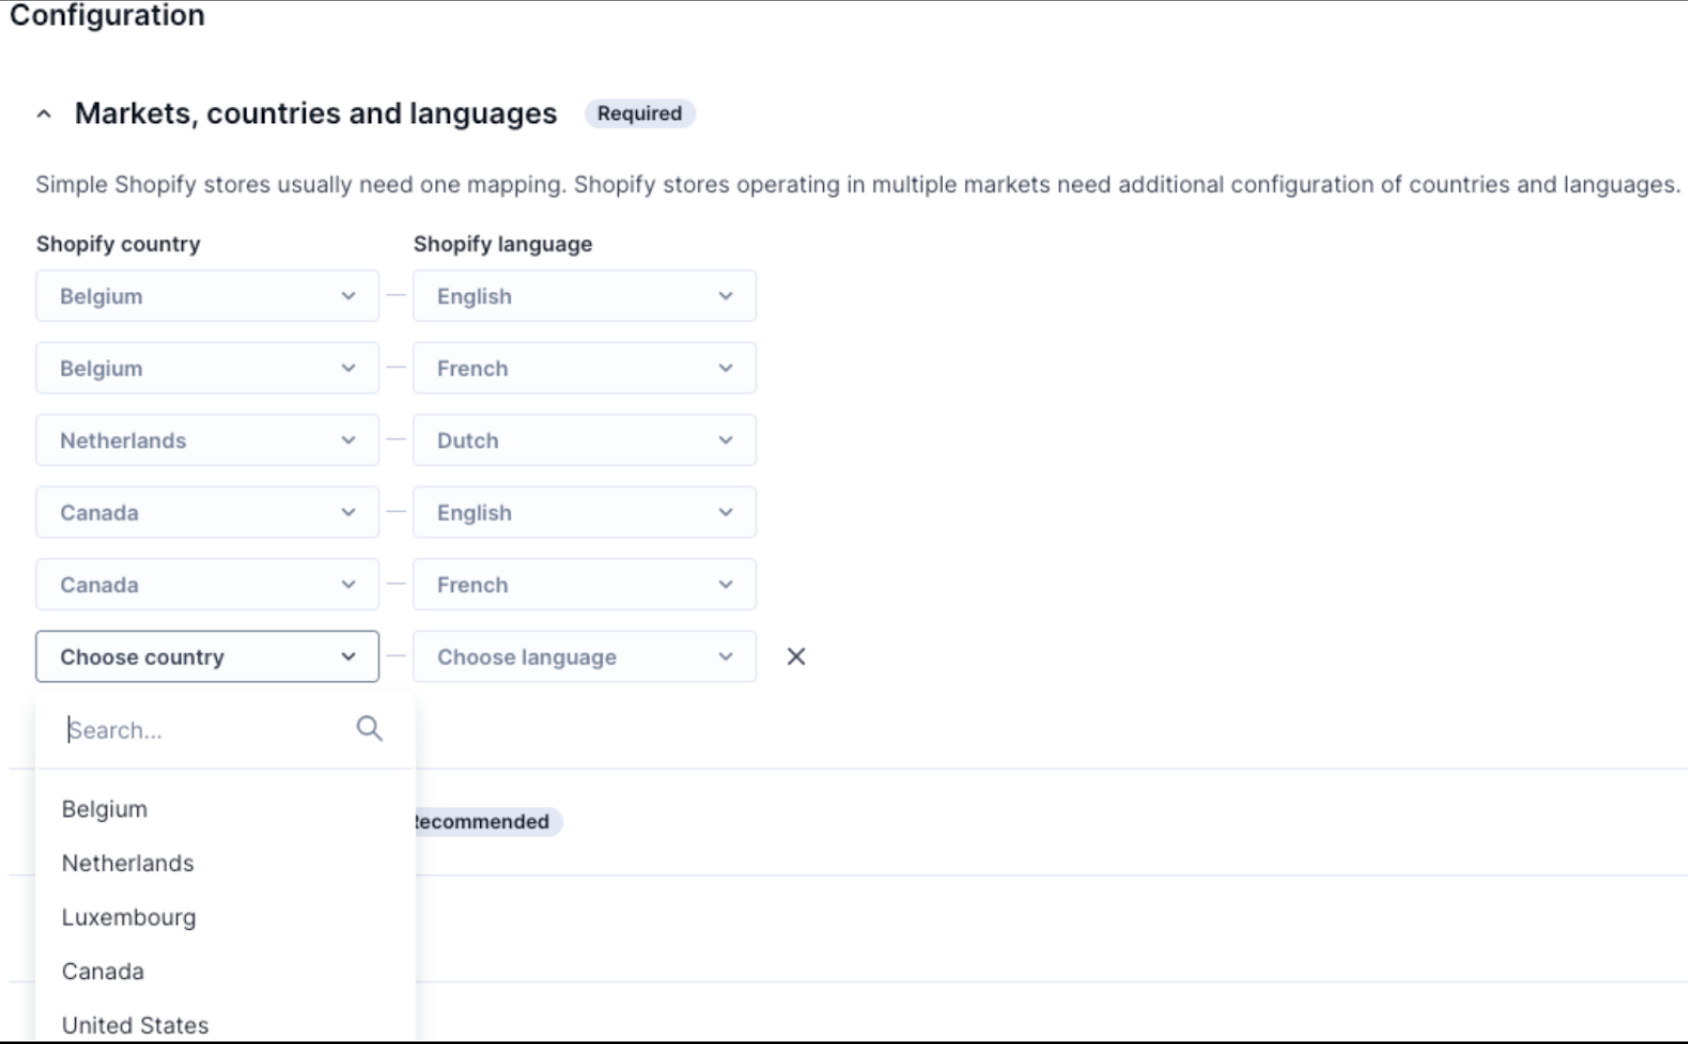
Markets, countries, and languages (optional)
Configure this if your store operates in multiple markets with localized products. Each country-language configuration creates a separate Item collection in Data hub with translations, local currency, and market-specific data.
ImportantOnly active Shopify markets appear in the integration configuration. Markets in "Draft" status won't be listed. If you don't see an expected market, check its status in Shopify and activate it before configuring it inside the integration.
Product and variant updates for localized markets are synced in real time via webhooks. For details on sync timing, see Is the integration real-time?
To configure:
- Click Add configuration in the Markets section.
- Select Country and Language.
- For Discovery: Assign the configuration to a catalog.
- Repeat for each country-language combination.
Web events tracking
This section allows you to configure which web events Bloomreach should track on your Shopify store.
- For Discovery: Insert the Discovery Pixel in your Shopify theme.
- For Engagement: Enable pixel tracking in the Shopify theme editor.
You can select which events to track, including view_category, view_item, search, and checkout events.
Settings configured here determine which events are available for tracking. You must complete the web tracking implementation in your Shopify theme for tracking to work. See Set up web tracking for Loomi AI for Shopify for implementation instructions.
Consent management
Configure how marketing consent syncs between Shopify (Email and SMS channels) and Bloomreach.
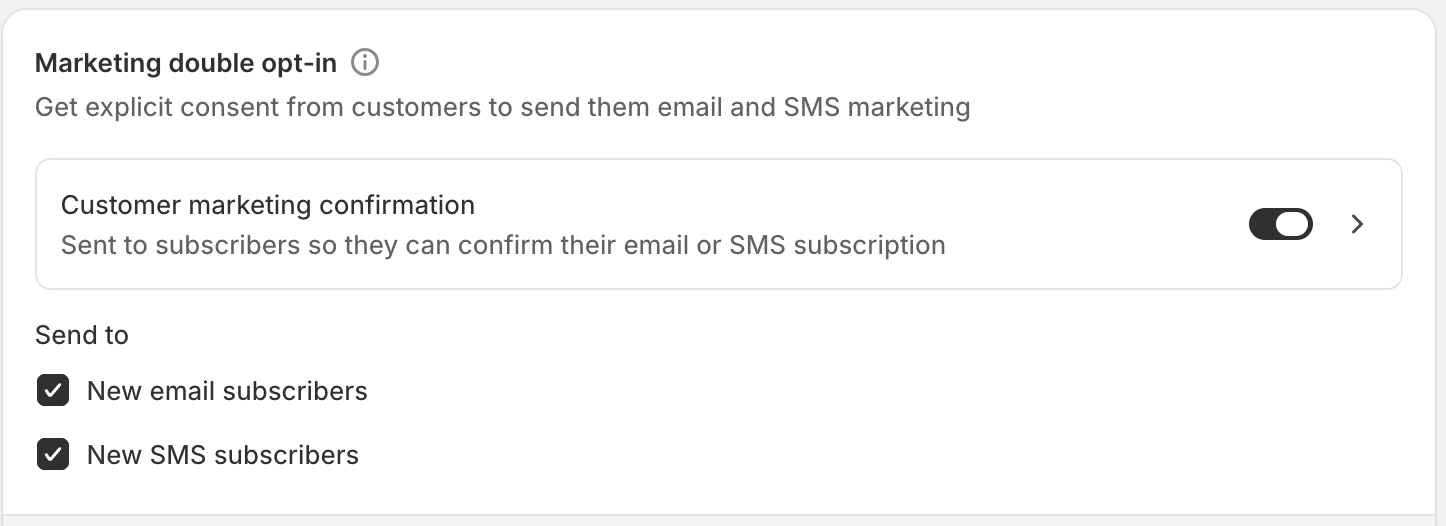
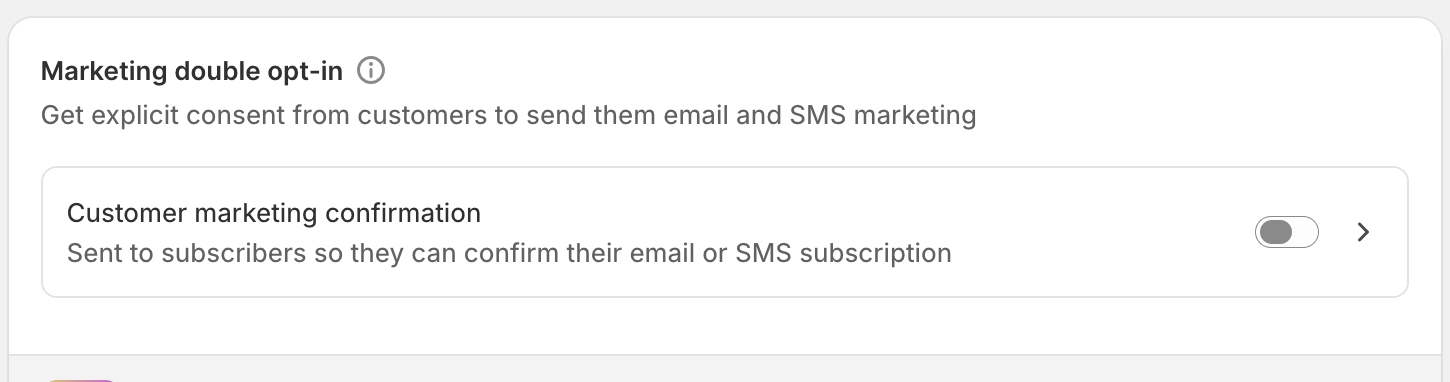
- Configure your marketing double opt-in settings in Shopify. In your Shopify admin, go to Settings > Customer privacy and enable the Customer marketing confirmation toggle in the Marketing double opt-in section to get explicit consent from customers for email and SMS marketing.
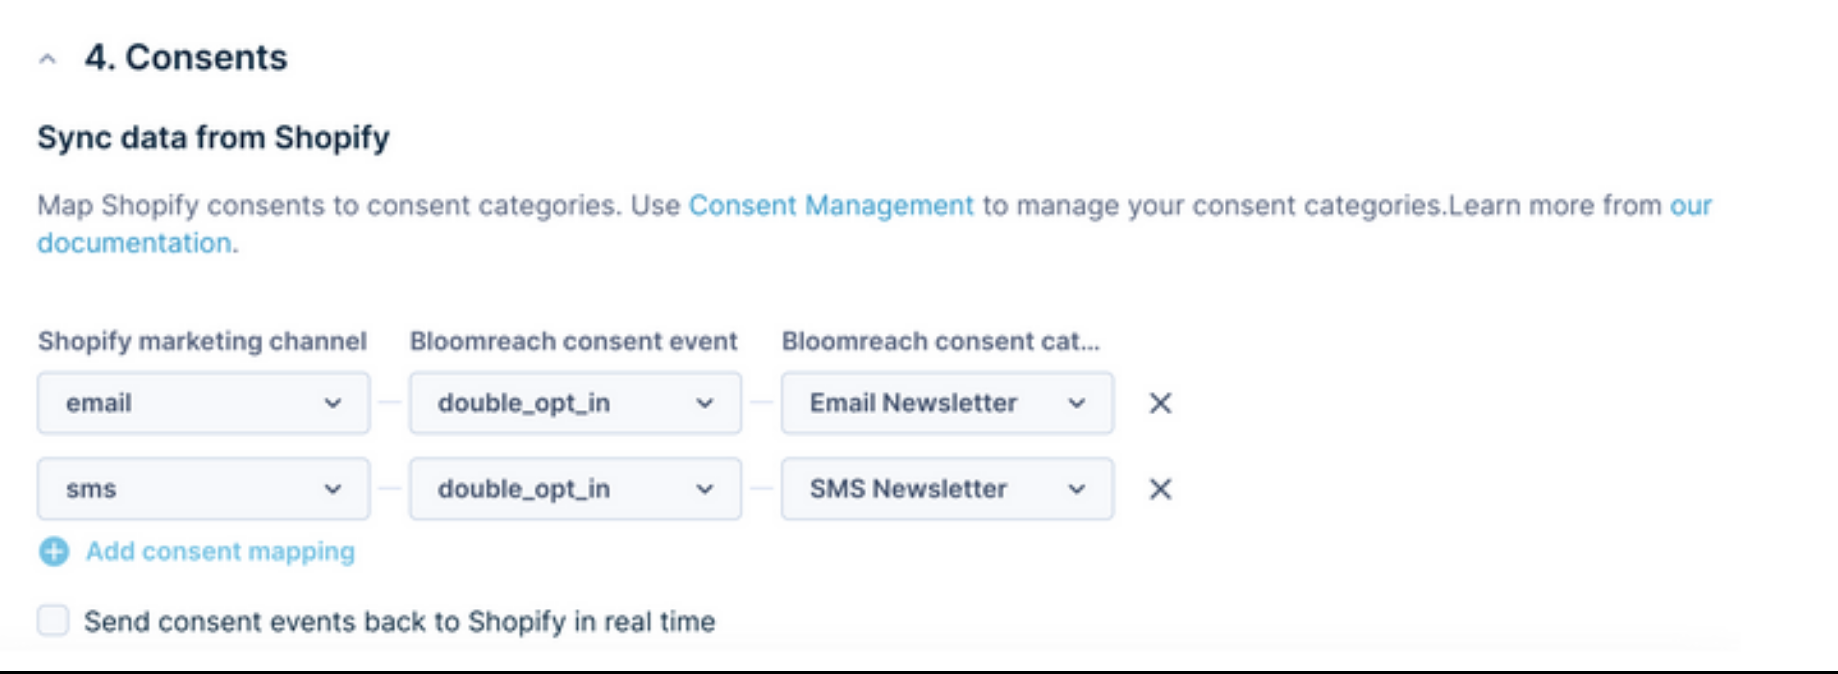
- In Data hub, map your Shopify marketing channels to Bloomreach consent events. You have 3 options:
Option 1: Consent events (Shopify manages double opt-in)
If Shopify manages your double opt-in process, select consent for the Bloomreach consent event:
- In the Shopify marketing channel column, select email and SMS.
- In the Bloomreach consent event dropdown, select consent for each channel.
- In the Bloomreach consent category dropdown, select the matching category (for example, email newsletter, SMS newsletter).
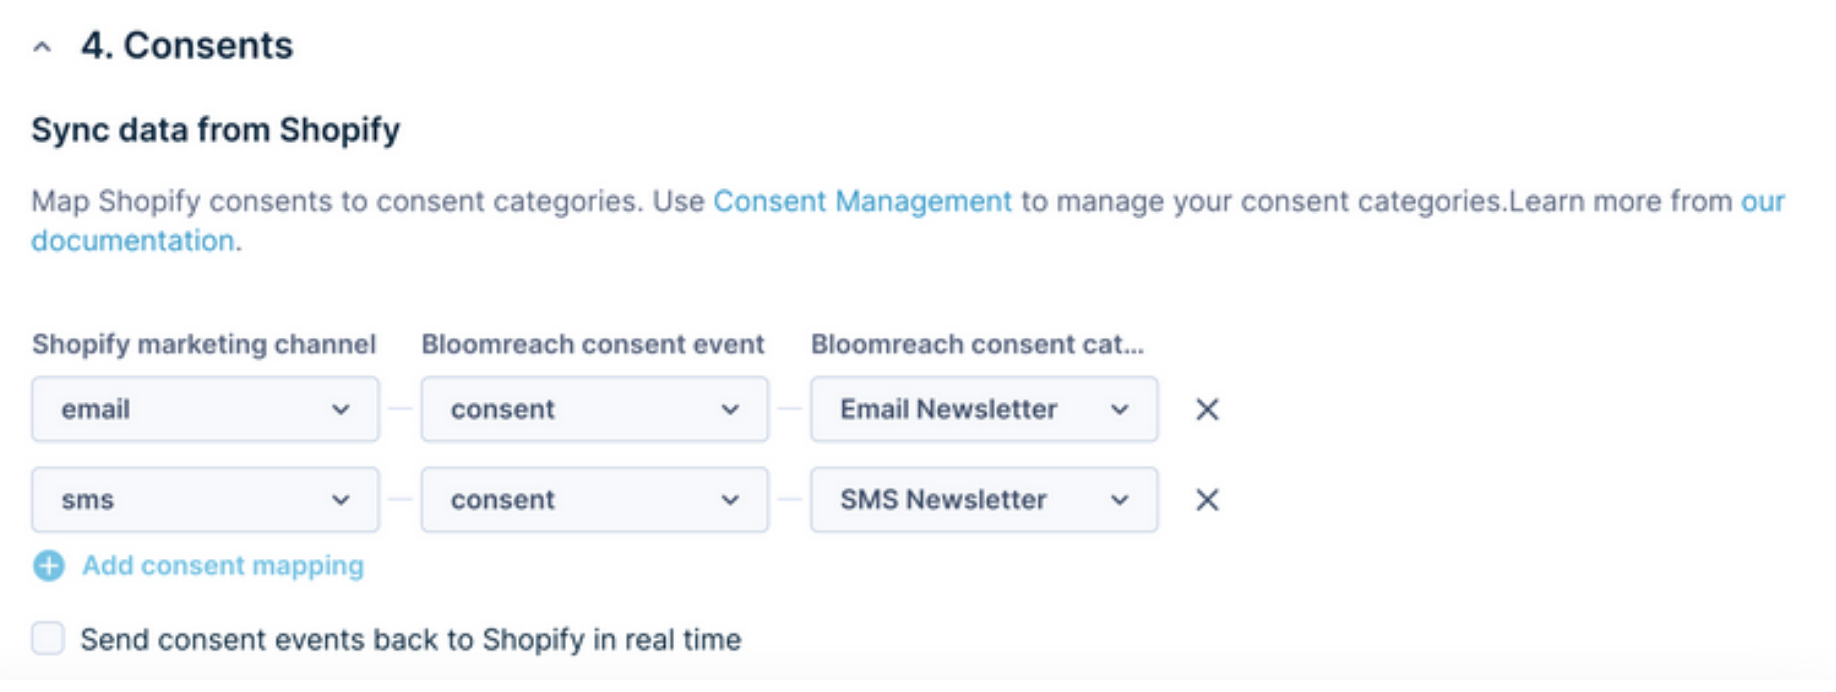
This creates a Bloomreach consent event for each customer who has consented.
Option 2: Double opt-in events (Bloomreach manages double opt-in)
If you want Bloomreach to manage your double opt-in process:
- In Shopify, go to Settings > Customer privacy and ensure the Customer marketing confirmation toggle is turned off.
- In Data hub:
- In the Shopify marketing channel column, add email and SMS.
- In the Bloomreach consent event dropdown, select double_opt_in for each channel.
- In the Bloomreach consent category dropdown, select the matching category.
When a customer subscribes to your communication in Shopify, a double_opt_in event appears in Bloomreach. You can use this event to trigger a double-opt-in workflow. Learn how to create a double opt-in scenario.
Option 3: Custom consent processing
Select shopify_consent option in Bloomreach consent event column to create a shopify_consent event with each consent change for custom scenario processing.
Map only one Bloomreach consent category per Shopify marketing channel.
Enable bidirectional sync
Check Send consent event back to Shopify in real time to sync consent changes from Bloomreach back to Shopify. We recommend enabling this to keep consents synchronized.
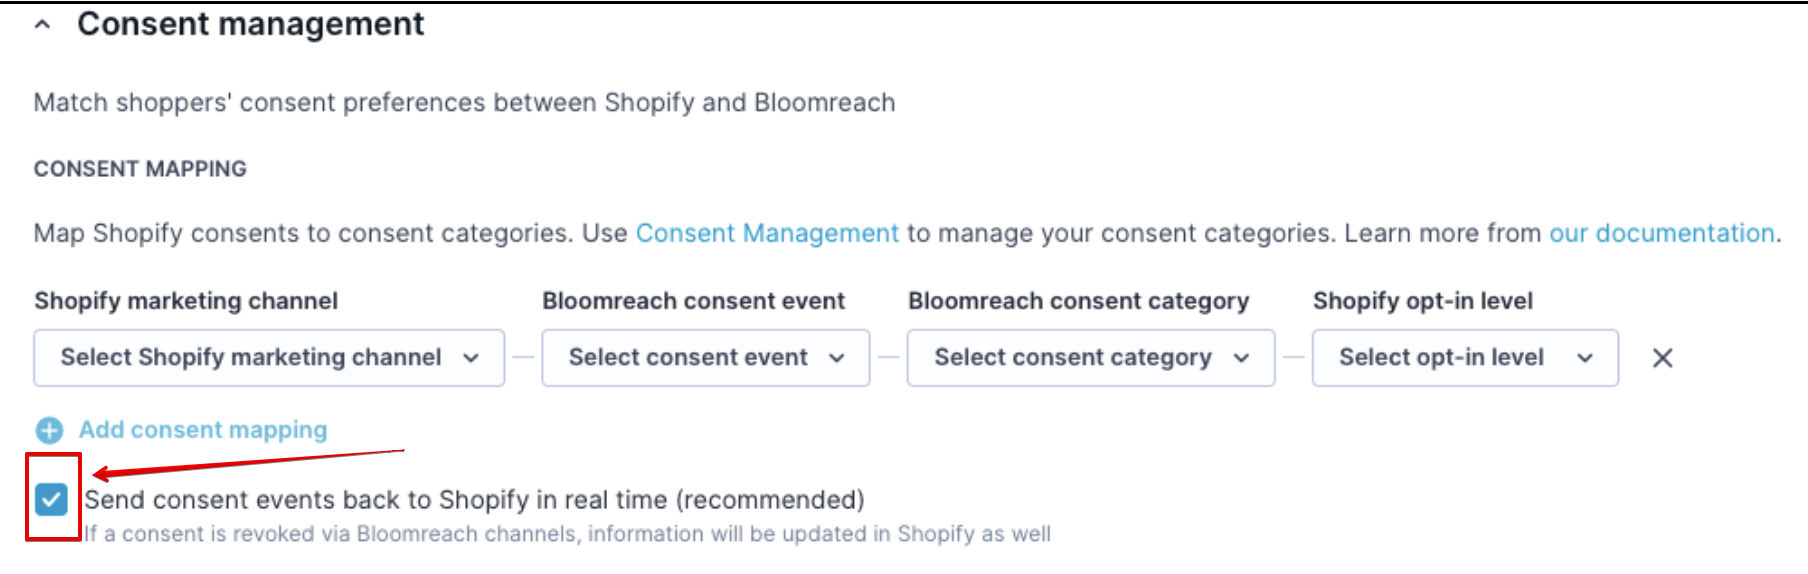
The Shopify opt-in level (single or confirmed opt-in) must match your Shopify store's Marketing double opt-in setting in Settings > Customer privacy. A mismatch can cause consent data to sync incorrectly
The integration supports accept and reject consent statuses.
WarningThe integration can't grant SMS "Subscribed" status for customers without a phone number in Shopify.
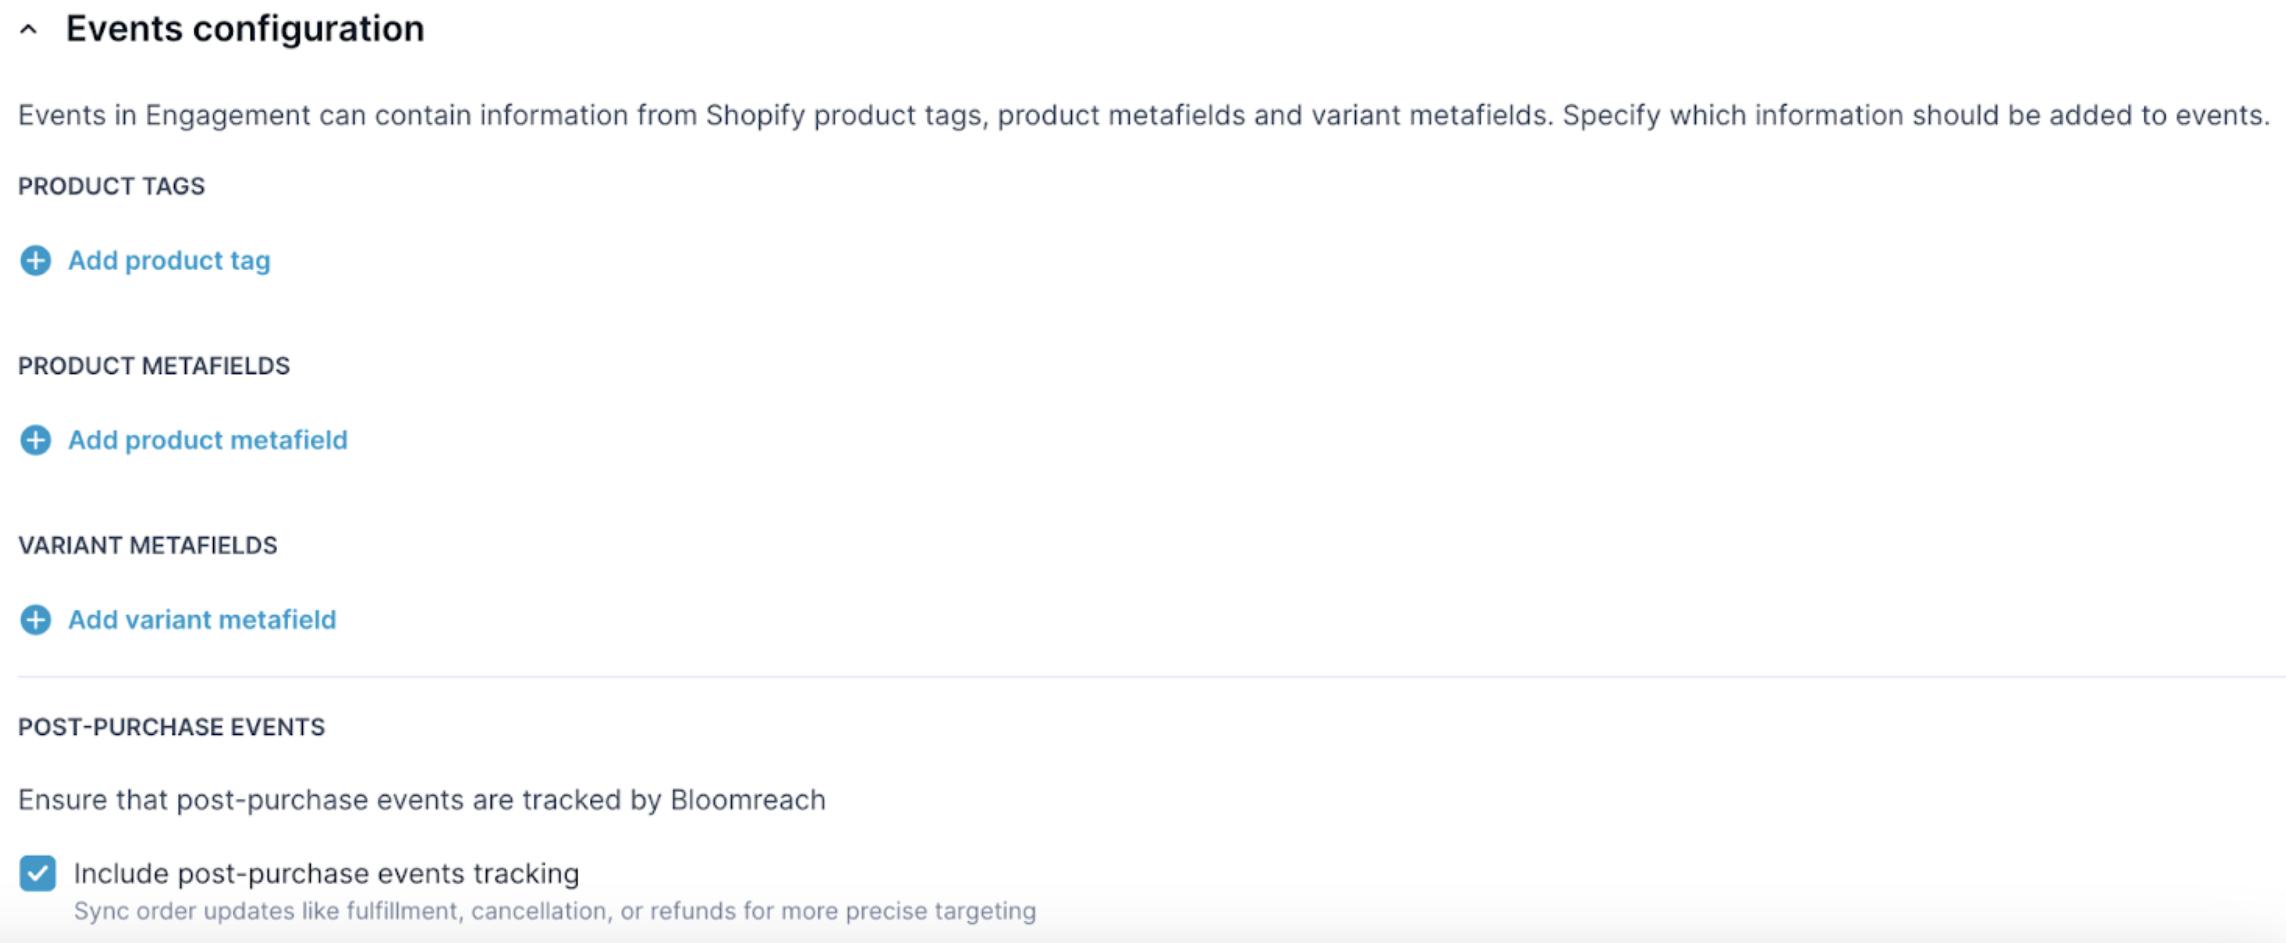
Events configuration
Configure your events to capture the data you need. Decide what product information you want to include in your events (for example, product tags or metafields in purchase events). Choose which post-purchase events to track, such as cancellations, refunds, and fulfillments.
NoteAll product tags and metafields are imported by default to your Item Collection. The configurations below are only needed if you want to enrich events (for example,
purchase_itemevents) with additional product information.
Product tags
Import Shopify product tags to enrich events, power recommendations, and enhance analytics.
Naming convention: Use tag_name[separator]value format (for example, gender_unisex, collection-winter, promo_code=Sale15).
To configure:
- In Events configuration > Product Tags, enter the Tag value (for example, color, gender).
- Enter the Separator character (for example, _, -, =).
- Click Add.
- Repeat for each tag.
Product tags appear in purchase_item events.
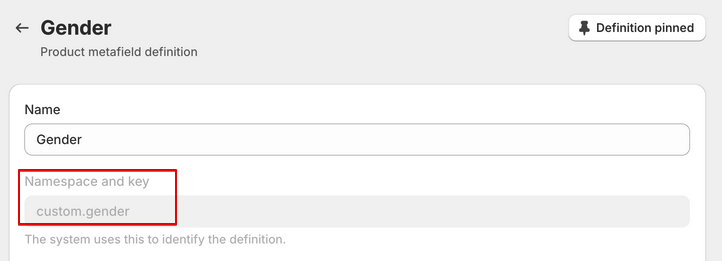
Product metafields
Import product metafields to enhance recommendations and analytics.
Supported types: boolean, color, date, date_time, multi_line_text_field, number_decimal, number_integer, single_line_text_field, url.
To find your metafield key: In Shopify, go to Settings > Custom Data > Products and copy the Namespace and key value (for example, custom.gender).
To configure in Data hub:
- In Events configuration > Product metafields, paste the Metafield key.
- Click Add.
- Repeat for each metafield.
Apply it in the same way for the Variant metafields.
Reimport and re-sync operations always use your current event configuration (including product and variant metafields). If you add or change a metafield here and then reimport historical purchase_item events, those events are reprocessed to include the new metafield values as if they had been tracked from the beginning.
Post-purchase events
Choose which post-purchase events you want to track in Bloomreach:
cancelled: Order cancellation eventsrefund_created: Full refund eventspartial_refund_created: Partial refund eventsfulfilled: Order fulfillment eventspartially_fulfilled: Partial fulfillment events
Select the events that are relevant for your business needs. These events help you track the complete order lifecycle in Bloomreach.
Save integration
Once you've configured all settings, save your integration to start syncing data.
Click Save integration to begin syncing:
- Customer profiles
- Historical purchases
- Products and variants
- Real-time data for future changes
Data import time varies based on store size. Monitor progress in Data hub.
Troubleshooting
Can’t uninstall the Engagement Shopify integration
Always disconnect the integration in Bloomreach first, then uninstall the Shopify app.
Uninstall order mattersIf you remove the Shopify marketplace app (or its webhooks) before you delete the integration in Bloomreach, the API token is invalidated and recovery requires manual deletion by engineering.
If you uninstall in the wrong order, these problems occur:
- The integration can't be deleted, and you'll see
401: Invalid API keyerrors because the API token is invalidated. - Webhooks keep triggering, but Shopify rejects them.
- Reinstalling the app doesn't fix the issue, because the new token doesn't work with the old integration.
- Recovery requires manual deletion by engineering. Contact Bloomreach Support to request it.
Correct uninstall order
- In Bloomreach, disconnect and delete the integration.
- In Shopify, uninstall the app.
Migrate to Loomi AI for Shopify
For customers migrating to Loomi AI for Shopify, set up a staging or development store in Shopify and use it to test the app before changing your live store. Don't make changes to a connected production store until you've validated the setup on staging.
Your existing integration and Loomi AI for Shopify use the same app. The new connector updates the UI—it doesn't replace the underlying installation. If you delete your existing integration by mistake:
- Your live tracking stops immediately.
- You can't restore the integration through the UI.
- Recovery requires manual engineering intervention.
If something goes wrong, contact Support. Don't try to reinstall or reconfigure without guidance.
Test Loomi AI for Shopify with an active Shopify integration
If you already have the Shopify integration active and you're exploring Loomi AI for Shopify, don't delete your existing integration while testing.
Your existing integration and Loomi AI for Shopify use the same app—the new connector is an updated version with a new UI, not a separate installation. Deleting it before you're ready to migrate breaks your setup in a way that can't be reversed through the UI. Recovery requires manual engineering intervention.
To test Loomi AI for Shopify safely, use a Shopify staging or development store instead.
If you decide to uninstall, always disconnect the integration in Bloomreach first, then uninstall the Shopify app—order matters critically.
Failed to load Shopify markets data
If you see the error "Failed to load Shopify markets data. Please refresh the page or contact support if the issue persists," at least one Shopify market must have a domain or language configured before you can continue.
To fix this, go to Settings > Markets in Shopify and open the market you want to use. Add a domain or language to that market, then return to Data Hub and retry the integration setup.
If you're integrating a US store, you can also fix this by enabling the US market—it already has domain and language parameters configured.
Next steps
Your Data hub integration is complete. Now set up web tracking to enable behavioral tracking and personalization.
Need help?
- Loomi AI for Shopify FAQ: Answers to common integration questions.
- Contact your Customer Success Manager for additional support.