

Set up web tracking for Loomi AI for Shopify
This guide walks you through setting up web tracking on your Shopify store to enable behavioral data collection and personalization features.
Running Loomi AI for Shopify alongside another Bloomreach product? Your web integration depends on your setup. See Choose your web integration before you start.
Overview
After setting up your Shopify integration inside Data hub, you need to set up web tracking on your Shopify theme. This enables Bloomreach to track customer behavior and power personalization features.
This guide covers the standard implementation using Bloomreach Web SDK for all Bloomreach users. For custom implementation methods, see Shopify Customization.
If your storefront has special tracking or initialization requirements, such as condition-based loading, kiosk or in-store exclusions, or other non-standard behavior, you may need a custom web implementation instead of the default setup.
Choose your web integration
Your web tracking method depends on which Bloomreach products you use with Shopify.
| Setup | Web tracking method | Data hub Event Streams needed? | Notes |
|---|---|---|---|
| Marketing-only Shopify | Marketing Shopify web integration | No | Data flows directly to Marketing. |
| Loomi AI for Shopify through Data hub | Bloomreach Web SDK with unified tracking | Yes | Created automatically during installation. |
| Search-only with Loomi AI for Shopify | Bloomreach Web SDK with Unified Tracking | Yes | Install the Search connector alongside Loomi AI for Shopify and enable only Search destinations. |
If you're using the legacy Marketing Shopify connector (not Loomi AI for Shopify), keep the Marketing web integration and don't set up Data hub Event Streams. The 2 paths are separate and can't be mixed.
Search-only customers
If you use Loomi AI for Shopify with Search but not Marketing:
- Install the Search connector alongside Loomi AI for Shopify.
- Configure your event streams with Search as the only destination. Don't enable Marketing destinations.
- For Search Recommendations, confirm that the Recommendations module is enabled in your Search dashboard and that your item collection is mapped to Search.
Prerequisites
Before you begin, ensure you have:
- Completed Data hub integration: Complete how to integrate Loomi AI for Shopify before setting up web tracking.
- Shopify theme editor access: Ensure access to edit your Shopify theme through Online Store > Themes > Edit theme.
- Marketing and Analytics consent: Configure a "Marketing and Analytics" consent category in your cookie acceptance banner. For more information, see Shopify Web Pixel prerequisites.
- Shopify customer privacy consent: To start Bloomreach Web SDK tracking, ensure Shopify customer privacy permissions allow analytics, marketing, and sale-of-data processing.
Set up web tracking
Bloomreach Web SDK is part of the official Bloomreach: Loomi AI app in the Shopify App Store.
ImportantA single store can only have one Bloomreach Web SDK pixel integration (1 project = 1 integration = 1 SDK).
Enable Bloomreach Web SDK
-
In your Shopify admin, go to Online Store > Themes > Edit Theme.
-
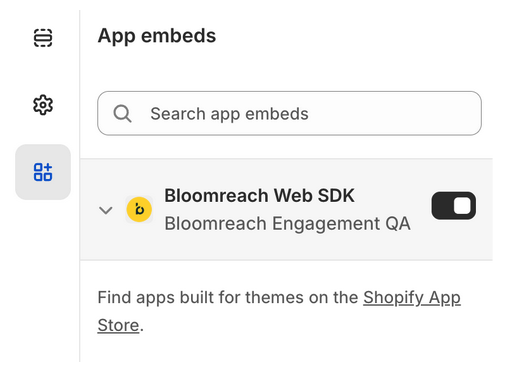
Click App Embeds in the left sidebar.
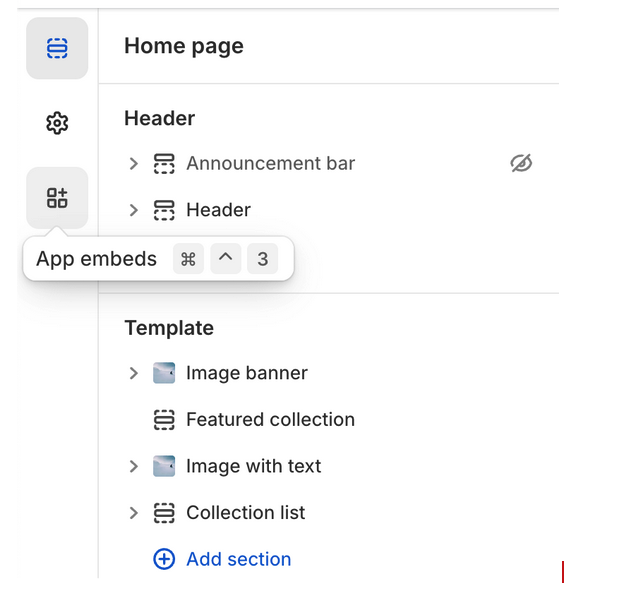
- In the App embeds panel, search for Bloomreach Web SDK in the search box.
- Find Bloomreach Web SDK and turn the toggle on.
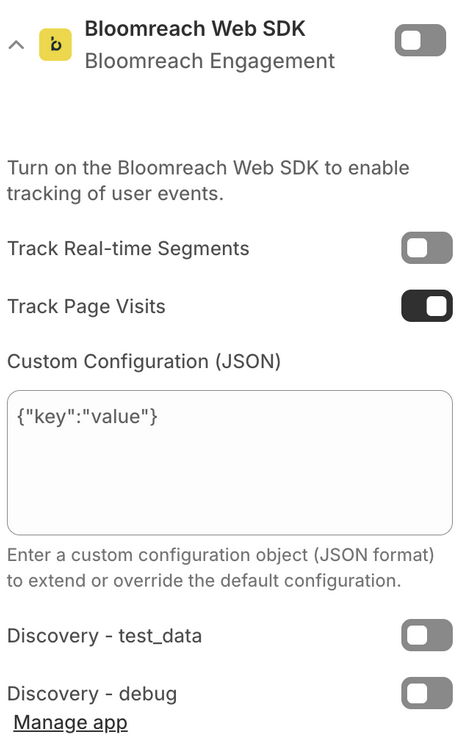
Configure Bloomreach Web SDK (optional)
After enabling the Bloomreach Web SDK, you can configure additional settings:
Available configuration options:
- Track Real-time Segments: Enable real-time segment tracking for personalization
- Track Page Visits: Enable page visit event tracking
- Custom Configuration (JSON): Add custom configuration to extend or override default settings.
Example:
{
  "track": {
    "google_analytics": false
  },
  "cookies": {
    "cross_subdomain": ".example.com",
    "expires": {
      "tracking": 15768000,
      "ab_test": 2592000
    }
  },
  "ping": {
    "enabled": true,
    "interval": 60
  },
  "webOptimization": {
    "experiments": false,
    "tagManager": true,
    "webLayers": true
  }
}Search-specific options:
-
Search - test_data: Enable this to flag event data as test data, which won't affect your analytics. Use this in test environments to validate tracking without impacting production data. Turn this off on your live site.
-
Search - debug: Enable this to view individual events from your test environment in real time. Events appear in the Integration mode of Events diagnostics within seconds. When disabled, events appear in Live mode with up to 2 hours delay.
- After configuring your settings, click Save to save your changes.
Configure event tracking in Data hub
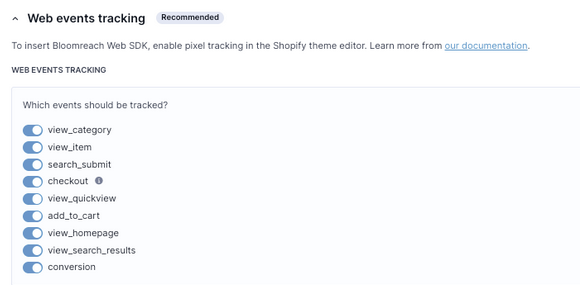
The Bloomreach Web SDK tracks the following customer behavior events. You can configure which specific event to track in your Data hub integration settings:
view_category: Category page viewsview_item: Product detail page viewssearch_submit: Search queries submittedcheckout: Checkout process eventsview_quickview: Quick view interactionsadd_to_cart: Add to cart actionsview_homepage: Homepage viewsview_search_results: Search results page viewsconversion: Purchase completion events
ImportantWhen switching from Marketing SDK to Bloomreach Web SDK, the
searchevent is now split intosearch_submitandview_search_results. Update any dependencies onsearchevents to usesearch_submit.
Validate event tracking
To validate that your event tracking is working correctly:
For Search
- Install the Bloomreach Tracking Console for Google Chrome.
- Use the Events management view to test Pixel Tracking with Debug Events.
For detailed validation steps and troubleshooting, see Pixel Validator documentation.
Existing server-side Search pixel
If your store already has a server-side Search pixel, don't add Search as a destination in the Loomi AI for Shopify event stream. Adding it would cause duplicate tracking events.
If Search was automatically added as a destination during setup, remove it from the event stream configuration in Data hub.
How Loomi AI for Shopify tracks eventsThe Loomi AI for Shopify Web SDK uses Data hub event streams to send events. It doesn't use the legacy
pix.gifpixel calls. To verify tracking, use the Bloomreach Tracking Console Extension instead of the browser Network tab.
For Marketing
- Install the Bloomreach Tracking Console for Google Chrome.
- Or open a customer profile in your Marketing project to verify incoming web events.
Open a customer profile in your Marketing project to verify incoming web events.
Limitations
Custom tracking domain (CTD) limitation
Custom Tracking Domains (CTD) aren't fully supported in Loomi AI for Shopify. If you specify a CTD value in the custom configuration section of the Shopify app settings, it only applies to generic Bloomreach Web SDK events such as page visits and sessions. It doesn't affect Shopify Web Pixel events such as view_item, search_submit, or purchase events.
This is a current product limitation of the standard Loomi AI for Shopify setup. Full custom tracking domain support for all Shopify Web Pixel traffic isn't available out of the box today.
Tracking gaps when combining Loomi AI for Shopify and Search V2 app blocks
If you use Loomi AI for Shopify tracking alongside Search V2 search, collection, or autosuggest app blocks, these events will not fire reliably:
- Search events from interactions with search app blocks.
- Category view events from interactions with collection blocks.
- Autosuggest events.
- Add-to-cart events from search or collection blocks (events may be missing properties or may not fire at all).
To avoid tracking gaps, move all use cases to Loomi AI for Shopify app blocks—including recommendations, which Loomi AI for Shopify now supports.
Next steps
Your web tracking setup is complete. Your Shopify store now sends behavioral data to Bloomreach to power personalization features.
Additional resources
- Loomi AI for Shopify overview: Return to the feature overview.
- Loomi AI for Shopify FAQ: Common questions about the integration.
Updated 1 day ago