Introduction
Bloomreach provides a Shopify connector with the GraphQL Commerce API. It's enabled by request only and has a number of specific configuration options in addition to the general options.
How to request configuration changes?
Please use our support channel to request configuration changes, including properties name and value(s).
Configuration Options
The following configuration options are available for the Shopify connector. If you wish to make a change, please submit a support request with the names of the properties and your preferred values.
| Property Name (* required field) | Description | Example Value(s) | Default Value |
|---|---|---|---|
| SHOPIFY_STOREFRONT_API_BASE_URL * | The base URL of the Shopify Storefront API. | https://yourstore.myshopify.com/api/2020-07 | |
| SHOPIFY_STOREFRONT_API_ACCESS_TOKEN * | The application access token passed to Shopify Storefront API. This token value is used when creating a ShopifyBuy Client using Shopify Storefront API Javascript SDK, or it is set to the X-Shopify-Storefront-Access-Token request header when making GraphQL requests. | '12345678901234567890123456789012' | |
| SHOPIFY_STOREFRONT_DOMAIN * | The merchant domain name to be passed when creating a ShopifyBuy Client using Shopify Storefront API Javascript SDK. | yourstore.myshopify.com | |
| SHOPIFY_ADMIN_API_URL * | The base URL of the Shopify Admin API, which is used to retrieve more advanced field data not available from the Shopify Storefront API. | https://********:********@yourstore.myshopify.com/admin/api/2020-07 | |
| SHOPIFY_MULTIPASS_SECRET | The secret used to generate Shopify Multipass tokens when redirecting to the Shopify Checkout page with enabling Multipass login. | '00123456789012345678901234567890' | |
| SHOPIFY_CUSTOM_ATTR_FIELDS | If a list of field names is specified as a comma separated string, then extra custom fields are extracted from the product item in the JSON response and included in the the GraphQL response like the following example:{ "data": { "findItemsByKeyword": { //... "items": [ { //... "customAttrs": [ { "name": "vendor", "values": [ "name" ] } ] }, //... ] } } } | 'vendor' |
Shopify Private App
The GraphQL Commerce needs access to Shopify Storefront and Admin API: it is recommended to create a Shopify Private App.
More specifically, store administrators need to:
- Enable private app development from the Shopify admin: please remember to select the Allow this app to access your storefront data using the Storefront API option in the Storefront API section;
- Generate credentials from the Shopify admin.
Once the private app is successfully created, store administrators can browse the related configurations and safely communicate both the Storefront access token and Admin API URL to system integrators.
Admin API Permission
The Shopify connector requires just one extra permission regarding the Product Admin API. In the Private App configuration, scroll to the Admin API section: in the Admin API Permission, click on the "Show inactive API Permission" and locate the Products entry. Once located, click on the related dropdown and select the "Read access" scope. Please save the new configuration.
The Admin API Permissions section should look like the image below:

Federated Checkout
Note:
This feature is only available to Shopify Plus merchants.
If you are using the default Online Store Sales Channel, you will have to use your Shopify storefront's checkout page (e.g. https://mystore.myshopify.com/1234567890/checkouts/) for payment processing (including billing address). However, by default your customer's login session won't be shared between your SPA and Shopify storefront, so the customer has to login again on the Shopify checkout page, even if they have already logged into your SPA. For this reason, the Accelerator provides a "Federated Checkout" integration, which is based on the Shopify Plus Multipass API.
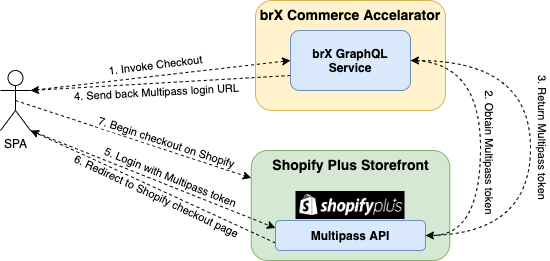
The checkout process is depicted below. First of all, you need to enable Multipass login through your shop admin, and then configure SHOPIFY_MULTIPASS_SECRET property in your .env file with the "multipass secret"value you get from the prior step.

Some important details about the flow depicted above (assuming the customer has already logged into the SPA):
- The SPA starts the check out process (e.g. when customer clicks on the "Checkout" button) by invoking the "checkOut" mutation on the GraphQL Commerce;
- The GraphQL Commerce tries to obtain a multipass token from Shopify Multipass API, using the account information of the current logged-in customer, the
SHOPIFY_MULTIPASS_SECRETvalue configured, and areturn_toURL of your Shopify storefront's checkout page for that customer. This will ensure the customer gets redirected to the checkout page after successful authentication with Multipass; - If the information in step 2 is correct, Shopify should respond with a "Multipass token";
- The GraphQL Commerce will use the token obtained in step 3 to construct a "Multipass login URL" (e.g.
https://mystore.myshopify.com/account/login/multipass/1234567abcdefg), and send it back to the SPA as part of the "checkOut" mutation response; - The SPA can now login to your Shopify storefront using the "Multipass login URL" from step 4;
- If the login is successful, Shopify should redirect your customer to the
return_toURL configured in step 2. In this case, it will be your Shopify storefront's checkout URL for that customer. - The customer can now continue their checkout process on your Shopify storefront's checkout page. Their cart contents, as well as account information, will be carried over to the checkout page.
Customize the Shopify "Order Status" page to redirect back to the SPA after checkout
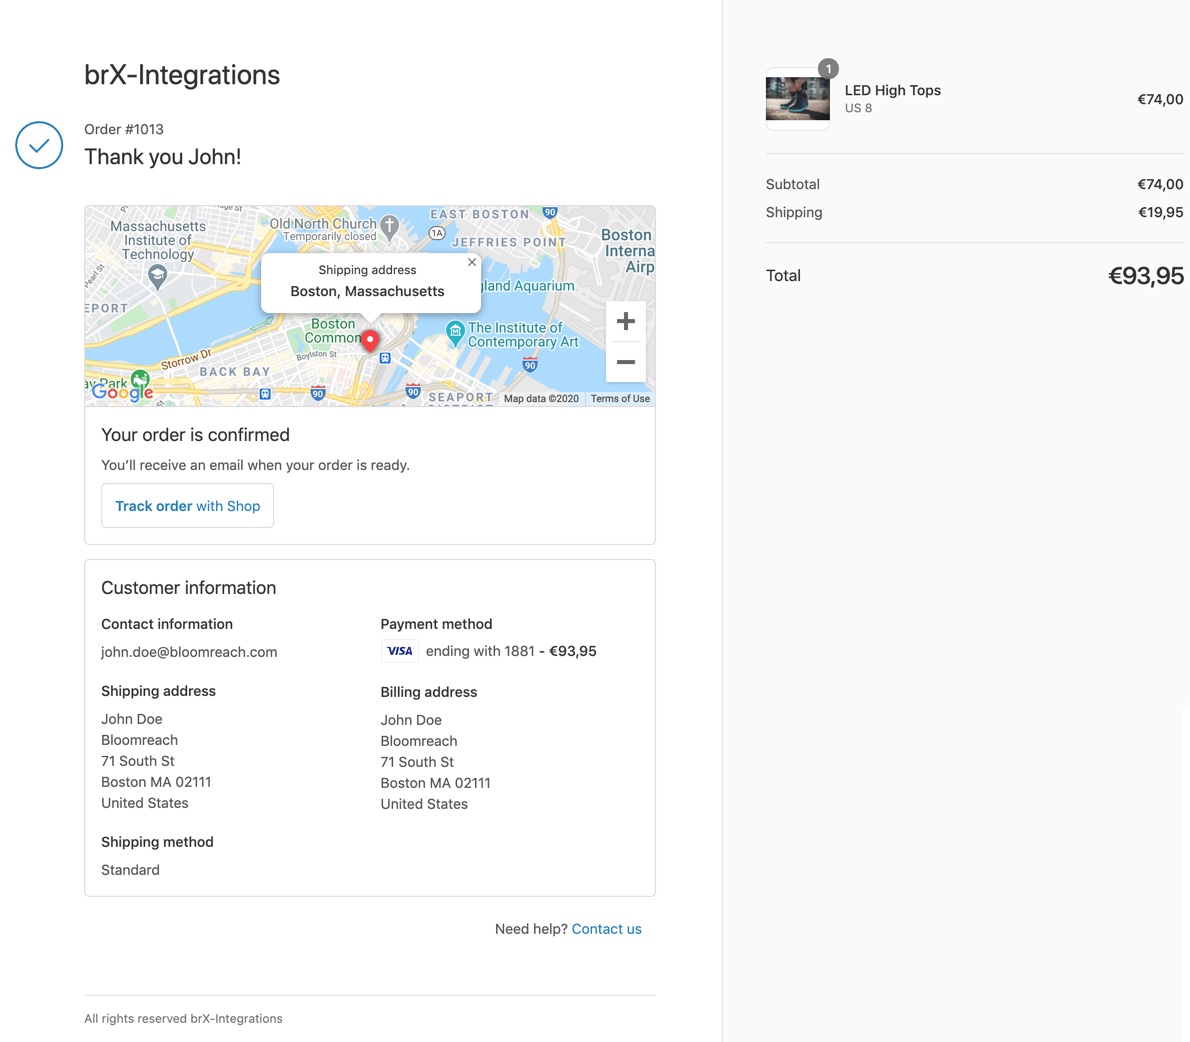
When the customer completes their checkout process on Shopify's checkout page, they will reach the Order Status page (see an example below):

To redirect the customer to your SPA from it, you can customize this page in a few ways:
- Insert HTML/Javascript using the Additional scripts field. For example, you can use that field to insert a button that will redirect the customer to your front-end page when clicked.
- If you are a Shopify Plus merchant, you can also modify checkout.liquid template to completely customize the checkout process. Notice: The checkout (not just the Order Status) is all hosted in one template.
